Red Hat Developer Hub documentation
Complete documentation for Red Hat Developer Hub.
Abstract
- Preface
- 1. Discover
- 2. Get started
- 3. Plan
- 4. Install
- 5. Upgrade
- 6. Migrate
- 7. Administer
- 8. Develop
- 8.1. Develop
- 8.2. Register and update software components to maintain a unified service inventory
- 8.3. Project standardization with software templates
- 8.3.1. Project standardization with software templates
- 8.3.2. Create a basic software template
- 8.3.3. Default environment parameters and secrets
- 8.3.4. Share software templates with your organization
- 8.3.5. Extending software templates for complex project requirements
- 8.3.6. Version Software Templates to track template updates and dependencies
- 8.3.7. Track component provenance to map dependencies back to source templates
- 8.3.8. Automate template lifecycle management
- 8.3.9. Standardized project generation with software templates
- 8.4. Automate repository onboarding to the catalog
- 8.5. Orchestrate infrastructure tasks using workflows
- 8.6. Write and publish documentation as code to keep knowledge synchronized
- 9. Configure
- 9.1. Configure
- 9.2. Configure core parameters to meet infrastructure requirements
- 9.2.1. Configure core parameters to meet infrastructure requirements
- 9.2.2. Default configurations to establish a deployment foundation
- 9.2.3. Provision custom config maps and secrets to define platform behavior
- 9.2.4. Configure a route with an external TLS certificate by using the Operator
- 9.2.5. Red Hat Developer Hub secrets
- 9.2.6. Inject extra files and environment variables into Backstage containers
- 9.2.7. Configure mount paths for default Secrets and Persistent Volume Claims (PVCs)
- 9.2.8. Mount secrets and PVCs to specific containers
- 9.2.9. Configure Red Hat Developer Hub deployment when using the Operator
- 9.2.10. Configure an RHDH instance with a TLS connection in Kubernetes
- 9.2.11. Configure corporate proxy settings to enable external network access
- 9.3. Customize the user interface to reflect organizational branding
- 9.3.1. Customize the user interface to reflect organizational branding
- 9.3.2. Customize Learning Paths to integrate tailored e-learning content
- 9.3.3. Configure the global header for consistent top-level navigation
- 9.3.4. Configure floating action buttons for quick access to workflows
- 9.3.5. Customize the Quick Start to guide user onboarding
- 9.3.6. Customize the Tech Radar page to visualize technology adoption
- 9.3.7. Customize themes and branding to align with corporate standards
- 9.3.8. Customize sidebar navigation and tabs to organize essential tools
- 9.3.9. Customize the Home page layout to optimize developer workflows
- 9.3.10. Configure Quick access cards to surface frequently used links
- 9.4. Configure language localization to improve accessibility for global users
- 10. Secure
- 10.1. Secure
- 10.2. Configure authentication providers to verify user identities
- 10.2.1. Configure authentication providers to verify user identities
- 10.2.2. Authentication methods and identity provider selection
- 10.2.3. Configure guest access to securely test non-production environments
- 10.2.4. Share credentials with your identity provider to secure communications
- 10.2.5. Import users and groups to synchronize enterprise directory data
- 10.2.6. Enable authentication to verify identities against enterprise directories
- 10.2.7. Connect your platform to external identity providers and APIs
- 10.2.8. Configure session expiration and auto-logout policies
- 10.3. Define authorization policies to restrict access based on user roles
- 10.3.1. Define authorization policies to restrict access based on user roles
- 10.3.2. Enable and give access to the role-based access control (RBAC) feature
- 10.3.3. Determine permission policy and role configuration source
- 10.3.4. Design your policy rules
- 10.3.5. Manage roles using the Web UI
- 10.3.6. Manage policies using the REST API
- 10.3.7. Define policies in external files to provision permissions during cluster deployment
- 10.3.8. Configure guest access
- 10.3.9. Permission policy types
- 10.3.10. Conditional policies in Red Hat Developer Hub
- 10.3.11. Download active users list in Red Hat Developer Hub
- 10.3.12. Delegate RBAC management to decentralize administration
- 11. Observe
- 11.1. Observe
- 11.2. Monitor system logs and application metrics to ensure platform availability
- 11.3. Manage telemetry collection to balance data insights with privacy requirements
- 11.4. Capture and review audit logs to trace user activities and maintain accountability
- 11.5. Centralize workflow observability
- 11.6. Collect diagnostic data to troubleshoot platform issues
- 12. Integrate
- 12.1. Integrate
- 12.2. Enable AI assistance for developers
- 12.2.1. Enable AI assistance for developers
- 12.2.2. Developer Lightspeed for RHDH architecture
- 12.2.3. Build a private knowledge base with Lightspeed Notebooks
- 12.2.4. Configure Model Context Protocol tools to enhance AI interactions with portal data
- 12.2.5. Accelerate AI model discovery by integrating the OpenShift AI Connector
- 12.3. Integrate CI/CD and infrastructure tools to visualize pipelines and workloads
- 13. Optimize
- 14. Extend
- 14.1. Extend
- 14.2. Manage the plugin ecosystem to add functionality without downtime
- 14.2.1. Manage the plugin ecosystem to add functionality without downtime
- 14.2.2. Install dynamic plugins
- 14.2.3. Browse and manage available plugins using the Extensions UI
- 14.2.4. Configure core front-end wiring for navigation and UI components
- 14.2.5. Configure route bindings and mount points for component integration
- 14.2.6. Configure specialized front-end extensions for APIs and features
- 14.2.7. Filter plugins by support badges
- 14.3. Develop custom dynamic plugins to support custom workflows
- 14.4. Manage containerized plugins securely by migrating to OCI artifacts
- 15. Troubleshoot
- 16. Reference
Preface
The complete Red Hat Developer Hub documentation, organized by category.
Chapter 1. Discover
1.1. Discover
TODO: Replace this placeholder with an overview of Discover.
1.2. Evaluate RHDH capabilities
1.2.1. Evaluate RHDH capabilities
TODO: Replace this placeholder with an overview of Evaluate RHDH capabilities.
1.2.2. Developer Lightspeed AI virtual assistant capabilities
1.2.2.1. Developer Lightspeed AI virtual assistant capabilities
TODO: Replace this placeholder with an overview of Developer Lightspeed AI virtual assistant capabilities.
1.2.3. Platform integrations for toolchain connectivity
1.2.3.1. Platform integrations for toolchain connectivity
TODO: Replace this placeholder with an overview of Platform integrations for toolchain connectivity.
Chapter 2. Get started
2.1. Get started
TODO: Replace this placeholder with an overview of Get started.
2.2. Set up the first RHDH instance
2.2.1. Set up the first RHDH instance
TODO: Replace this placeholder with an overview of Set up the first RHDH instance.
2.2.2. Enable initial authentication to verify user access
2.2.2.1. Enable initial authentication to verify user access
TODO: Replace this placeholder with an overview of Enable initial authentication to verify user access.
Chapter 3. Plan
3.1. Plan
TODO: Replace this placeholder with an overview of Plan.
3.2. Plan your deployment architecture and scale
3.2.1. Plan your deployment architecture and scale
TODO: Replace this placeholder with an overview of Plan your deployment architecture and scale.
3.2.2. Sizing requirements for cluster resource provisioning
3.2.2.1. Sizing requirements for cluster resource provisioning
TODO: Replace this placeholder with an overview of Sizing requirements for cluster resource provisioning.
3.2.3. Scale your deployment using enterprise performance benchmarks
3.2.3.1. Scale your deployment using enterprise performance benchmarks
TODO: Replace this placeholder with an overview of Scale your deployment using enterprise performance benchmarks.
Chapter 4. Install
4.1. Install
TODO: Replace this placeholder with an overview of Install.
4.2. Install on OpenShift Container Platform to leverage existing Red Hat infrastructure
4.2.1. Install on OpenShift Container Platform to leverage existing Red Hat infrastructure
TODO: Replace this placeholder with an overview of Install on OpenShift Container Platform to leverage existing Red Hat infrastructure.
4.3. Install on managed hyperscaler environments to integrate with cloud resources
4.3.1. Install on managed hyperscaler environments to integrate with cloud resources
TODO: Replace this placeholder with an overview of Install on managed hyperscaler environments to integrate with cloud resources.
4.4. Install in an air-gapped environment
4.4.1. Install in an air-gapped environment
TODO: Replace this placeholder with an overview of Install in an air-gapped environment.
Chapter 5. Upgrade
5.1. Upgrade
TODO: Replace this placeholder with an overview of Upgrade.
5.2. Upgrade RHDH to apply the latest features and security patches
5.2.1. Upgrade RHDH to apply the latest features and security patches
TODO: Replace this placeholder with an overview of Upgrade RHDH to apply the latest features and security patches.
Chapter 6. Migrate
6.1. Migrate
TODO: Replace this placeholder with an overview of Migrate.
6.2. Migrate from a local database to an external PostgreSQL server
6.2.1. Migrate from a local database to an external PostgreSQL server
TODO: Replace this placeholder with an overview of Migrate from a local database to an external PostgreSQL server.
Chapter 7. Administer
7.1. Administer
TODO: Replace this placeholder with an overview of Administer.
7.2. Evaluate component compliance using Scorecards
7.2.1. Evaluate component compliance using Scorecards
TODO: Replace this placeholder with an overview of Evaluate component compliance using Scorecards.
7.2.2. Set up Scorecards
7.2.2.1. Set up Scorecards
TODO: Replace this placeholder with an overview of Set up Scorecards.
7.2.3. Install and configure Scorecards
7.2.3.1. Install and configure Scorecards
TODO: Replace this placeholder with an overview of Install and configure Scorecards.
7.2.4. Manage metric thresholds
7.2.4.1. Manage metric thresholds
TODO: Replace this placeholder with an overview of Manage metric thresholds.
7.3. Monitor portfolio health using aggregated Scorecard KPIs
7.3.1. Monitor portfolio health using aggregated Scorecard KPIs
TODO: Replace this placeholder with an overview of Monitor portfolio health using aggregated Scorecard KPIs.
7.3.2. Monitor collective health
7.3.2.1. Monitor collective health
TODO: Replace this placeholder with an overview of Monitor collective health.
7.3.3. Configure aggregated Scorecard KPIs
7.3.3.1. Configure aggregated Scorecard KPIs
TODO: Replace this placeholder with an overview of Configure aggregated Scorecard KPIs.
7.3.4. Identify services impacting team compliance KPIs
7.3.4.1. Identify services impacting team compliance KPIs
TODO: Replace this placeholder with an overview of Identify services impacting team compliance KPIs.
7.4. Analyze platform adoption trends to measure engagement and tool popularity
7.4.1. Analyze platform adoption trends to measure engagement and tool popularity
TODO: Replace this placeholder with an overview of Analyze platform adoption trends to measure engagement and tool popularity.
7.4.2. Adoption Insights
7.4.2.1. Adoption Insights
TODO: Replace this placeholder with an overview of Adoption Insights.
Chapter 8. Develop
8.1. Develop
TODO: Replace this placeholder with an overview of Develop.
8.2. Register and update software components to maintain a unified service inventory
8.2.1. Register and update software components to maintain a unified service inventory
TODO: Replace this placeholder with an overview of Register and update software components to maintain a unified service inventory.
8.2.2. Manage your software components
8.2.2.1. Manage your software components
TODO: Replace this placeholder with an overview of Manage your software components.
8.3. Project standardization with software templates
8.3.1. Project standardization with software templates
TODO: Replace this placeholder with an overview of Project standardization with software templates.
8.3.2. Create a basic software template
To automate the setup of standardized environments for your developers, you must create a template definition. This definition allows RHDH to automate the repetitive tasks of repository creation and initial configuration.
Prerequisites
- You have added a custom Developer Hub application configuration.
- You have a Git repository to store Software Template files.
Procedure
- Create a directory in your Git repository for the Software Template.
-
Create a file named
template.yamlin that directory. -
In the
template.yamlfile, define theapiVersion,kind, andmetadatato identify the starter kit in the software catalog. -
Add a
specsection to define theparametersthat a developer must provide when they use the Software Template. Define the
stepsrequired to generate the project, which can includefetch:templateto retrieve the skeleton andpublish:githubto create the new repository.ImportantYou must include TechDocs in your Software Templates to ensure that documentation is automatically generated for every new project created from the Software Template.
Verification
-
Inspect the
template.yamlfile to ensure the YAML syntax is valid. -
Confirm that the
nameandactionfields are defined so the template is correctly recognized as a Scaffolder task. -
Check that the defined
parametersmatch the variables used in your Software Template skeleton files. -
Navigate to the form playground at
<instance_url>/create/template-formand test the Software Template configuration to confirm the fields and logic render as intended.
8.3.3. Default environment parameters and secrets
The scaffolder supports a defaultEnvironment configuration that provides default parameters and secrets to all templates. Use this configuration in your app-config.yaml file to reduce template complexity and improve security by centralizing common values.
- Example of an app-config.yaml configured for default parameters and secrets
scaffolder:
  defaultEnvironment:
    parameters:
      githubOrg: my-org
      defaultOwner: platform-team
    secrets:
GITHUB_TOKEN: ${GITHUB_TOKEN}Default parameters are isolated in their own context to avoid naming conflicts.
Default parameters are accessible via ${{ environment.parameters.* }} in templates.
- Example of default parameters configuration for application deployment
spec:
  parameters:
    - title: Project details
      required:
        - name
      properties:
        name:
          title: Name
          type: string
          description: Unique name for the new repository.

  steps:
    - id: fetch-base
      name: Fetch skeleton
      action: fetch:template
      input:
        url: ./skeleton
        values:
          name: ${{ parameters.name }} # Resolves to frontend input value
          owner: ${{ environment.parameters.defaultOwner }} # Resolves to defaultEnvironment.parameters.defaultOwner
Default secrets are resolved from environment variables and accessible via ${{ environment.secrets.* }} in template actions.
- Example of a default secret configuration
spec:
  parameters:
    - title: Project details
      required:
        - name
      properties:
        name:
          title: Name
          type: string
          description: Unique name for the new repository.

  steps:
    - id: publish
      name: Publish to GitHub
      action: publish:github
      input:
        allowedHosts: ['github.com']
        description: ${{ parameters.name }}
        repoUrl: github.com?owner=${{ environment.parameters.githubOrg }}&repo=${{ parameters.name }}
token: ${{ environment.secrets.GITHUB_TOKEN }} # Resolves to defaultEnvironment.secrets.GITHUB_TOKENSecrets are automatically masked in logs. They are only available to backend actions, never exposed to the frontend.
8.3.5. Extending software templates for complex project requirements
Use advanced logic to create Software Templates that adapt to specific project requirements and user inputs. Advanced templating includes parameterization, conditional logic, and fetch-and-run capabilities.
| Feature | Description |
|---|---|
|
Parameterization |
Use variables to inject user-provided data into project files. |
|
Conditional Logic |
Perform specific automation steps only when certain conditions are met. |
|
Fetch and Run |
Retrieve remote files and run commands during the setup process. |
8.3.6. Version Software Templates to track template updates and dependencies
8.3.6.1. Version Software Templates to track template updates and dependencies
Software Templates in Red Hat Developer Hub provide a streamlined way to create software components and publish them to different version control repositories such as Git. Platform engineers create and maintain Software Templates in Red Hat Developer Hub.
8.3.6.2. Version a Software Template in Red Hat Developer Hub
Version Software Templates by using the catalog:scaffolded-from and catalog:template:version custom actions to track template versions and the entities created from them.
Prerequisites
- You have added a custom Developer Hub application configuration.
The following dynamic plugins are enabled in your
Backstageormy-rhdh-app-configfile:-
backstage-community-plugin-catalog-backend-module-scaffolder-relation-processor-dynamic -
backstage-plugin-notifications -
backstage-plugin-notifications-backend-dynamic
-
Procedure
Make sure the required plugins are enabled in your RHDH
my-rhdh-app-configfile or the Backstage custom resource (CR):global: dynamic: plugins: - package: ./dynamic-plugins/dist/backstage-community-plugin-catalog-backend-module-scaffolder-relation-processor-dynamic disabled: false - package: ./dynamic-plugins/dist/backstage-plugin-notifications disabled: false - package: ./dynamic-plugins/dist/backstage-plugin-notifications-backend-dynamic disabled: false- Modify the Software Template that you want to update.
- Complete one or both of the following tasks:
-
Include the annotation in your template: Add the
backstage.io/template-versionannotation in your template metadata. When this annotation is present, it is automatically used to annotate your catalog entity and display a default version value. Pass the annotation as input to the action: This method takes precedence over the annotation in the template itself and allows the user running the template to specify the version.
# ...
- id: version-templateRef
  name: Append the version of this template to the entityRef
  action: catalog:template:version
  input:
    annotations:
      backstage.io/template-version: ${{ parameters.version }}
# ...
Verification
- Create a catalog component using the updated Software Template. This step creates a new component in Backstage and optionally, pushes files to an external repository (for example, GitHub, GitLab).
Check the component in the Catalog UI.
- On the Catalog page, locate the newly created catalog component.
-
Verify that the
backstage.io/template-versionannotation is present in the entity. You can use INSPECT ENTITY and select YAML Raw or JSON Raw view to find the annotation in the component definition.
Only if you have published the catalog component: Check the component file in the repository.
- If VIEW SOURCE is present in your UI: Click VIEW SOURCE to open the stored component file in the repository.
-
Locate the file manually and verify that the
backstage.io/template-versionannotation is present.
8.3.6.3. Enable Software Template version update notifications in Red Hat Developer Hub
Enable notification alerts for template version updates so that component owners are automatically notified when the Software Template used to generate their components is updated to a new version.
Prerequisites
You have installed and configured the RHDH notification plugins:
-
backend:
@backstage/plugin-notifications-backend -
front-end:
@backstage/plugin-notifications
-
backend:
Procedure
-
Open your RHDH
app-config.yamlfile. -
Add the following configuration to the
scaffoldersection to enable Software Template update notifications Optional: To customize the notification title and description, add the
messageblock:scaffolder: notifications: templateUpdate: enabled: true message: title: 'Custom title for $ENTITY_DISPLAY_NAME' description: 'Custom description'where:
enabled-
Set to
trueto enable the notification. Default value isfalse. message:title- Enter the notification title.
message:descriptionEnter the notification description.
NoteThe
message:titleandmessage:descriptionfields support the$ENTITY_DISPLAY_NAMEvariable. The system replaces this variable with the title (or the name, if the title is missing) of the scaffolded entity.
Verification
-
Log in to your
Red Hat Developer Hubinstance. - In the left navigation menu, verify that the Notifications item is displayed.
- Update the version of a Software Template and verify that the owner of a component scaffolded from that template receives a notification.
8.3.7. Track component provenance to map dependencies back to source templates
8.3.7.1. Track component provenance to map dependencies back to source templates
Track the dependency link between a generated entity and its source template to simplify lifecycle management.
Platform engineers use custom actions within the Software Template scaffolding process to establish and track the dependency link between a generated entity (Component or Resource) and its source template. This relationship is called scaffolding provenance.
Platform administrators use custom actions such as catalog:scaffolded-from and catalog:template:version in the Scaffolder backend module to track the template version and the corresponding entity version, which simplifies lifecycle management.
8.3.7.2. Configure provenance and Software Template versioning Red Hat Developer Hub
Modify the Software Template YAML definition to add provenance information during the scaffolding process.
As a platform engineer, you must modify the Software Template YAML definition to ensure the required provenance information is added during the scaffolding process.
Prerequisites
Procedure
-
Locate the Software Template object YAML file where you want to add the provenance information and add a step that uses the
catalog:scaffolded-fromaction. This action links the resulting catalog entity back to the source template. Optional: To track the template version (for example, v1.0 versus v1.5), include the
catalog:template:versionaction in thestepssection. The following code block is an example to adding versioning action to thestepssection:steps: - id: create-provenance-annotation name: Append the entityRef of this template to the entityRef action: catalog:scaffolded-from - id: create-version-annotation name: Create Template Version Annotation action: catalog:template:version input: templateVersion: ${{ parameters.version }} - ... other steps ...where:
steps:input:templateVersionReads the version parameter
NoteThe
catalog:template:versionaction reads a version parameter defined in the template and applies it as an annotation to the resulting catalog entity.
In your Red Hat Developer Hub
app-config.yamlfile, configure thecatalog.locationssection to point to the Software Template that you want to add. You might need to addTemplateto the globalcatalog.rules.allowlist or add a granular rule to the location to allow for Software Templates ingestion, as shown in the following example:# ... catalog: locations: - type: url target: https://<repository_url>/example-template.yaml rules: - allow: [Template] # ...where:
catalog.locations.type-
Enter the
urltype if you are importing templates from a repository, such as GitHub or GitLab. catalog.locations.target- Enter the URL for the template.
catalog.locations.rules.allow-
Enter the
Templaterule to allow new Software Templates to be added to the catalog.
Verification
After creating a component with the updated template, verify the provenance annotations in the resulting Catalog Entity YAML.
- In the Red Hat Developer Hub navigation menu, go to Catalog and locate the newly created catalog component.
- To view the underlying data that links the entity to the template, select the INSPECT ENTITY option.
To verify provenance annotations, complete the following steps:
-
Select the YAML Raw or JSON Raw view and verify the presence of the data item for the
scaffoldedFromlink. Optional: If versioning was included, verify the presence of the
backstage.io/template-versionannotation.NoteIf you publish the catalog component to an external repository (such as Git), the component file in that repository must also contain the
backstage.io/template-versionannotation.
-
Select the YAML Raw or JSON Raw view and verify the presence of the data item for the
8.3.7.3. View Software Template dependencies
View all entities created from a specific Software Template to identify the complete dependency and impact map.
As a developer, you can track which entities were created from a specific Software Template. When a platform engineer configures provenance on a template, you can quickly identify the complete dependency and impact map of that template by viewing all linked components and resources in the Catalog.
Procedure
- In the Red Hat Developer Hub navigation menu, click Catalog, use the filters to find and select the Software Template you want to inspect.
- In the Software Template detail page, click the Dependencies tab. This view lists all catalog entities such as components, resources, and systems that reference this template, including any version information if configured.
8.3.8. Automate template lifecycle management
8.3.8.1. Automate template lifecycle management
Automatically apply template updates to all downstream repositories to maintain compliance without manual file comparisons.
When Software Templates receive security updates or configuration changes, you can apply those updates to all downstream repositories automatically so that your applications remain compliant without manual file comparisons.
Automated template lifecycle management maintains consistency by monitoring your source templates. When a template version changes, the scaffolder-relation-processor plugin identifies all entities provisioned from that template and creates a pull request (PR) or merge request (MR) containing the necessary file updates, additions, or deletions.
8.3.8.2. Enable automated template updates
Configure the scaffolder-relation-processor plugin to synchronize Software Template changes to downstream repositories.
To automate the synchronization of changes from Software Templates to your repositories, you must configure the plugin in your backend settings and ensure that your entities contain the required metadata.
Prerequisites
- You have added a custom Developer Hub application configuration.
-
You have configured GitHub or GitLab integrations in your
RHDH app-config.yamlfile. -
Your scaffolded entities include the
spec.scaffoldedFromfield referencing the source template. -
Your entities include the
backstage.io/managed-by-locationannotation pointing to a valid GitHub or GitLab URL.
Procedure
Enable the template sync and notification plugins in your
RHDH dynamic-plugins.yamlfile:plugins: # Enables the core template synchronization logic - package: './dynamic-plugins/dist/backstage-community-plugin-scaffolder-backend-module-scaffolder-relation-processor' disabled: false # Required only if you want to receive notifications for new pull requests - package: './dynamic-plugins/dist/backstage-plugin-notifications' disabled: false-
Open your
RHDH app-config.yamlfile. Configure the pull request (PR) feature by adding the following configuration:
scaffolder:
  pullRequests:
    templateUpdate:
      enabled: true
Optional: Enable notifications to alert entity owners when a PR is created:
scaffolder: notifications: templateUpdate: enabled: true- Restart the Red Hat Developer Hub instance to apply the changes.
Verification
- Update the version of a source template in its repository.
- Navigate to a repository scaffolded from that template.
-
Confirm that a new pull request named
[component-name]/template-upgrade-v[version]exists.
8.3.8.3. Template sync considerations and limitations
Review reviewer assignment, variable resolution limitations, and other details to troubleshoot the synchronization process.
Review the following details to troubleshoot or refine the synchronization process.
- Reviewer assignment
The plugin automatically assigns a reviewer if the entity owner is a User entity with a defined VCS login.
-
GitHub: Requires the
github.com/user-loginannotation. GitLab: Requires the
gitlab.com/user-loginannotation.If the owner is a Group, the plugin creates the PR without an assigned reviewer.
-
GitHub: Requires the
- Variable resolution limitations
The synchronization engine uses regex matching to resolve template variables such as
${{ values.name }}. You must manually review PRs because:- Variables that do not match keys in the scaffolded repository remain in raw template syntax.
-
Conditional Jinja2 blocks (
{% if %}) are stripped, which might cause unexpected formatting. - Complex nested structures might not resolve correctly.
- Error handling
If a PR fails to create due to credential issues or network errors, the plugin:
- Logs the error in the backend.
- Sends a failure notification to the entity owner (if notifications are enabled).
- Skips the sync if no file differences are detected between the template and the repository.
8.3.8.4. Template synchronization and notification outcomes
Review the behavior for each combination of pull request creation and notification settings.
You can enable pull requests and notifications independently. The following table describes the behavior for each configuration combination:
| PR Creation | Notifications | Outcome |
|---|---|---|
|
Disabled |
Disabled |
No action occurs when a template updates. |
|
Disabled |
Enabled |
The plugin sends a notification to the entity owner with a link to the catalog. |
|
Enabled |
Disabled |
The plugin creates a PR but sends no notification. |
|
Enabled |
Enabled |
The plugin creates a PR and sends a notification to the owner with a link to the PR. |
If PR creation fails, the plugin sends a notification containing error details instead of the custom message.
8.3.9. Standardized project generation with software templates
8.3.9.1. Standardized project generation with software templates
Use Software Templates in Red Hat Developer Hub to provide standardized project starter kits that improve developer productivity and ensure that new projects follow organizational standards.
8.3.9.2. Software Templates in Red Hat Developer Hub
You can use Software Templates in RHDH to automate the project setup process to reduce manual configuration and errors for developers. These Software Templates are part of the Backstage Scaffolder system.
A Software Template consists of a YAML file with the following elements:
- Metadata
- Names and describes the template so developers can find the correct starter kit in the catalog.
- Parameters
- Define the specific information developers must provide, such as the project name or owner.
- Steps
- Sequence of steps that the system performs to build the project, which can include fetching a repository skeleton, injecting parameters, and publishing the code to a Git provider.
8.3.9.3. Sample software template
This sample Software Template defines project parameters and publishes the generated code to a GitHub repository.
apiVersion: scaffolder.backstage.io/v1beta3
kind: Template
metadata:
  name: basic-node-service
  title: Basic Node.js Service
  description: A starter kit for a standardized Node.js microservice.
  tags:
    - nodejs
    - recommended
spec:
  owner: platform-team
  type: service
  parameters:
    - title: ProjectDetails
      required:
        - name
        - owner
      properties:
        name:
          title: Name
          type: string
          description: Unique name for the new repository.
        owner:
          title: Owner
          type: string
          description: The group responsible for this component.
          ui:field: OwnerPicker
          ui:options:
            allowedKinds:
              - Group
  steps:
    - id: fetch-base
      name: Fetch Skeleton
      action: fetch:template
      input:
        url: ./skeleton
        values:
          name: ${{ parameters.name }}
          owner: ${{ parameters.owner }}
    - id: publish
      name: Publish to GitHub
      action: publish:github
      input:
        allowedHosts: ['github.com']
        description: This is ${{ parameters.name }}
        repoUrl: github.com?owner=my-org&repo=${{ parameters.name }}
  output:
    links:
      - title: Repository
url: ${{ steps['publish'].output.remoteUrl }}8.4. Automate repository onboarding to the catalog
8.4.1. Automate repository onboarding to the catalog
TODO: Replace this placeholder with an overview of Automate repository onboarding to the catalog.
8.4.2. Import source code repositories in bulk
8.4.2.1. Import source code repositories in bulk
TODO: Replace this placeholder with an overview of Import source code repositories in bulk.
8.4.3. Configure bulk import capabilities
8.4.3.1. Configure bulk import capabilities
TODO: Replace this placeholder with an overview of Configure bulk import capabilities.
8.5. Orchestrate infrastructure tasks using workflows
8.5.1. Orchestrate infrastructure tasks using workflows
TODO: Replace this placeholder with an overview of Orchestrate infrastructure tasks using workflows.
8.5.2. Build serverless workflows
8.5.2.1. Build serverless workflows
TODO: Replace this placeholder with an overview of Build serverless workflows.
8.5.3. Automate workflow deployments
8.5.3.1. Automate workflow deployments
TODO: Replace this placeholder with an overview of Automate workflow deployments.
8.5.3.2. Install Orchestrator in an air-gapped environment
8.5.3.2.1. Install Orchestrator in an air-gapped environment
TODO: Replace this placeholder with an overview of Install Orchestrator in an air-gapped environment.
8.6. Write and publish documentation as code to keep knowledge synchronized
8.6.1. Write and publish documentation as code to keep knowledge synchronized
TODO: Replace this placeholder with an overview of Write and publish documentation as code to keep knowledge synchronized.
8.6.2. Configure TechDocs storage and CI/CD pipelines
8.6.2.1. Configure TechDocs storage and CI/CD pipelines
TODO: Replace this placeholder with an overview of Configure TechDocs storage and CI/CD pipelines.
8.6.3. Install TechDocs add-ons
8.6.3.1. Install TechDocs add-ons
TODO: Replace this placeholder with an overview of Install TechDocs add-ons.
Chapter 9. Configure
9.1. Configure
TODO: Replace this placeholder with an overview of Configure.
9.2. Configure core parameters to meet infrastructure requirements
9.2.1. Configure core parameters to meet infrastructure requirements
TODO: Replace this placeholder with an overview of Configure core parameters to meet infrastructure requirements.
9.2.2. Default configurations to establish a deployment foundation
9.2.2.1. Default configurations to establish a deployment foundation
Deploy a standard Red Hat Developer Hub instance, understand its structure, and tailor the instance to meet your needs.
9.2.2.2. Red Hat Developer Hub default configuration guide
The Operator creates Kubernetes resources with default configuration that you can customize using the Backstage Custom Resource.
The Operator stores the default configuration in a ConfigMap named rhdh-default-config in the rhdh-operator namespace on OpenShift. This ConfigMap has the YAML manifests that define the foundational structure of the RHDH instance.
You can create a basic RHDH instance by applying an empty Backstage Custom Resource as follows:
apiVersion: backstage.redhat.com/v1alpha4
kind: Backstage
metadata:
name: my-rhdh-instance
namespace: rhdh
The Operator automatically creates the following resources in the specified RHDH namespace by default based on the default configuration:
| File Name | Resource Group/Version/Kind (GVK) | Resource Name | Description |
|---|---|---|---|
|
|
|
|
(Mandatory) The main Backstage application deployment. |
|
|
|
|
(Mandatory) The Backstage application service. |
|
|
|
|
The PostgreSQL database stateful set. Needed if |
|
|
|
|
The PostgreSQL database service. Needed if |
|
|
|
|
The PostgreSQL database credentials secret. Needed if |
|
|
|
|
The OpenShift Route to expose Backstage externally. (Optional) Applied to OpenShift only. |
|
|
|
|
(Optional) Specifies one or more Backstage |
|
|
|
|
(Optional) Specifies additional ConfigMaps to mount as files into the Backstage Pod. |
|
|
|
|
(Optional) Specifies additional ConfigMaps to expose as environment variables in the Backstage Pod. |
|
|
|
|
(Optional) Specifies additional Secrets to mount as files into the Backstage Pod. |
|
|
|
|
(Optional) Specifies additional Secrets to expose as environment variables in the Backstage Pod. |
|
|
|
|
(Optional) Specifies the dynamic plugins that the Operator installs into the Backstage instance. |
|
|
list of |
|
(Optional) The Persistent Volume Claim for PostgreSQL database. |
{cr-name} is the name of the Backstage Custom Resource, for example 'my-rhdh-instance' in the above example.
9.2.2.3. Automated Operator features
Use the Operator to automate key configuration processes for your Backstage application.
9.2.2.3.1. Metadata generation
The Operator automatically generates metadata values for default resources at runtime to ensure proper application function.
For all the default resources, the Operator generates metadata.name according to the rules defined in the Default Configuration files, particularly the Resource name column. For example, a Backstage Custom Resource (CR) named mybackstage creates a Kubernetes Deployment resource called backstage-mybackstage.
The Operator generates the following metadata for each resource:
deployment.yaml-
spec.selector.matchLabels[rhdh.redhat.com/app] = backstage-{cr-name} -
spec.template.metadata.labels[rhdh.redhat.com/app] = backstage-{cr-name}
-
service.yaml-
spec.selector[rhdh.redhat.com/app] = backstage-{cr-name}
-
db-statefulset.yaml-
spec.selector.matchLabels[rhdh.redhat.com/app] = backstage-psql-{cr-name} -
spec.template.metadata.labels[rhdh.redhat.com/app] = backstage-psql-{cr-name}
-
db-service.yaml-
spec.selector[rhdh.redhat.com/app] = backstage-psql-{cr-name}
-
9.2.2.3.2. Many resources
Define and create many resources of the same type in a single YAML file by using the --- delimiter to separate resource definitions.
For example, adding the following code snip to pvcs.yaml creates two PersistentVolumeClaims (PVCs) called backstage-{cr-name}-myclaim1 and backstage-{cr-name}-myclaim2 and mounts them to the Backstage container.
apiVersion: v1
kind: PersistentVolumeClaim
metadata:
  name: myclaim1
...
---
apiVersion: v1
kind: PersistentVolumeClaim
metadata:
  name: myclaim2
...
9.2.2.3.3. Default base URLs
The Operator automatically sets base URLs for your application based on route parameters and OpenShift cluster ingress domain.
The Operator follows these rules to set the base URLs for your application:
- If the cluster is not OpenShift, the Operator makes no changes.
-
If you explicitly set the
spec.application.route.enabledfield in your Custom Resource (CR) tofalse, the Operator makes no changes. -
If you define
spec.application.route.hostin the Backstage CR, the Operator sets the base URLs tohttps://<spec.application.route.host>. -
If you specify the
spec.application.route.subdomainin the Backstage CR, the Operator sets the base URLs tohttps://<spec.application.route.subdomain>.<cluster_ingress_domain>. -
If you do not set a custom host or subdomain, the Operator sets the base URLs to
https://backstage-<cr_name>-<namespace>.<cluster_ingress_domain>, which is the default domain for the created Route resource.
The Operator updates the following base URLs in the default app-config config map:
-
app.baseUrl -
backend.baseUrl -
backend.cors.origin
You can perform these actions on a best-effort basis and only on OpenShift. During an error or on non-OpenShift clusters, you can still override these defaults by providing a custom app-config config map.
9.2.2.4. Time syntax in Red Hat Developer Hub
Use supported time duration formats in Red Hat Developer Hub, including human-readable strings, duration objects, ISO 8601 strings, and cron expressions.
|
Format |
Description |
Example |
Compound values |
|
Human-readable strings |
Simple strings compatible with the |
|
No |
|
Duration objects |
A structured object specifying time units. Matches the |
  timeout:
    minutes: 30
|
Yes |
|
ISO 8601 duration strings |
Standard ISO 8601 duration strings. |
|
Yes |
|
Format |
Description |
Example |
|
Cron |
An object containing a |
  frequency:
    cron: '*/30 * * * *'
|
RHDH configuration reader readDurationFromConfig explicitly disallows plain numbers to prevent ambiguity.
However, specific raw configuration fields, such as direct Node.js HTTP server settings, might strictly require numbers. Always check the specific documentation for the field you are configuring.
9.2.3. Provision custom config maps and secrets to define platform behavior
9.2.3.1. Provision custom config maps and secrets to define platform behavior
Configure Red Hat Developer Hub by using config maps to mount files and directories and secrets to inject environment variables into your Red Hat OpenShift Container Platform application.
9.2.3.2. Provision your custom Red Hat Developer Hub configuration
Provision custom config maps and secrets on Red Hat OpenShift Container Platform (RHOCP) to configure Red Hat Developer Hub before running the application.
On Red Hat OpenShift Container Platform, you can skip this step to run Developer Hub with the default config map and secret. Your changes on this configuration might get reverted on Developer Hub restart.
Prerequisites
-
By using the OpenShift CLI (
oc), you have access, with developer permissions, to the OpenShift cluster aimed at containing your Developer Hub instance.
Procedure
For security, store your secrets as environment variables values in an OpenShift Container Platform secret, rather than in plain text in your configuration files. Collect all your secrets in the
secrets.txtfile, with one secret per line inKEY=valueform.Author your custom
app-config.yamlfile. This is the main Developer Hub configuration file. You need a customapp-config.yamlfile to avoid the Developer Hub installer to revert user edits during upgrades. When your customapp-config.yamlfile is empty, Developer Hub is using default values.- To prepare a deployment with the Red Hat Developer Hub Operator on OpenShift Container Platform, you can start with an empty file.
To prepare a deployment with the Red Hat Developer Hub Helm chart, or on Kubernetes, enter the Developer Hub base URL in the relevant fields in your
app-config.yamlfile to ensure proper functionality of Developer Hub. The base URL is what a Developer Hub user sees in their browser when accessing Developer Hub. The relevant fields arebaseUrlin theappandbackendsections, andoriginin thebackend.corssubsection:Configuring the
baseUrlinapp-config.yaml:app: title: Red Hat Developer Hub baseUrl: https://<my_developer_hub_domain> backend: auth: externalAccess: - type: legacy options: subject: legacy-default-config secret: "${BACKEND_SECRET}" baseUrl: https://<my_developer_hub_domain> cors: origin: https://<my_developer_hub_domain>
Optionally, enter your configuration such as:
Author your custom
dynamic-plugins.yamlfile to enable plugins. By default, Developer Hub enables a minimal plugin set, and disables plugins that require configuration or secrets, such as the GitHub repository discovery plugin and the Role-based access control (RBAC) plugin.Enable the GitHub repository discovery and the RBAC features:
dynamic.plugins.yamlincludes: - dynamic-plugins.default.yaml plugins: - package: ./dynamic-plugins/dist/backstage-plugin-catalog-backend-module-github disabled: false - package: ./dynamic-plugins/dist/backstage-community-plugin-rbac disabled: falseProvision your custom configuration files to your OpenShift Container Platform cluster.
Create the <my-rhdh-project> project aimed at containing your Developer Hub instance.
$ oc create namespace my-rhdh-project
Create config maps for your
app-config.yamlanddynamic-plugins.yamlfiles in the <my-rhdh-project> project.$ oc create configmap my-rhdh-app-config --from-file=app-config.yaml --namespace=my-rhdh-project $ oc create configmap dynamic-plugins-rhdh --from-file=dynamic-plugins.yaml --namespace=my-rhdh-project
You can also create the config maps by using the web console.
Provision your
secrets.txtfile to themy-rhdh-secretssecret in the <my-rhdh-project> project.$ oc create secret generic my-rhdh-secrets --from-file=secrets.txt --namespace=my-rhdh-project
You can also create the secret by using the web console.
9.2.3.3. Use the Red Hat Developer Hub Operator to run Developer Hub with your custom configuration
Use the Red Hat Developer Hub Operator to deploy Developer Hub with custom configuration by creating a custom resource that mounts config maps and injects secrets.
Prerequisites
-
By using the OpenShift CLI (
oc), you have access, with developer permissions, to the OpenShift Container Platform cluster aimed at containing your Developer Hub instance. - Your administrator has installed the Red Hat Developer Hub Operator in the cluster.
-
You have provisioned your custom config maps and secrets in your
<my-rhdh-project>project. - You have a working default storage class, such as the Elastic Block Store (EBS) storage add-on, configured in your EKS cluster.
Procedure
Author your Backstage CR in a
my-rhdh-custom-resource.yamlfile to use your custom config maps and secrets.Minimal
my-rhdh-custom-resource.yamlcustom resource example:apiVersion: rhdh.redhat.com/v1alpha5 kind: Backstage metadata: name: my-rhdh-custom-resource spec: application: appConfig: mountPath: /opt/app-root/src configMaps: - name: my-rhdh-app-config extraEnvs: secrets: - name: <my_product_secrets> extraFiles: mountPath: /opt/app-root/src route: enabled: true database: enableLocalDb: truemy-rhdh-custom-resource.yamlcustom resource example with dynamic plugins and RBAC policies config maps, and external PostgreSQL database secrets:apiVersion: rhdh.redhat.com/v1alpha5 kind: Backstage metadata: name: <my-rhdh-custom-resource> spec: application: appConfig: mountPath: /opt/app-root/src configMaps: - name: my-rhdh-app-config - name: rbac-policies dynamicPluginsConfigMapName: dynamic-plugins-rhdh extraEnvs: secrets: - name: <my_product_secrets> - name: my-rhdh-database-secrets extraFiles: mountPath: /opt/app-root/src secrets: - name: my-rhdh-database-certificates-secrets key: postgres-crt.pem, postgres-ca.pem, postgres-key.key route: enabled: true database: enableLocalDb: false
- Mandatory fields
- No fields are mandatory. You can create an empty Backstage CR and run Developer Hub with the default configuration.
- Optional fields
spec.application.appConfig.configMaps- Enter your config map name list.
Mount files in the
my-rhdh-app-configconfig map:spec: application: appConfig: mountPath: /opt/app-root/src configMaps: - name: my-rhdh-app-configMount files in the
my-rhdh-app-configandrbac-policiesconfig maps:spec: application: appConfig: mountPath: /opt/app-root/src configMaps: - name: my-rhdh-app-config - name: rbac-policiesspec.application.extraEnvs.envsOptionally, enter your additional environment variables that are not secrets, such as your proxy environment variables.
Inject your
HTTP_PROXY,HTTPS_PROXYandNO_PROXYenvironment variables:spec: application: extraEnvs: envs: - name: HTTP_PROXY value: 'http://10.10.10.105:3128' - name: HTTPS_PROXY value: 'http://10.10.10.106:3128' - name: NO_PROXY value: 'localhost,example.org'spec.application.extraEnvs.secretsEnter your environment variables secret name list.
Inject the environment variables in your Red Hat Developer Hub secret:
spec:
  application:
    extraEnvs:
      secrets:
         - name: <my_product_secrets>
Inject the environment variables in the Red Hat Developer Hub and
my-rhdh-database-secretssecrets:spec: application: extraEnvs: secrets: - name: <my_product_secrets> - name: my-rhdh-database-secretsNote<my_product_secrets>is your preferred Developer Hub secret name, specifying the identifier for your secret configuration within Developer Hub.spec.application.extraFiles.secretsEnter your certificates files secret name and files list.
Mount the
postgres-crt.pem,postgres-ca.pem, andpostgres-key.keyfiles contained in themy-rhdh-database-certificates-secretssecret:spec: application: extraFiles: mountPath: /opt/app-root/src secrets: - name: my-rhdh-database-certificates-secrets key: postgres-crt.pem, postgres-ca.pem, postgres-key.keyspec.database.enableLocalDbEnable or disable the local PostgreSQL database.
Disable the local PostgreSQL database generation to use an external postgreSQL database:
spec:
  database:
    enableLocalDb: false
On a development environment, use the local PostgreSQL database:
spec: database: enableLocalDb: truespec.deployment- Optionally, enter your deployment configuration.
Apply your Backstage CR to start or update your Developer Hub instance:
$ oc apply --filename=my-rhdh-custom-resource.yaml --namespace=my-rhdh-project
9.2.3.4. Use the Red Hat Developer Hub Helm chart to run Developer Hub with your custom configuration
Use the Red Hat Developer Hub Helm chart to deploy Developer Hub with a custom application configuration file on OpenShift Container Platform.
Prerequisites
- By using the OpenShift Container Platform web console, you have access with developer permissions, to an OpenShift Container Platform project named <my-rhdh-project>, aimed at containing your Developer Hub instance.
-
You have uploaded your custom configuration files and secrets in your
<my-rhdh-project>project.
Procedure
Configure Helm to use your custom configuration files in Developer Hub.
- Go to the Helm tab to see the list of Helm releases.
- Click the overflow menu on the Helm release that you want to use and select Upgrade.
- Use the YAML view to edit the Helm configuration.
Set the value of the
upstream.backstage.extraAppConfig.configMapRefandupstream.backstage.extraAppConfig.filenameparameters as follows:upstream: backstage: extraAppConfig: - configMapRef: my-rhdh-app-config filename: app-config.yaml- Click Upgrade.
Next steps
- Install Developer Hub by using Helm.
9.2.4. Configure a route with an external TLS certificate by using the Operator
To secure application traffic with your own certificate, configure the Developer Hub route to use a TLS certificate stored in a Kubernetes secret.
On Red Hat OpenShift Container Platform 4.18 and earlier, securing a route with an external certificate is a Technology Preview feature that requires enabling the RouteExternalCertificate Feature Gate. On Red Hat OpenShift Container Platform 4.19 and later, this feature is Generally Available and does not require a Feature Gate.
For more information, see Securing routes with external certificates in TLS secrets.
Prerequisites
- An OpenShift Container Platform administrator has installed the Red Hat Developer Hub Operator.
-
You have a TLS certificate stored in a Kubernetes secret of type
kubernetes.io/tlsin the same namespace as your Developer Hub instance, and the certificate is valid for the route host configured in yourBackstagecustom resource, for examplemy-rhdh.apps.example.com.
Procedure
Add the
spec.application.route.tls.externalCertificateSecretNamefield to yourBackstagecustom resource, referencing the name of the secret that contains your TLS certificate:apiVersion: rhdh.redhat.com/v1alpha5 kind: Backstage metadata: name: my-rhdh spec: application: route: enabled: true host: my-rhdh.apps.example.com tls: externalCertificateSecretName: my-rhdh-tls-certApply the updated custom resource:
$ oc apply -f my-rhdh.yaml
Verification
Verify that the route uses your external certificate:
$ oc get route backstage-$cr_name -o jsonpath='{.spec.tls}' | jq .
9.2.5. Red Hat Developer Hub secrets
Developer Hub uses Kubernetes secrets to store sensitive values such as authentication credentials, backend secrets, and database passwords. The app-config.yaml file references these values through ${VAR_NAME} environment variable substitution.
The following are common secrets used by Developer Hub:
my-rhdh-secrets-
The main Developer Hub secrets containing authentication provider client IDs and secrets, the
BACKEND_SECRET, and other sensitive credentials. my-rhdh-database-certificates-secrets-
Optional. Contains external PostgreSQL TLS certificates such as
postgres-crt.pem,postgres-ca.pem, andpostgres-key.key.
To create secrets, author the secret values in a local file (for example, my-rhdh-secrets.txt), then create a Kubernetes secret by running oc create secret generic.
You can provision secrets using either of the following methods:
-
With the Operator: Reference secrets in the
Backstagecustom resource by using thespec.application.extraEnvs.secretsfield to inject secrets as environment variables, or thespec.application.extraFiles.secretsfield to mount secrets as files, such as, TLS certificates. -
With the Helm chart: Reference secrets by using the
upstream.backstage.extraEnvVarsSecretsorupstream.backstage.extraEnvVarsfield with asecretKeyRef. You can also mount secrets as files by using both theupstream.backstage.extraVolumesandupstream.backstage.extraVolumeMountsvalues.
Additional resources
9.2.6. Inject extra files and environment variables into Backstage containers
Inject extra files and environment variables into Backstage containers by mounting ConfigMaps and Secrets by using the mountPath field.
-
If you do not specify
keyandmountPath: The system mounts each key or value as afilenameor content with asubPath. -
If you specify
keywith or withoutmountPath: The system mounts the specified key or value with asubPath. -
If you specify only
mountPath: The system mounts a directory containing all the keys or values without asubPath. If you do not specify the
containersfield: The volume mounts only to thebackstage-backendcontainer. By default, files mount only to thebackstage-backendcontainer. You can also specify other targets, including a list of containers by name (such asdynamic-plugin-installorselectcustomsidecars) or select all containers in the Backstage Pod.Note-
OpenShift Container Platform does not automatically update a volume mounted with
subPath. By default, the RHDH Operator monitors these ConfigMaps or Secrets and refreshes the RHDH Pod when changes occur. - For security purposes, Red Hat Developer Hub does not give the Operator Service Account read access to Secrets. As a result, mounting files from Secrets without specifying both mountPath and key is not supported.
-
OpenShift Container Platform does not automatically update a volume mounted with
Procedure
Apply the configuration to your
Backstage custom resource (CR). The following code block is an example:spec: application: extraFiles: mountPath: _<default_mount_path>_ configMaps: - name: _<configmap_name_all_entries>_ - name: _<configmap_name_single_key>_ key: _<specific_file_key>_ containers: - "*" - name: _<configmap_name_custom_path>_ mountPath: _<custom_cm_mount_path>_ containers: - backstage-backend - install-dynamic-plugins secrets: - name: _<secret_name_single_key>_ key: _<specific_secret_key>_ containers: - install-dynamic-plugins - name: _<secret_name_custom_path>_ mountPath: _<custom_secret_mount_path>_ pvcs: - name: _<pvc_name_default_path>_ - name: _<pvc_name_custom_path>_ mountPath: _<custom_pvc_mount_path>_ extraEnvs: configMaps: - name: _<configmap_name_env_var>_ key: _<env_var_key>_ containers: - "*" secrets: - name: _<secret_name_all_envs>_ envs: - name: _<static_env_var_name>_ value: "_<static_env_var_value>_" containers: - install-dynamic-pluginswhere:
spec.application.extraFiles.mountPath-
Specifies the default base mount path for files if you do not set a specific
mountPathfor a resource (for example,/<default_mount_path>). spec.application.extraFiles.configMaps.name-
Mounts all entries from
<configmap_name_all_entries>to the default mount path. spec.application.extraFiles.configMaps.key-
Mounts **only the specified key (for example,
<specific_file_key>.txt) from the ConfigMap. spec.application.extraFiles.configMaps.containers-
Targets all containers (
"*") for mounting. spec.application.extraFiles.configMaps.mountPath-
Overrides the default and mounts all ConfigMap entries as a directory at the specified path (for example,
/<custom_cm_mount_path>). spec.application.extraFiles.secrets.key- Mounts only a specific key from the Secret.
spec.application.extraFiles.secrets.mountPath-
Overrides the default and mounts all Secret entries as a directory at the specified path (for example,
/<custom_secret_mount_path>). spec.application.extraFiles.pvcs.name-
Mounts the PVC to the default mount path, appending the PVC name (for example,
/<default_mount_path>/<pvc_name_default_path>). spec.application.extraFiles.pvcs.mountPath-
Overrides the default and mounts the PVC to the specified path (for example,
/<custom_pvc_mount_path>). spec.application.extraEnvs.configMaps.containers-
Injects the specified ConfigMap key as an environment variable into all containers (
"*"). spec.application.extraEnvs.secrets.name- Injects all keys from the Secret as environment variables into the default container.
spec.application.envs.containersTargets only the listed container for the static environment variable injection.
NoteThe following explicit options are supported:
-
No or an empty field: Mounts only to the
backstage-backendcontainer. -
*(asterisk) as the first and only array element: Mounts to all containers. -
Explicit container names, for example,
install-dynamic-plugins: Mounts only to the listed containers.
-
No or an empty field: Mounts only to the
Verification
Verify the files mount with the following correct paths and container targets:
| Resource | Target type | Path(s) or name(s) | Container(s) |
|---|---|---|---|
|
ConfigMap ( |
File |
|
|
|
ConfigMap ( |
File |
|
All |
|
ConfigMap ( |
Directory |
|
|
|
Secret ( |
File |
|
|
|
Secret ( |
Directory |
|
|
|
PVC ( |
Directory |
|
|
|
ConfigMap ( |
Environment variable |
|
All |
|
Secret ( |
Environment variable |
|
|
|
Custom Resource Definition (CRD) ( |
Environment variable |
|
|
9.2.7. Configure mount paths for default Secrets and Persistent Volume Claims (PVCs)
Configure custom mount paths for Secrets and PVCs by adding the rhdh.redhat.com/mount-path annotation to your resource.
Procedure
To specify a PVC mount path, add the
rhdh.redhat.com/mount-pathannotation to your configuration file as shown in the following example:apiVersion: v1 kind: PersistentVolumeClaim metadata: name: <my_claim> annotations: rhdh.redhat.com/mount-path: /mount/path/from/annotationWhere:
<my_claim>- The PVC to mount.
rhdh.redhat.com/mount-path-
The mount path for the PVC, in this case the
/mount/path/from/annotationdirectory.
To specify a Secret mount path, add the
rhdh.redhat.com/mount-pathannotation to your configuration file as shown in the following example:apiVersion: v1 kind: Secret metadata: name: <my_secret> annotations: rhdh.redhat.com/mount-path: /mount/path/from/annotation
9.2.8. Mount secrets and PVCs to specific containers
Mount secrets and PVCs to specific containers by adding the rhdh.redhat.com/containers annotation to your configuration file.
Procedure
To mount Secrets to all containers, set the
rhdh.redhat.com/containersannotation to*in your configuration file:apiVersion: v1 kind: Secret metadata: name: <my_secret> annotations: rhdh.redhat.com/containers:
*ImportantSet
rhdh.redhat.com/containersto*to mount it to all containers in the deployment.To mount to specific containers, separate the names with commas:
apiVersion: v1 kind: PersistentVolumeClaim metadata: name: <my_claim> annotations: rhdh.redhat.com/containers: "init-dynamic-plugins,backstage-backend"NoteThis configuration mounts the
<my_claim>PVC to theinit-dynamic-pluginsandbackstage-backendcontainers.
9.2.9. Configure Red Hat Developer Hub deployment when using the Operator
Configure Red Hat Developer Hub deployment by using the spec.deployment.patch field in the Red Hat Developer Hub Operator custom resource to control the Deployment resource.
Create a Backstage CR with the following fields:
apiVersion: rhdh.redhat.com/v1alpha5
kind: Backstage
metadata:
  name: developer-hub
spec:
  deployment:
    patch:
      spec:
template:labelsAdd labels to the Developer Hub pod.
For example, to add the label
my=true:apiVersion: rhdh.redhat.com/v1alpha5 kind: Backstage metadata: name: developer-hub spec: deployment: patch: spec: template: metadata: labels: my: truevolumes
Add an additional volume named my-volume and mount it under /my/path in the Developer Hub application container.
apiVersion: rhdh.redhat.com/v1alpha5
kind: Backstage
metadata:
  name: developer-hub
spec:
  deployment:
    patch:
      spec:
        template:
          spec:
            containers:
              - name: backstage-backend
                volumeMounts:
                  - mountPath: /my/path
                    name: my-volume
            volumes:
              - ephemeral:
                  volumeClaimTemplate:
                    spec:
                      storageClassName: "special"
                name: my-volume
Replace the default dynamic-plugins-root volume with a persistent volume claim (PVC) named dynamic-plugins-root. Note the $patch: replace directive, otherwise the system adds a new volume.
apiVersion: rhdh.redhat.com/v1alpha5
kind: Backstage
metadata:
  name: developer-hub
spec:
  deployment:
    patch:
      spec:
        template:
          spec:
            volumes:
              - $patch: replace
                name: dynamic-plugins-root
                persistentVolumeClaim:
claimName: dynamic-plugins-rootcpurequestSet the CPU request for the Developer Hub application container to 250m.
apiVersion: rhdh.redhat.com/v1alpha5 kind: Backstage metadata: name: developer-hub spec: deployment: patch: spec: template: spec: containers: - name: backstage-backend resources: requests: cpu: 250mmy-sidecarcontainerAdd a new
my-sidecarsidecar container into the Developer Hub Pod.apiVersion: rhdh.redhat.com/v1alpha5 kind: Backstage metadata: name: developer-hub spec: deployment: patch: spec: template: spec: containers: - name: my-sidecar image: quay.io/my-org/my-sidecar:latest
Additional resources
9.2.10. Configure an RHDH instance with a TLS connection in Kubernetes
Configure RHDH with a TLS connection in Kubernetes to ensure secure connections with third-party applications and external databases.
These features are for Technology Preview only. Technology Preview features are not supported with Red Hat production service level agreements (SLAs), might not be functionally complete, and Red Hat does not recommend using them for production. These features provide early access to upcoming product features, enabling customers to test functionality and provide feedback during the development process.
For more information on Red Hat Technology Preview features, see Technology Preview Features Scope.
Prerequisites
- You have set up an Azure Red Hat OpenShift (ARO) cluster with a public CA-signed certificate. For more information about obtaining CA certificates, refer to your vendor documentation.
You have created a namespace and setup a service account with proper read permissions on resources.
For example, you can use the following Kubernetes manifest for role-based access control:
apiVersion: rbac.authorization.k8s.io/v1 kind: ClusterRole metadata: name: backstage-read-only rules: - apiGroups: - '*' resources: - pods - configmaps - services - deployments - replicasets - horizontalpodautoscalers - ingresses - statefulsets - limitranges - resourcequotas - daemonsets verbs: - get - list - watch #...- You have obtained the secret and the service CA certificate associated with your service account.
You have created some resources and added annotations to them so the Kubernetes plugin can discover them. You can apply these Kubernetes annotations:
-
backstage.io/kubernetes-idto label components -
backstage.io/kubernetes-namespaceto label namespaces
-
Procedure
Enable the Kubernetes plugins in the
dynamic-plugins-rhdh.yamlfile by settingdisabledtofalse:kind: ConfigMap apiVersion: v1 metadata: name: dynamic-plugins-rhdh data: dynamic-plugins.yaml: | includes: - dynamic-plugins.default.yaml plugins: - package: ./dynamic-plugins/dist/backstage-plugin-kubernetes-backend-dynamic disabled: false - package: ./dynamic-plugins/dist/backstage-plugin-kubernetes disabled: false # ...NoteThe
backstage-plugin-kubernetesplugin is currently in Technology Preview. As an alternative, you can use the./dynamic-plugins/dist/backstage-plugin-topology-dynamicplugin, which is Generally Available (GA).Set the Kubernetes cluster details and configure the catalog sync options in the
app-config.yamlconfiguration file:kind: ConfigMap apiVersion: v1 metadata: name: my-rhdh-app-config data: "app-config.yaml": | # ... catalog: rules: - allow: [Component, System, API, Resource, Location] providers: kubernetes: openshift: cluster: openshift processor: namespaceOverride: default defaultOwner: guests schedule: frequency: seconds: 30 timeout: seconds: 5 kubernetes: serviceLocatorMethod: type: 'multiTenant' clusterLocatorMethods: - type: 'config' clusters: - url: <target_cluster_api_server_url> name: openshift authProvider: 'serviceAccount' skipTLSVerify: false skipMetricsLookup: true dashboardUrl: <target_cluster_console_url> dashboardApp: openshift serviceAccountToken: ${K8S_SERVICE_ACCOUNT_TOKEN} caData: ${K8S_CONFIG_CA_DATA} # ...url-
The base URL to the Kubernetes control plane. You can run the
kubectl cluster-infocommand to get the base URL. skipTLSVerify-
Set the value of this parameter to
falseto enable the verification of the TLS certificate. dashboardUrl- (Optional) The link to the Kubernetes dashboard managing the ARO cluster.
serviceAccountToken-
(Optional) Pass the service account token by using a
K8S_SERVICE_ACCOUNT_TOKENenvironment variable that you define in your<my_product_secrets>secret. caData-
Pass the CA data by using a
K8S_CONFIG_CA_DATAenvironment variable that you define in your<my_product_secrets>secret.
- Save the configuration changes.
Verification
Run the RHDH application to import your catalog:
$ kubectl -n rhdh-operator get pods -w
- Verify that the pod log shows no errors for your configuration.
- Go to Catalog and check the component page in the Developer Hub instance to verify the cluster connection and the presence of your created resources.
If you meet connection errors, such as certificate issues or permissions, check the message box in the component page or view the logs of the pod.
9.2.11. Configure corporate proxy settings to enable external network access
9.2.11.1. Configure corporate proxy settings to enable external network access
In a network restricted environment, configure Red Hat Developer Hub to use your proxy to access remote network resources.
You can run the Developer Hub application behind a corporate proxy by setting any of the following environment variables before starting the application:
HTTP_PROXY- Denotes the proxy to use for HTTP requests.
HTTPS_PROXY- Denotes the proxy to use for HTTPS requests.
NO_PROXY- Set the environment variable to bypass the proxy for certain domains. The variable value is a comma-separated list of hostnames or IP addresses that do not require the proxy, even if you specify one.
9.2.11.2. The NO_PROXY exclusion rules
Configure NO_PROXY to bypass the proxy for specific hostnames, IP addresses, and port numbers when using Developer Hub.
The default value for NO_PROXY in RHDH is localhost,127.0.0.1. If you want to override it, include at least localhost or localhost:7007 in the list. Otherwise, the RHDH backend might fail.
Matching follows these rules:
-
NO_PROXY=*will bypass the proxy for all requests. -
Space and commas might separate the entries in the
NO_PROXYlist. For example,NO_PROXY="localhost,example.com", orNO_PROXY="localhost example.com", orNO_PROXY="localhost, example.com"would have the same effect. -
If
NO_PROXYhas no entries, configuring theHTTP(S)_PROXYsettings makes the backend send all requests through the proxy. -
The backend does not perform a DNS lookup to decide if a request should bypass the proxy or not. For example, if DNS resolves
example.comto1.2.3.4, settingNO_PROXY=1.2.3.4has no effect on requests sent toexample.com. Only requests sent to the IP address1.2.3.4bypass the proxy. -
If you add a port after the hostname or IP address, the request must match both the host/IP and port to bypass the proxy. For example,
NO_PROXY=example.com:1234would bypass the proxy for requests tohttp(s)://example.com:1234, but not for requests on other ports, such ashttp(s)://example.com. -
If you do not specify a port after the hostname or IP address, all requests to that host/IP address will bypass the proxy regardless of the port. For example,
NO_PROXY=localhostwould bypass the proxy for requests sent to URLs such ashttp(s)://localhost:7077andhttp(s)://localhost:8888. -
IP Address blocks in CIDR notation will not work. So setting
NO_PROXY=10.11.0.0/16will not have any effect, even if the backend sends a request to an IP address in that block. -
Supports only IPv4 addresses. IPv6 addresses such as
::1will not work. -
Generally, the proxy is only bypassed if the hostname is an exact match for an entry in the
NO_PROXYlist. The only exceptions are entries that start with a dot (.) or with a wildcard (*). In such a case, bypass the proxy if the hostname ends with the entry.
List the domain and the wildcard domain if you want to exclude a given domain and all its subdomains. For example, you would set NO_PROXY=example.com,.example.com to bypass the proxy for requests sent to http(s)://example.com and http(s)://subdomain.example.com.
9.2.11.3. Configure proxy information in Operator deployment
Configure proxy settings for Operator-based deployments by setting environment variables in the ConfigMap or custom resource file.
- As a cluster administrator with access to the Operator namespace, you can configure the proxy variables in the Operator’s default ConfigMap file. This configuration applies the proxy settings to all the users of the Operator.
- As a developer, you can configure the proxy variables in a custom resource (CR) file. This configuration applies the proxy settings to the RHDH application created from that CR.
Prerequisites
- You have installed the Red Hat Developer Hub application.
Procedure
- Perform one of the following steps based on your role:
As an administrator, set the proxy information in the Operator’s default ConfigMap file:
-
Search for a ConfigMap file named
backstage-default-configin the default namespacerhdh-operatorand open it. -
Find the
deployment.yamlkey. Set the value of the
HTTP_PROXY,HTTPS_PROXY, andNO_PROXYenvironment variables in theDeploymentspec as shown in the following example:# ... deployment.yaml: |- apiVersion: apps/v1 kind: Deployment spec: template: spec: # ... initContainers: - name: install-dynamic-plugins # ... env: - name: NPM_CONFIG_USERCONFIG value: /opt/app-root/src/.npmrc.dynamic-plugins - name: HTTP_PROXY value: 'http://10.10.10.105:3128' - name: HTTPS_PROXY value: 'http://10.10.10.106:3128' - name: NO_PROXY value: 'localhost,example.org' # ... containers: - name: backstage-backend # ... env: - name: APP_CONFIG_backend_listen_port value: "7007" - name: HTTP_PROXY value: 'http://10.10.10.105:3128' - name: HTTPS_PROXY value: 'http://10.10.10.106:3128' - name: NO_PROXY value: 'localhost,example.org'
-
Search for a ConfigMap file named
As a developer, set the proxy information in your
BackstageCR file as shown in the following example:spec: # ... application: extraEnvs: envs: - name: HTTP_PROXY value: 'http://10.10.10.105:3128' - name: HTTPS_PROXY value: 'http://10.10.10.106:3128' - name: NO_PROXY value: 'localhost,example.org'- Save the configuration changes.
9.2.11.4. Configure proxy information in Helm deployment
Configure proxy settings for Helm-based deployments by setting environment variables in the Helm configuration file.
Prerequisites
- You have installed the Red Hat Developer Hub application.
Procedure
Set the proxy information in your Helm configuration file:
upstream:
  backstage:
    extraEnvVars:
      - name: HTTP_PROXY
        value: '<http_proxy_url>'
      - name: HTTPS_PROXY
        value: '<https_proxy_url>'
      - name: NO_PROXY
        value: '<no_proxy_settings>'
Where,
<http_proxy_url>- Denotes a variable that you must replace with the HTTP proxy URL.
<https_proxy_url>- Denotes a variable that you must replace with the HTTPS proxy URL.
<no_proxy_settings>Denotes a variable that you must replace with comma-separated URLs, which you want to exclude from proxying, for example,
<example1>.com,<example2>.com.For example:
upstream:
  backstage:
    extraEnvVars:
      - name: HTTP_PROXY
        value: 'http://10.10.10.105:3128'
      - name: HTTPS_PROXY
        value: 'http://10.10.10.106:3128'
      - name: NO_PROXY
        value: 'localhost,example.org'
- Save the configuration changes.
9.3. Customize the user interface to reflect organizational branding
9.3.1. Customize the user interface to reflect organizational branding
TODO: Replace this placeholder with an overview of Customize the user interface to reflect organizational branding.
9.3.2. Customize Learning Paths to integrate tailored e-learning content
9.3.2.1. Customize Learning Paths to integrate tailored e-learning content
In Red Hat Developer Hub, you can configure Learning Paths by hosting the required data externally and by using the built-in proxy to deliver this data. You can provide Learning Paths data from a JSON file hosted on a web server or from a dedicated service that provides the data in JSON format by using an API.
9.3.2.2. About Learning Paths
The Learning Paths plugin in Red Hat Developer Hub integrates customized e-learning content into developer workflows to accelerate onboarding, address skill gaps, and ensure that teams stay updated with best practices.
9.3.2.3. Customize the Learning Paths by using a hosted JSON file
For ease of use and simplicity, you can configure the Learning Paths by using a hosted JSON file.
Procedure
- Publish the JSON file containing your Learning Paths data to a web server, such as GitHub or GitLab. You can find an example at https://raw.githubusercontent.com/redhat-developer/rhdh/release-1.10/packages/app/public/learning-paths/data.json.
Configure the Developer Hub proxy to access the Learning Paths data from the hosted JSON file, by adding the following to the
app-config.yamlfile:proxy: endpoints: '/developer-hub': target: <target> pathRewrite: '^/api/proxy/developer-hub/learning-paths': '<learning_path.json>' changeOrigin: true secure: true<target>-
Enter the hosted JSON file base URL, such as
https://raw.githubusercontent.com. <learning_path.json>Enter the hosted JSON file path without the base URL, such as
'/redhat-developer/rhdh/main/packages/app/public/learning-paths/data.json'TipWhen also configuring the home page, due to the use of overlapping
pathRewritesfor both thelearning-pathandhomepagequick access proxies, create thelearning-pathsconfiguration (^api/proxy/developer-hub/learning-paths) before you create thehomepageconfiguration (^/api/proxy/developer-hub). For example:proxy: endpoints: '/developer-hub': target: https://raw.githubusercontent.com/ pathRewrite: '^/api/proxy/developer-hub/learning-paths': '/redhat-developer/rhdh/main/packages/app/public/learning-paths/data.json' '^/api/proxy/developer-hub': '/redhat-developer/rhdh/main/packages/app/public/homepage/data.json' changeOrigin: true secure: true
Additional resources
9.3.2.4. Customize the Learning Paths by using a customization service
For advanced scenarios, you can host your Red Hat Developer Hub customization service to provide data to all configurable Developer Hub pages, such as the Learning Paths. You can even use a different service for each page.
Procedure
-
Deploy your Developer Hub customization service on the same OpenShift Container Platform cluster as your Developer Hub instance. You can find an example at
red-hat-developer-hub-customization-provider, that provides the same data as default Developer Hub data. The customization service provides a Learning Paths data URL such as:http://<rhdh-customization-provider>/learning-paths. Configure the Developer Hub proxy to use your dedicated service to provide the Learning Path data, add the following to the
app-config.yamlfile:proxy: endpoints: '/developer-hub/learning-paths': target: <learning_path_data_url> changeOrigin: true qsecure: true # Change to "false" in case of using self hosted cluster with a self-signed certificate
9.3.2.5. Start and complete lessons in Learning Paths
As a developer, you can start a course and complete the lessons at your own pace.
Prerequisites
- You can log in to developers.redhat.com
-
If RBAC is enabled, you have a role with the following permission:
catalog.entity.read.
Procedure
- In your Red Hat Developer Hub navigation menu, click Learning Paths.
Select the tile for the course you want to begin.
NoteThis action redirects you to the main page of the course in the Red Hat Developers site.
9.3.5. Customize the Quick Start to guide user onboarding
9.3.5.1. Customize the Quick Start to guide user onboarding
The quick start plugin provides guided onboarding for Red Hat Developer Hub users through customizable, interactive steps that help users get familiar with the platform.
9.3.5.2. About quick starts
The quick start plugin provides guided onboarding for users of Red Hat Developer Hub. It displays a customizable drawer interface with interactive quick start steps that help users get familiar with the platform.
If RBAC is not enabled, quick start is only accessible to users with administrator permissions.
The quick start plugin is enabled by default and includes the following components:
- Set up authentication
- Set up secure login credentials to protect your account from unauthorized access.
- Configure RBAC
- Assign roles and permissions to control who can view, create, or edit resources, ensuring secure and efficient collaboration.
- Configure Git
- Connect your Git providers, such as GitHub to manage code, automate workflows, and integrate with platform features.
- Manage plugins
- Browse and install extensions to add features, connect to external tools, and customize your experience.
9.3.5.3. Configure role-based access control for quick starts
You can control which users see specific quick start guides by configuring role-based access control (RBAC) for quick starts in your app-config.yaml file.
Prerequisites
- You have configured RBAC in RHDH.
Procedure
Enable RBAC in your app-config.yaml file:
permission:
  enabled: true
When RBAC is enabled, the system determines user roles based on permissions:
-
Users with
policy.entity.createpermission are assigned the admin role. Users without this permission are assigned the developer role.
NoteIf RBAC is disabled (
permission.enabled: false) or not configured, users are assumed to be platform engineers setting up Red Hat Developer Hub (RHDH) and are assigned the admin role.
-
Users with
Configure quick start items with role assignments in your app-config.yaml file:
app:
  quickstart:
    - title: 'Platform Configuration'
      titleKey: steps.platformConfiguration.title
      roles: ['admin']
      # Only admins see this
    - title: 'Getting Started as Developer'
      titleKey: steps.gettingStarted.title
      roles: ['developer']
      # Only developers see this
    - title: 'Universal Welcome Guide'
      titleKey: steps.universalWelcome.title
      roles: ['admin', 'developer']
      # Both user roles see this
The following roles are supported:
- admin
- Platform engineers, administrators, and users with elevated permissions
- developer
Regular developers and users with standard permissions
NoteQuick start items without a
rolesproperty default to the admin role. Items can specify multiple roles, and users see quick start items that match their assigned role.
9.3.5.4. Customize your Red Hat Developer Hub quick start
As an administrator, you can configure the Red Hat Developer Hub quick start plugin to create customized onboarding for your Developer Hub users.
Prerequisites
Procedure
Update your
app-config.yamlwith the following code:app: quickstart: - title: 'Welcome to Developer Hub' description: 'Learn the basics of navigating the Developer Hub interface' icon: 'home' roles: ['admin', 'developer'] # Show to both roles cta: text: 'Get Started' link: '/catalog' - title: 'Create Your First Component' description: 'Follow our guide to register your first software component' icon: 'code' roles: ['admin', 'developer'] # Show to both roles cta: text: 'Create Component' link: '/catalog-import' - title: 'Explore Templates' description: 'Discover available software templates to bootstrap new projects' icon: 'template' roles: ['admin', 'developer'] # Show to both roles cta: text: 'Browse Templates' link: '/create'where:
title- Enter the display title for the quick start step.
description- Enter the brief description of what the step covers.
icon(Optional) Enter the icon identifier. You can use a full image URL, a valid SVG path, or one of the following common keys:
For a list of supported icons you can use in your quick start definitions, see Common icons for customization.
9.3.5.5. Disable the quick start plugin
You can disable the quick start plugin if you do not want to use guided onboarding steps in your Developer Hub instance.
Procedure
To disable the quick start plugin, set the disabled property to
trueas shown in the following code:global: dynamic: includes: - dynamic-plugins.default.yaml plugins: - package: ./dynamic-plugins/dist/red-hat-developer-hub-backstage-plugin-quickstart disabled: true
9.3.5.6. Use quick start onboarding steps
You can use the quick start onboarding steps to learn more about the administrator features of RHDH.
Prerequisites
- (Optional) If RBAC is enabled, you must have administrator permissions to access to the quick start feature.
Procedure
-
In your RHDH navigation menu, click the Help (
?) icon. - In the dropdown menu, click Quick start.
- Select the quick start step that you want to begin.
To close the quick start drawer, click Hide.
 Note
NoteYour overall progress is tracked and displayed as a progress bar and a progress percentage in the quick start footer.
9.3.5.7. Enable quick start localization in RHDH
Enable translation key support for quick start titles, descriptions, and CTAs so that users can onboard in their preferred language.
If a translation key is present but the corresponding localized string is missing, the system defaults to the original text defined in the quick start configuration (title, description, text). If no translation key is defined at all, the original text is displayed.
Prerequisites
- You have enabled localization in your RHDH application.
Procedure
For all quick start steps (both existing and new) in your configuration file, you must define both the original text and the new localization keys. For example, in the
quickstartsection of your customapp-config.yamlfile, add thetitleKey,descriptionKey, andtextKeyvalues, as follows:app-config.yamlfragmentapp: quickstart: # Existing quick start steps should also be updated with keys - title: 'Setup Authentication' titleKey: steps.setupAuth.title description: 'Learn the basics of navigating the {product-short} interface' descriptionKey: steps.setupAuth.description icon: 'home' cta: text: 'Get Started' textKey: steps.setupAuth.ctaTitle link: '/catalog' # ...where:
title- (Mandatory) Fallback for the title.
titleKey- Key for the translated title.
description- (Mandatory) Fallback for the description.
descriptionKey- Key for the translated description.
text- (Mandatory) Fallback for the CTA text.
textKey- Key for the translated CTA text.
In your
dynamic-plugins.yamlfile, add thetranslationResourcessection to yourred-hat-developer-hub-backstage-plugin-quickstartconfiguration, as follows:app-config.yamlfragmentplugins: - package: ./dynamic-plugins/dist/red-hat-developer-hub-backstage-plugin-quickstart disabled: false pluginConfig: dynamicPlugins: frontend: red-hat-developer-hub.backstage-plugin-quickstart: # translationResources definition is required for translations to work translationResources: - importName: quickstartTranslations ref: quickstartTranslationRef # ... other configurations like mountPoints ...where:
- importName
- Enter the name used to reference the import.
- ref
- Reference to the resource definition.
In your translation file, map the keys from the first step to the localized strings for each supported language.
allTranslations.jsonfragment"plugin.quickstart": { "en": { "steps.setupAuth.title": "Manage plugins EN", "steps.setupAuth.description": "EN Browse and install extensions to add features, connect with external tools, and customize your experience.", "steps.setupAuth.ctaTitle": "Start" }, "fr": { "steps.setupAuth.title": "Gérer les plugins FR", "steps.setupAuth.description": "FR Parcourez et installez des extensions pour ajouter des fonctionnalités, vous connecter à des outils externes et personnaliser votre expérience.", "steps.setupAuth.ctaTitle": "Commencer" } }
9.3.6. Customize the Tech Radar page to visualize technology adoption
9.3.6.1. Customize the Tech Radar page to visualize technology adoption
In Red Hat Developer Hub, the Tech Radar page is provided by the tech-radar dynamic plugin, which is disabled by default. For information about enabling dynamic plugins in Red Hat Developer Hub see Configuring dynamic plugins.
In Red Hat Developer Hub, you can configure Learning Paths by passing the data into the app-config.yaml file as a proxy. The base Tech Radar URL must include the /developer-hub/tech-radar proxy.
Due to the use of overlapping pathRewrites for both the tech-radar and homepage quick access proxies, you must create the tech-radar configuration (^api/proxy/developer-hub/tech-radar) before you create the homepage configuration (^/api/proxy/developer-hub).
You can provide data to the Tech Radar page from the following sources:
- JSON files hosted on GitHub or GitLab.
- A dedicated service that provides the Tech Radar data in JSON format using an API.
9.3.6.2. Customize the Tech Radar page by using a JSON file
For ease of use and simplicity, you can configure the Tech Radar page by using a hosted JSON file.
Prerequisites
-
You have specified the data sources for the Tech Radar plugin in the
integrationssection of theapp-config.yamlfile. For example, you have enabled Developer Hub integration with GitHub. -
You have enabled the
./dynamic-plugins/dist/backstage-community-plugin-tech-radarand/dynamic-plugins/dist/backstage-community-plugin-tech-radar-backend-dynamicplugins.
Procedure
- Publish the JSON file containing your Tech Radar data to a web server, such as GitHub or GitLab. You can find an example at https://raw.githubusercontent.com/backstage/community-plugins/main/workspaces/tech-radar/plugins/tech-radar-common/src/sampleTechRadarResponse.json.
Configure Developer Hub to access the Tech Radar data from the hosted JSON files, by adding the following to the
app-config.yamlfile:techRadar: url: <tech_radar_data_url><tech_radar_data_url>- Enter the Tech Radar data hosted JSON URL.
9.3.6.3. Customize the Tech Radar page by using a customization service
For advanced scenarios, you can host your Red Hat Developer Hub customization service to offer data to all configurable Developer Hub pages, such as the Tech Radar page. You can even use a different service for each page.
Prerequisites
-
You have specified the data sources for the Tech Radar plugin in the
integrationssection of theapp-config.yamlfile. For example, you have enabled Developer Hub integration with GitHub. -
You have enabled the
./dynamic-plugins/dist/backstage-community-plugin-tech-radarand/dynamic-plugins/dist/backstage-community-plugin-tech-radar-backend-dynamicplugins.
Procedure
-
Deploy your Developer Hub customization service on the same OpenShift Container Platform cluster as your Developer Hub instance. You can find an example at
red-hat-developer-hub-customization-provider, that provides the same data as default Developer Hub data. The customization service provides a Tech Radar data URL such as:http://<rhdh-customization-provider>/tech-radar. Add the dedicated service as an allowed host by adding the following code to the
app-config.yamlfile:backend: reading: allow: - host: '<rhdh_customization_provider_base_url>'<rhdh_customization_provider_base_url>-
Enter the base URL of your Tech Radar data URL, such as:
<rhdh-customization-provider>.
Add the following to the
app-config.yamlfile:techRadar: url: <tech_radar_data_url><tech_radar_data_url>-
Enter your Tech Radar data URL, such as:
http://<rhdh-customization-provider>/tech-radar.
9.3.7. Customize themes and branding to align with corporate standards
9.3.7.1. Customize themes and branding to align with corporate standards
By modifying the visual aspects of the interface, organizations can align Red Hat Developer Hub with their branding guidelines and improve the overall user experience.
The following default theme configurations are available for Red Hat Developer Hub:
- The Red Hat Developer Hub theme
- Default theme configurations to make your developer portal look like a standard Red Hat Developer Hub instance.
- The Backstage theme
- Default theme configurations to make your developer portal look like a standard Backstage instance.
You can change or disable particular parameters in a default theme or create a fully customized theme by modifying the app-config.yaml file. From the app-config.yaml file, you can customize common theme components, including the following components:
- Company name and logo
- Font color, size, and style of text in paragraphs, headings, headers, and buttons
- Header color, gradient, and shape
- Button color
- Navigation indicator color
You can also customize some components from the Developer Hub GUI, such as the theme mode (Light Theme, Dark Theme, or Auto).
9.3.7.2. Switch the theme mode for your Developer Hub instance
You can switch the RHDH interface between light, dark, or auto mode (which matches your system preference).
In RHDH, theme configurations are used to change the look and feel of different UI components. So, you might notice changes in different UI components, such as buttons, tabs, sidebars, cards, and tables along with some changes in background color and font used on the RHDH pages.
Prerequisites
- You are logged in to the RHDH web console.
Procedure
- From the Developer Hub web console, click Settings.
From the Appearance panel, select Light, Dark, or Auto to change the theme mode.
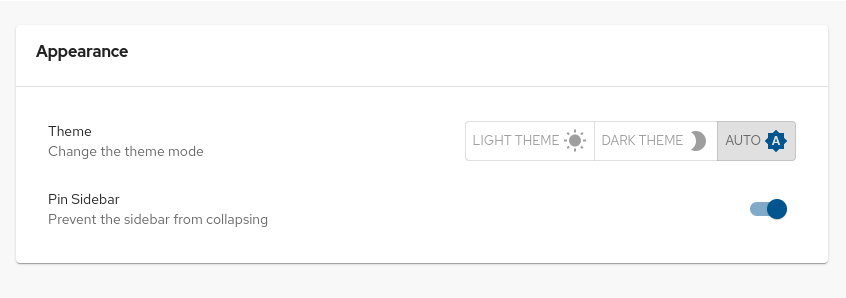
Verification
- The interface immediately updates to reflect the selected theme.
9.3.7.3. Customize the branding logo of your Developer Hub instance
You can customize the branding logo of your Developer Hub instance by configuring the branding section in the app-config.yaml file.
Procedure
Customize the branding logo by configuring the
brandingsection in theapp-config.yamlfile:app: branding: fullLogo: ${BASE64_EMBEDDED_FULL_LOGO} iconLogo: ${BASE64_EMBEDDED_ICON_LOGO}fullLogo- Enter the logo on the expanded (pinned) sidebar as a base64 encoded image.
iconLogoEnter the logo on the collapsed (unpinned) sidebar as a base64 encoded image.
You can format the
BASE64_EMBEDDED_FULL_LOGOenvironment variable as follows:BASE64_EMBEDDED_FULL_LOGO: "data:_<media_type>_;base64,<base64_data>"The following example demonstrates how to customize the
BASE64_EMBEDDED_FULL_LOGOby using thedata:_<media_type>_;base64,<base64_data>format:SVGLOGOBASE64=$(base64 -i logo.svg) BASE64_EMBEDDED_FULL_LOGO="data:image/svg+xml;base64,$SVGLOGOBASE64"
Replace
image/svg+xmlwith the correct media type for your image (for example,image/pngandimage/jpeg), and adjust the file extension accordingly. As a result, you can embed the logo directly without referencing an external file.You can also customize the width of the branding logo by setting a value for the
fullLogoWidthfield in thebrandingsection, as shown in the following example:app: branding: fullLogoWidth: 110px # ...fullLogoWidth-
The default value for the logo width is
110px. The following units are supported:integer,px,em,rem, percentage.
9.3.7.4. Customize the theme mode color palettes for your Developer Hub instance
You can customize the color palettes of the light and dark theme modes in your Developer Hub instance by configuring the light.palette and dark.palette parameters in the branding.theme section of the app-config.yaml file.
Procedure
Configure the
light.paletteanddark.paletteparameters in thebranding.themesection of theapp-config.yamlfile:app: branding: theme: light: palette: primary: main: <light_primary_color> navigation: indicator: <light_indicator_color> pageTheme: default: backgroundColor: [<light_background_color_1>, <light_background_color_2>] dark: palette: primary: main: <dark_primary_color> navigation: indicator: <dark_indicator_color> pageTheme: default: backgroundColor: [<dark_background_color_1>, <dark_background_color_2>] # ...light|darkEnter the theme name:
lightordark.palette.primary:main-
Enter the palette main primary color, such as
#fffffforwhite. palette.navigation:indicator-
Enter the palette navigation indicator color, which is a vertical bar that indicates the selected tab in the navigation panel, such as
#FF0000orred. pageTheme:default:backgroundColor-
Enter the default page theme background color, such as
#fffffforwhite.
Additional resources
9.3.7.5. Customize the page theme header for your Developer Hub instance
Customize the header color for the light and dark theme modes in your Developer Hub instance by modifying the branding.theme section of the app-config.yaml file.
Procedure
Modify the
branding.themesection of theapp-config.yamlfile:app: branding: theme: light: palette: {} pageTheme: default: backgroundColor: "<default_light_background_color>" fontColor: "<default_light_font_color>" shape: none apis: backgroundColor: "<apis_light_background_color>" fontColor: "<apis_light_font_color>" shape: none dark: palette: {} pageTheme: default: backgroundColor: "<default_dark_background_color>" fontColor: "<default_dark_font_color>" shape: none # ...light-
Enter the theme mode, such as
lightordark. defaultEnter the default page theme configuration
backgroundColor-
Enter the page header background color, such as
#fffffforwhite. fontColor-
Enter the page header text color, such as
#000000orblack. shape-
Enter the page header pattern, such as
wave,round, ornone.apis::Enter the page id to configure, such asapisorhome.
9.3.7.6. Customize the font for your Developer Hub instance
You can configure the typography section of the app-config.yaml file to change the default font family and size of the page text, as well as the font family and size of each heading level.
Procedure
Configure the
typographysection of theapp-config.yamlfile:app: branding: theme: light: typography: fontFamily: "Times New Roman" htmlFontSize: 11 # smaller is bigger h1: fontFamily: "Times New Roman" fontSize: 40 h2: fontFamily: "Times New Roman" fontSize: 30 h3: fontFamily: "Times New Roman" fontSize: 30 h4: fontFamily: "Times New Roman" fontSize: 30 h5: fontFamily: "Times New Roman" fontSize: 30 h6: fontFamily: "Times New Roman" fontSize: 30 dark: typography: fontFamily: "Times New Roman" htmlFontSize: 11 # smaller is bigger h1: fontFamily: "Times New Roman" fontSize: 40 h2: fontFamily: "Times New Roman" fontSize: 30 h3: fontFamily: "Times New Roman" fontSize: 30 h4: fontFamily: "Times New Roman" fontSize: 30 h5: fontFamily: "Times New Roman" fontSize: 30 h6: fontFamily: "Times New Roman" fontSize: 30 # ...
9.3.7.7. Load a custom Developer Hub theme by using a dynamic plugin
You can load a custom Developer Hub theme from a dynamic plugin.
Procedure
Export a theme provider function in your dynamic plugin, for example:
import { lightTheme } from './lightTheme'; // some custom theme
import { UnifiedThemeProvider } from '@backstage/theme';
export const lightThemeProvider = ({ children }: { children: ReactNode }) => (
  <UnifiedThemeProvider theme={lightTheme} children={children} />
);
For more information about creating a custom theme, see Backstage documentation - Creating a Custom Theme.
Configure Developer Hub to load the theme in the UI by using the
themesconfiguration field:dynamicPlugins: frontend: example.my-custom-theme-plugin: themes: - id: light title: Light variant: light icon: someIconReference importName: lightThemeProviderid-
Enter your theme ID, such as
my_theme. Enterdarkto override the default Developer Hub dark theme. Enterlightto override the default Developer Hub light theme.
Verification
- The theme is available in the Developer Hub Settings page.
9.3.7.8. Custom component options for your Developer Hub instance
You can use two component variants (Patternfly or MUI) to customize various components of your Developer Hub theme.
- Patternfly
- MUI
In addition to assigning a component variant to each parameter in the light or dark theme mode configurations, you can toggle the rippleEffect on or off.
The following code shows the options that you can use in the app-config.yaml file to configure the theme components for your Developer Hub instance:
app:
  branding:
    theme:
      light:
        options:
          rippleEffect: off / on
          paper: patternfly / mui
          buttons: patternfly / mui
          inputs: patternfly / mui
          accordions: patternfly / mui
          sidebars: patternfly / mui
          pages: patternfly / mui
          headers: patternfly / mui
          toolbars: patternfly / mui
          dialogs: patternfly / mui
          cards: patternfly / mui
          tables: patternfly / mui
          tabs: patternfly / mui
      dark:
        options:
          rippleEffect: off / on
          paper: patternfly / mui
          buttons: patternfly / mui
          inputs: patternfly / mui
          accordions: patternfly / mui
          sidebars: patternfly / mui
          pages: patternfly / mui
          headers: patternfly / mui
          toolbars: patternfly / mui
          dialogs: patternfly / mui
          cards: patternfly / mui
          tables: patternfly / mui
          tabs: patternfly / mui
9.3.10. Configure Quick access cards to surface frequently used links
9.3.10.1. Configure Quick access cards to surface frequently used links
You can customize the Quick access card on the Red Hat Developer Hub Home page by configuring a proxy in your app-config.yaml file. You can provide data from JSON files hosted on GitHub or GitLab, or from a dedicated service that provides the data in JSON format by using an API.
9.3.10.2. Use hosted JSON files to provide data to the Quick access card
You can configure Developer Hub to fetch Quick access card data from JSON files hosted on external servers such as GitHub or GitLab by configuring a proxy endpoint in your Developer Hub configuration.
To display data in the Quick access card from a hosted JSON file, you must configure a proxy endpoint in your configuration file.
Prerequisites
- You have installed Red Hat Developer Hub by using the Operator or a Helm chart. For more information, see Installing Red Hat Developer Hub on OpenShift Container Platform.
Procedure
To access the data from the JSON files, add the following code to the
app-config.yamlDeveloper Hub configuration file:proxy: endpoints: # Other Proxies # customize developer hub instance '/developer-hub': target: <DOMAIN_URL> # i.e https://raw.githubusercontent.com/ pathRewrite: '^/api/proxy/developer-hub': <path to json file> # i.e /redhat-developer/rhdh/main/packages/app/public/homepage/data.json changeOrigin: true secure: true # Change to "false" in case of using self hosted cluster with a self-signed certificate headers: <HEADER_KEY>: <HEADER_VALUE> # optional and can be passed as needed i.e Authorization can be passed for private GitHub repo and PRIVATE-TOKEN can be passed for private GitLab repoThe icon field uses predefined system icons. Select the correct key for your service from the Common icons for customization table.
9.3.10.3. Use a dedicated service to provide data to the Quick access card
You can deploy a dedicated customization service to provide Quick access card data to your Developer Hub instance. This approach allows you to use the same service for all configurable pages or different services for each page.
Prerequisites
- You have installed the Red Hat Developer Hub using Helm chart. For more information, see Installing Red Hat Developer Hub on OpenShift Container Platform with the Helm chart.
Procedure
- In the Red Hat OpenShift Container Platform web console, click +Add > Import from Git.
Enter the URL of your Git repository into the Git Repo URL field.
To use the
red-hat-developer-hub-customization-providerservice, add the URL for the red-hat-developer-hub-customization-provider repository or your fork of the repository containing your customizations.-
On the General tab, enter
red-hat-developer-hub-customization-providerin the Name field and click Create. On the Advanced Options tab, copy the value from Target Port.
NoteTarget Port automatically generates a Kubernetes or OpenShift Container Platform service to communicate with.
Add the following code to the
app-config.yamlfile:proxy: endpoints: # Other Proxies # customize developer hub instance '/developer-hub': target: ${HOMEPAGE_DATA_URL} # For example: http://<SERVICE_NAME>:8080, such as http://rhdh-customization-provider:8080 changeOrigin: true # Change to "false" in case of using self-hosted cluster with a self-signed certificate secure: trueNoteThe
red-hat-developer-hub-customization-providerservice contains the 8080 port by default. If you are using a custom port, you can specify it with the 'PORT' environmental variable in theapp-config.yamlfile.-
Replace the
HOMEPAGE_DATA_URLby adding the URL torhdh-secretsor by directly replacing it in your custom ConfigMap. - Delete the Developer Hub pod to ensure that the new configurations are loaded correctly.
Verification
To view the service, go to the OpenShift Container Platform web console and click Networking > Service.
NoteYou can also view Service Resources in the Topology view.
Ensure that the provided API URL for the Home page returns the data in JSON format as shown in the following example:
[ { "title": "Dropdown 1", "isExpanded": false, "links": [ { "iconUrl": "https://imagehost.com/image.png", "label": "Dropdown 1 Item 1", "url": "https://example.com/" }, { "iconUrl": "https://imagehost2.org/icon.png", "label": "Dropdown 1 Item 2", "url": "" } ] }, { "title": "Dropdown 2", "isExpanded": true, "links": [ { "iconUrl": "http://imagehost3.edu/img.jpg", "label": "Dropdown 2 Item 1", "url": "http://example.com" } ] } ]NoteIf the request call fails or is not configured, the Developer Hub instance falls back to the default local data.
If the images or icons do not load, then allowlist them by adding your image or icon host URLs to the Content Security Policy (CSP)
img-srcin your custom ConfigMap as shown in the following example:kind: ConfigMap apiVersion: v1 metadata: name: app-config.yaml data: app-config.yaml: | app: title: Red Hat Developer Hub backend: csp: connect-src: - "'self'" - 'http:' - 'https:' img-src: - "'self'" - 'data:' - <image host url 1> - <image host url 2> - <image host url 3> # Other Configurations
9.4. Configure language localization to improve accessibility for global users
9.4.1. Configure language localization to improve accessibility for global users
Red Hat Developer Hub supports multiple languages through its localization framework, enabling international teams to use the platform in their preferred language.
9.4.2. Enable the localization framework
9.4.2.1. Enable the localization framework
Red Hat Developer Hub supports multiple languages through its localization framework. You can enable language selection, override default translations, and implement localization support in custom plugins.
9.4.2.2. Enable the localization framework in Developer Hub
Enabling localization enhances accessibility, improves the user experience for a global audience, and assists organizations in meeting language requirements in specific regions.
Learn how to enable the localization framework to add a localization feature to RHDH. The following languages are supported:
- English (en)
- French (fr)
- German (de)
- Italian (it)
- Japanese (ja)
- Spanish (es)
The default language for RHDH is English.
Procedure
Add the
i18nsection to your custom Developer Hubapp-config.yamlconfiguration file:app-config.yamlfragment with localizationi18nfields... i18n: locales: # List of supported locales. Must include
en, otherwise the translation framework will fail to load. - en - fr - de - it - ja - es defaultLocale: en # Optional. Defaults toenif not specified. ...
9.4.2.3. Override translations
You can override plugin translation strings without modifying the plugin source code.
Prerequisites
- You have enabled localization in your RHDH application.
-
For an Operator-installed RHDH instance, you have installed the OpenShift CLI (
oc). For more information about installingoc, see Installing the OpenShift CLI.
Procedure
Create a JSON file containing the translation strings that you want to override, as shown in the following example. Supported languages include English (default), French, German, Italian, Japanese and Spanish.
allTranslations.jsonfragment with translation string overrides{ "plugin.global-floating-action-button": { "en": { "fab.quay.label": "QUAY EN JSON", "fab.rbac.label": "RBAC EN JSON", "fab.rbac.tooltip": "RBAC EN tooltip JSON" }, "fr": { "fab.quay.label": "QUAY French JSON", "fab.quay.tooltip": "QUAY french tooltip JSON", "fab.rbac.label": "RBAC French JSON", "fab.rbac.tooltip": "RBAC french tooltip JSON" } }, "plugin.global-header": { "en": { "applicationLauncher.developerHub": "{product-short} EN JSON" }, "fr": { "applicationLauncher.developerHub": "{product-short} French JSON" } } }Log in to your cluster and create a config map for your translations override strings:
$ oc create configmap all-translations \
    --from-file=/<path_to>/allTranslations.json
Update your deployment configuration based on your installation method:
NoteAs shown in the following examples, we recommend that you use the same mount path for your
allTranslations.jsonfile and any other override files that you create, for example/opt/app-root/src/translations.For an Operator-installed RHDH instance, update your
Backstagecustom resource (CR). For more information about configuring a CR, see Using the Red Hat Developer Hub Operator to run Developer Hub with your custom configuration.In the
spec.application.extraFilessection, add the translations custom app configuration as shown in the following example:Backstage custom resource fragment
apiVersion: rhdh.redhat.com/v1alpha5
kind: {product-custom-resource-type}
spec:
  application:
    extraFiles:
      mountPath: /opt/app-root/src/translations
      configMaps:
        - name: all-translations
For a Helm-installed RHDH instance, update your Developer Hub
BackstageHelm chart to mount in the Developer Hub filesystem your files from theall-translationsconfig map:- In the Developer Hub Helm chart, go to Root Schema → Backstage chart schema → Backstage parameters → Backstage container additional volume mounts.
Select Add Backstage container additional volume mounts and add the following values:
- mountPath
-
/opt/app-root/src/translations - name
-
all-translations
Add the translations to the Backstage container additional volumes in the Developer Hub Helm chart:
- name
-
all-translations - configMap
- defaultMode
-
420 - name
-
all-translations
Update the
i18nsection to your custom Developer Hubapp-config.yamlconfiguration file to include the following translation override file:app-config.yamlfragment with localizationi18nfieldsi18n: locales: # List of supported locales. Must include
en, otherwise the translation framework will fail to load. - en - fr - de - it - ja - es defaultLocale: en # Optional. Defaults toenif not specified. overrides: # List of JSON translation files applied in order (last file wins). Each file may override/add translations for one or more plugins/locales - /opt/app-root/src/translations/all-translations.json
9.4.2.4. Implement localization support for your custom plugins
You can implement localization support in your custom RHDH plugins so that your plugins are accessible to a diverse, international user base and follow recommended best practices.
Procedure
Create the following translation files in your plugin’s
src/translations/directory:import { createTranslationRef } from "@backstage/core-plugin-api/alpha"; export const myPluginMessages = { page: { title: "My Plugin", subtitle: "Plugin description", }, common: { exportCSV: "Export CSV", noResults: "No results found", }, table: { headers: { name: "Name", count: "Count", }, }, }; export const myPluginTranslationRef = createTranslationRef({ id: "plugin.my-plugin", messages: myPluginMessages, });import { createTranslationMessages } from "@backstage/core-plugin-api/alpha"; import { myPluginTranslationRef } from "./ref"; const myPluginTranslationDe = createTranslationMessages({ ref: myPluginTranslationRef, messages: { "page.title": "Mein Plugin", "page.subtitle": "Plugin-Beschreibung", "common.exportCSV": "CSV exportieren", "common.noResults": "Keine Ergebnisse gefunden", "table.headers.name": "Name", "table.headers.count": "Anzahl", }, }); export default myPluginTranslationDe;import { createTranslationMessages } from "@backstage/core-plugin-api/alpha"; import { myPluginTranslationRef } from "./ref"; const myPluginTranslationFr = createTranslationMessages({ ref: myPluginTranslationRef, messages: { "page.title": "Mon Plugin", "page.subtitle": "Description du plugin", "common.exportCSV": "Exporter CSV", "common.noResults": "Aucun résultat trouvé", "table.headers.name": "Nom", "table.headers.count": "Nombre", }, }); export default myPluginTranslationFr;import { createTranslationResource } from "@backstage/core-plugin-api/alpha"; import { myPluginTranslationRef } from "./ref"; export const myPluginTranslations = createTranslationResource({ ref: myPluginTranslationRef, translations: { de: () => import("./de"), fr: () => import("./fr"), }, }); export { myPluginTranslationRef };Create translation hooks file, as follows:
import { useTranslationRef } from "@backstage/core-plugin-api/alpha";
import { myPluginTranslationRef } from "../translations";

export const useTranslation = () => useTranslationRef(myPluginTranslationRef);
Update your plugin components to replace hard-coded strings with translation calls as shown in the following example:
const MyComponent = () => {
 return (
   <div>
     <h1>My Plugin</h1>
     <button>Export CSV</button>
   </div>
 );
};
import { useTranslation } from '../hooks/useTranslation'; const MyComponent = () => { const { t } = useTranslation(); return ( <div> <h1>{t('page.title')}</h1> <button>{t('common.exportCSV')}</button> </div> ); };(Optional) If your content contains variables, use interpolation:
// In your translation files
'table.pagination.topN': 'Top {{count}} items'

// In your component
const { t } = useTranslation();
const message = t('table.pagination.topN', { count: '10' });
(Optional) If your content contains dynamic translation keys (for example, from your plugin configuration):
// Configuration object with translation keys
const CARD_CONFIGS = [
 { id: 'overview', titleKey: 'cards.overview.title' },
 { id: 'details', titleKey: 'cards.details.title' },
 { id: 'settings', titleKey: 'cards.settings.title' },
];

// In your component
const { t } = useTranslation();

const CardComponent = ({ config }) => {
 return (
   <div>
     <h2>{t(config.titleKey as any)}</h2>
     {/* Use 'as any' for dynamic keys */}
   </div>
 );
};
Export the translation resources
// Export your plugin
export { myPlugin } from "./plugin";

// Export translation resources for the application
export { myPluginTranslations, myPluginTranslationRef } from "./translations";
Update your
dynamic-plugins.default.yamlfile, as follows:backstage-community.plugin-my-plugin: translationResources: - importName: myPluginTranslations ref: myPluginTranslationRef module: AlphaUpdate your
package.jsonfile as follows:"exports": { ".": "./src/index.ts", "./alpha": "./src/alpha.ts", "./package.json": "./package.json" }, "main": "src/index.ts", "types": "src/index.ts", "typesVersions": { "*": { "alpha": [ "src/alpha.ts" ], "package.json": [ "package.json" ] } }
Verification
To verify your translations, create a test mock file. For example:
Create the following test mock file src/test-utils/mockTranslations.ts:
import { myPluginMessages } from "../translations/ref";

function flattenMessages(obj: any, prefix = ""): Record<string, string> {
 const flattened: Record<string, string> = {};
 for (const key in obj) {
   if (obj.hasOwnProperty(key)) {
     const value = obj[key];
     const newKey = prefix ? `${prefix}.${key}` : key;
     if (typeof value === "object" && value !== null) {
       Object.assign(flattened, flattenMessages(value, newKey));
     } else {
       flattened[newKey] = value;
     }
   }
 }
 return flattened;
}

const flattenedMessages = flattenMessages(myPluginMessages);

export const mockT = (key: string, params?: any) => {
 let message = flattenedMessages[key] || key;
 if (params) {
   for (const [paramKey, paramValue] of Object.entries(params)) {
     message = message.replace(
       new RegExp(`{{${paramKey}}}`, "g"),
       String(paramValue),
     );
   }
 }
 return message;
};

export const mockUseTranslation = () => ({ t: mockT });
Update your tests as follows:
import { mockUseTranslation } from "../test-utils/mockTranslations";

jest.mock("../hooks/useTranslation", () => ({
 useTranslation: mockUseTranslation,
}));

// Your test code...
9.4.2.5. Select the language for your Developer Hub instance
Use the Appearance panel to select a language for RHDH. Supported languages include English (default), French, German, Italian, Japanese and Spanish.
Prerequisites
- You are logged in to the Developer Hub web console.
- You have enabled the localization framework in your RHDH instance.
Procedure
- From the Developer Hub web console, click the down arrow next to your profile name, then click Settings.
From the Appearance panel, click the language dropdown to select your language of choice.
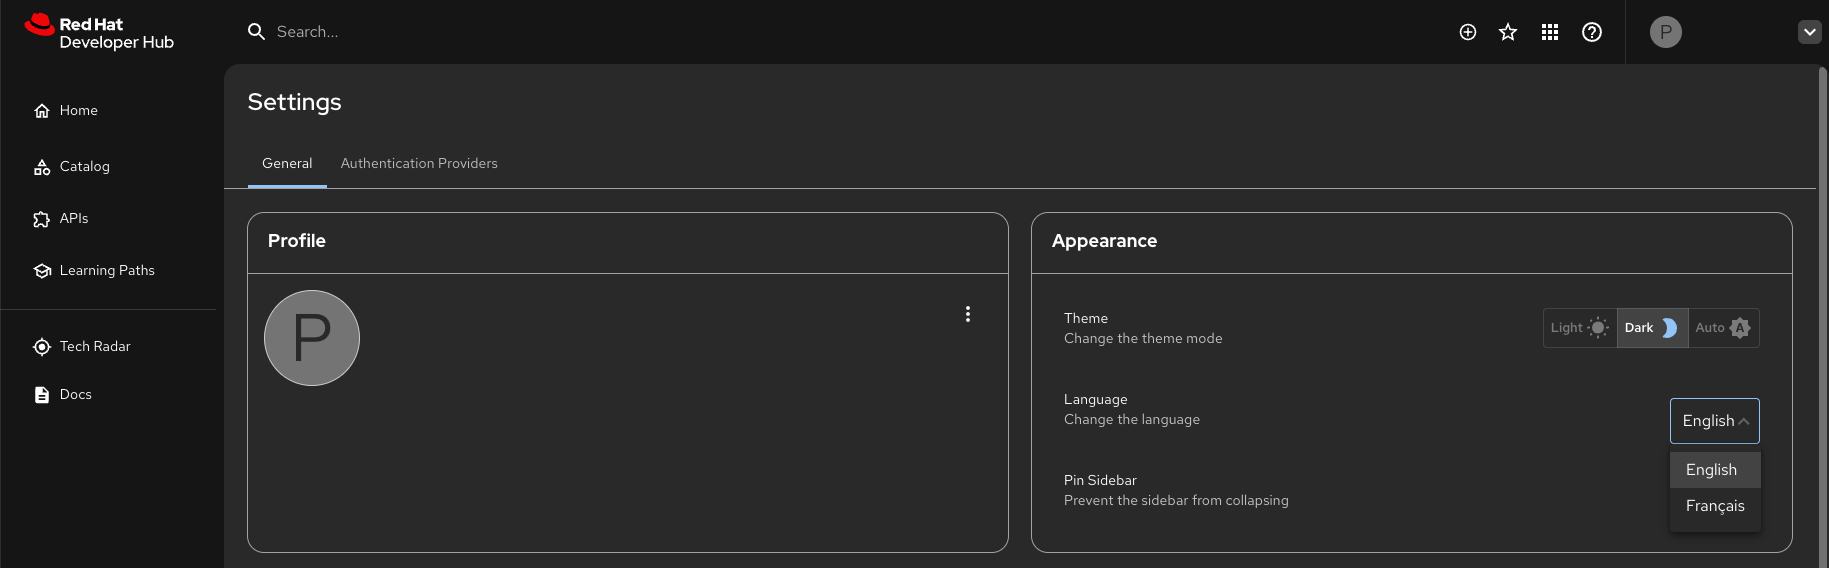
9.4.3. Best practices for implementing localization support for custom plugins in RHDH
These best practices help ensure a robust, type-safe localization workflow with reliable deployment across all targeted languages.
- Do not modify original English strings
- This preserves the source of truth for all translators, preventing unexpected changes that would invalidate existing translations and ensuring consistency across all versions.
- Use flat dot notation in translation files
-
Flat dot notation, for example
page.title, follows the standardi18nextlibrary convention, which optimizes runtime lookups and keeps the actual translation values concise and easy to manage for translation services. - Use nested objects in the reference file for TypeScript support
- This allows the TypeScript compiler to enforce structural type checking on your translation keys, catching errors during development rather than at runtime.
- Test with mocks to ensure translations work correctly
- This isolates the translation logic, guaranteeing the correct keys are passed and rendered without relying on a full environment setup or external translation files during unit testing.
- Add all languages to your application configuration
- This ensures that the RHDH application initializes and loads all necessary language resources at startup, making the locales immediately available for users to select in the UI.
Common patterns for using translation functions include simple text, variables, and dynamic keys:
| Use case | Pattern | Example |
|---|---|---|
|
Simple text |
|
|
|
With variables |
|
|
|
Dynamic keys |
|
|
Chapter 10. Secure
10.1. Secure
Manage authentication and authorization in Red Hat Developer Hub to control user access, verify identities, and enforce role-based policies.
You can enable authentication in Red Hat Developer Hub to allow users to sign in using credentials from an external identity provider, such as RHBK, GitHub, or Microsoft Azure, and provision user and group data to the software catalog.
Red Hat Developer Hub (RHDH) administrators can use role-based access control (RBAC) to manage authorizations of other users by defining roles, permissions, and policies for users and groups.
10.2. Configure authentication providers to verify user identities
10.2.1. Configure authentication providers to verify user identities
Enable authentication with your main identity provider to allow users to sign in to Red Hat Developer Hub using their organizational credentials.
10.2.2. Authentication methods and identity provider selection
10.2.2.1. Authentication methods and identity provider selection
User provisioning and authentication are two independent mechanisms in Red Hat Developer Hub. You can configure them separately depending on your requirements.
10.2.2.2. Understand authentication and user provisioning
User provisioning and authentication are two independent mechanisms in Red Hat Developer Hub. You can configure them separately depending on your requirements.
10.2.2.2.1. User provisioning
To fully enable catalog features, provision user and group data from an Identity Provider (IdP) to the Developer Hub software catalog. Catalog provider plugins handle this task asynchronously. These plugins query the IdP for relevant user and group information, and create or update corresponding entities in the Developer Hub catalog. Scheduled provisioning ensures that the catalog accurately reflects the users and groups in your organization.
You can provision users and groups from any supported source, including Red Hat Build of Keycloak (RHBK), GitHub, GitLab, Microsoft Azure, or LDAP. LDAP provisioning works independently of your authentication provider. Following associations are supported:
| User provisioning | Authentication |
|---|---|
|
RHBK |
RHBK |
|
LDAP |
RHBK |
|
GitHub |
GitHub |
|
Microsoft Azure |
Microsoft Azure |
For example, you can authenticate users with RHBK while provisioning user and group data from your LDAP directory.
Configuring user provisioning is critical for several reasons.
- Enabling authorization by allowing you to define access controls based on user and group memberships synchronized from your IdP.
Provisioning user and group data to the catalog is necessary for various catalog features that rely on understanding entity ownership and relationships between users, groups, and software components.
ImportantWithout this provisioning step, features such as displaying who owns a catalog entity might not function correctly.
To explore Developer Hub features in a non-production environment, you can:
- To use Developer Hub without external IdP, enable the guest user to skip configuring authentication and authorization, log in as the guest user, and access all Developer Hub features.
-
To use Developer Hub without authorization policies and features relying on the software catalog, you can enable the
dangerouslyAllowSignInWithoutUserInCatalogresolver option. This setting bypasses the check requiring a user to be in the catalog but still enforces authentication.
Developer Hub uses a one-way synchronization model, where user and group data flow from your Identity Provider to the Developer Hub software catalog. As a result, deleting users or groups manually through the Developer Hub Web UI or REST API might be ineffective or cause inconsistencies, since Developer Hub will create those entities again during the next import.
10.2.2.2.2. Authentication
When a user attempts to access Developer Hub, Developer Hub redirects them to a configured authentication provider, such as Red Hat Build of Keycloak (RHBK), GitHub, GitLab, or Microsoft Azure. This external IdP is responsible for authenticating the user.
On successful authentication, the Developer Hub authentication plugin, configured in your app-config.yaml file, processes the response from the IdP, resolves the identity in the Developer Hub software catalog, and establishes a user session within Developer Hub.
Authentication works independently of user provisioning. By default you cannot authenticate users without provisioning them to the software catalog. You can override this behavior to authenticate users without provisioning them to the software catalog, by using the dangerouslyAllowSignInWithoutUserInCatalog parameter. However, provisioning is a prerequisite for full catalog functionality, such as entity ownership and group-based access controls.
10.2.3. Configure guest access to securely test non-production environments
10.2.3.1. Configure guest access to securely test non-production environments
For trial or non-production environments, you can enable guest access to explore Developer Hub features without configuring authentication. For production environments, disable guest access to ensure security.
10.2.3.2. Enable the Guest login
To allow users to log in as a guest on the login page, enable the guest login option.
Procedure
In the
app-config.yamlfile, set the authentication environment todevelopment:auth: environment: development
- Restart the Developer Hub application to apply the changes.
Verification
- Go to the login page of your Developer Hub instance.
- Verify that the option to log in as a guest is available.
10.2.3.3. Disable the Guest login
To prevent users from logging in as a guest on the login page, disable the guest login option.
Procedure
In the
app-config.yamlfile, set the authentication environment toproduction:auth: environment: production
- Restart the Developer Hub application to apply the changes.
Verification
- Go to the login page of your Developer Hub instance.
- Verify that the option to log in as a guest is no longer available.
10.2.6. Enable authentication to verify identities against enterprise directories
10.2.6.1. Enable authentication to verify identities against enterprise directories
Enable authentication with your main identity provider to allow users to sign in to Red Hat Developer Hub using their organizational credentials.
10.2.6.2. Enable authentication with Red Hat Build of Keycloak (RHBK)
Configure Red Hat Build of Keycloak (RHBK) as your Red Hat Developer Hub sign-in provider by enabling the OIDC authentication provider.
Prerequisites
- You have shared a secret with RHBK.
- You have provisioned users and groups to the software catalog.
Procedure
The OIDC provider authentication backend plugin requires Developer Hub to support sessions. Enable session support by adding the session secret to your
app-config.yamlfile:auth: session: secret: ${SESSION_SECRET}Add an OIDC provider section to your
app-config.yamlfile:auth: environment: production providers: oidc: production: metadataUrl: ${KEYCLOAK_BASE_URL} clientId: ${KEYCLOAK_CLIENT_ID} clientSecret: ${KEYCLOAK_CLIENT_SECRET} prompt: auto signInPage: oidcenvironment: production-
Mark the environment as
productionto hide the Guest login in the Developer Hub home page. metadataUrl,clientId,clientSecret- Configure the OIDC provider with your secrets.
promptEnter
autoto allow the identity provider to automatically determine whether to prompt for credentials or bypass the login redirect if an active RHBK session exists.The identity provider defaults to
none, which assumes that you are already logged in. Sign-in requests without an active session are rejected.signInPage-
Enter
oidcto enable the OIDC provider as default sign-in provider.
Optional: Add optional fields to the OIDC authentication provider section in your
app-config.yamlfile:auth: providers: oidc: production: metadataUrl: ${KEYCLOAK_BASE_URL} clientId: ${KEYCLOAK_CLIENT_ID} clientSecret: ${KEYCLOAK_CLIENT_SECRET} callbackUrl: ${KEYCLOAK_CALLBACK_URL} tokenEndpointAuthMethod: ${KEYCLOAK_TOKEN_ENDPOINT_METHOD} tokenSignedResponseAlg: ${KEYCLOAK_SIGNED_RESPONSE_ALG} additionalScopes: ${KEYCLOAK_SCOPE} signIn: resolvers: - resolver: oidcSubClaimMatchingKeycloakUserId - resolver: preferredUsernameMatchingUserEntityName - resolver: emailMatchingUserEntityProfileEmail - resolver: emailLocalPartMatchingUserEntityName dangerouslyAllowSignInWithoutUserInCatalog: true sessionDuration: { hours: 24 } backstageTokenExpiration: { minutes: _<user_defined_value>_ } signInPage: oidccallbackUrl- RHBK callback URL.
tokenEndpointAuthMethod- Enter your token endpoint authentication method.
tokenSignedResponseAlg- Token signed response algorithm.
additionalScopes- Enter additional RHBK scopes to request for during the authentication flow.
signInresolversAfter successful authentication, the user signing in must be resolved to an existing user in the Developer Hub catalog. To best match users securely for your use case, consider configuring a specific resolver.
Enter the resolver list to override the default resolver:
oidcSubClaimMatchingKeycloakUserId.Available values:
oidcSubClaimMatchingKeycloakUserId-
Matches the user with the immutable
subparameter from OIDC to the RHBK user ID. Consider using this resolver for enhanced security. oidcLdapUuidMatchingAnnotationMatches the user by their immutable LDAP UUID. Requires a custom client scope in Red Hat Build of Keycloak.
For setup instructions, see Match users by LDAP UUID with Red Hat Build of Keycloak.
emailLocalPartMatchingUserEntityName- Matches the email local part with the user entity name.
emailMatchingUserEntityProfileEmail- Matches the email with the user entity profile email.
preferredUsernameMatchingUserEntityNameMatches the preferred username with the user entity name.
The authentication provider tries each sign-in resolver in order until it succeeds, and fails if none succeed.
WarningIn production mode, configure only one resolver to make sure users are securely matched.
dangerouslyAllowSignInWithoutUserInCatalog: trueConfigure the sign-in resolver to bypass the user provisioning requirement in the Developer Hub software catalog.
WarningIn production mode, do not enable the
dangerouslyAllowSignInWithoutUserInCatalogoption.
sessionDuration-
Lifespan of the user session. Enter a duration in
mslibrary format (such as '24h', '2 days'), ISO duration, or "human duration" as used in code. backstageTokenExpirationEnter a value to modify the Developer Hub token expiration from its default value of one hour. It refers to the validity of short-term cryptographic tokens, not to the session duration. The expiration value must be set between 10 minutes and 24 hours.
WarningIf multiple valid refresh tokens are issued due to frequent refresh token requests, older tokens will remain valid until they expire. Enhance security and prevent potential misuse of older tokens by enabling a refresh token rotation strategy in your RHBK realm.
- From the Configure section of the navigation menu, click Realm Settings.
- From the Realm Settings page, click the Tokens tab.
- From the Refresh tokens section of the Tokens tab, toggle the Revoke Refresh Token to the Enabled position.
To disable the guest login option, in the
app-config.yamlfile, set the authentication environment toproduction:auth: environment: production
Verification
- Go to the Developer Hub login page.
- Your Developer Hub sign-in page displays Sign in using OIDC and the Guest user sign-in is disabled.
- Log in with OIDC by using the saved Username and Password values.
10.2.6.3. Match users by LDAP UUID with Red Hat Build of Keycloak
When you use Red Hat Build of Keycloak with LDAP user federation, configure the oidcLdapUuidMatchingAnnotation sign-in resolver to match users by their immutable LDAP UUID for secure user resolution. This requires a custom client scope in Red Hat Build of Keycloak that exposes the LDAP UUID as a token claim.
Prerequisites
- LDAP user federation is configured in Red Hat Build of Keycloak.
- LDAP provisioning is enabled in Red Hat Developer Hub. For more information, see Enable user provisioning with LDAP.
- A Red Hat Developer Hub client is created in Red Hat Build of Keycloak.
Procedure
-
In the Red Hat Build of Keycloak admin console, go to Client scopes and click Create client scope. Name the scope
ldap_uuid. In the
ldap_uuidscope, click the Mappers tab, then click Add mapper > Configure a new mapper > User Attribute. Configure the mapper with the following values:-
Name:
LDAP_ID -
User Attribute:
LDAP_ID -
Token Claim Name:
ldap_uuid -
Claim JSON Type:
String - Add to ID token: ON
- Add to userinfo: ON
-
Name:
-
Go to Clients > your Red Hat Developer Hub client > Client scopes. Click Add client scope and add
ldap_uuidas a Default scope. Optional: Add the
oidcLdapUuidMatchingAnnotationresolver to yourapp-config.yamlfile, to replace the defaultldap_uuidresolver:auth: providers: oidc: production: signIn: resolvers: - resolver: oidcLdapUuidMatchingAnnotation ldapUuidKey: ldap_uuidldapUuidKey-
Enter the token claim name containing the LDAP UUID value. The default value is
ldap_uuid. This value must match the Token Claim Name configured in step 2.
- Restart the Red Hat Developer Hub application to apply the changes.
10.2.6.4. Enable authentication with GitHub
Configure GitHub as your Red Hat Developer Hub sign-in provider.
Prerequisites
- You have shared secrets with GitHub.
- You have provisioned users and groups to the software catalog.
Procedure
Add a GitHub authentication provider section to your
app-config.yamlfile:auth: environment: production providers: github: production: clientId: ${GITHUB_APP_CLIENT_ID} clientSecret: ${GITHUB_APP_CLIENT_SECRET} signInPage: githubenvironment-
Enter
productionto disable the Guest login option in the Developer Hub login page. clientId-
Enter the configured secret variable name:
${GITHUB_APP_CLIENT_ID}. clientSecret-
Enter the configured secret variable name:
${GITHUB_APP_CLIENT_SECRET}. signInPage-
Enter
githubto enable the GitHub provider as your Developer Hub sign-in provider.
Optional: Add optional fields to the GitHub authentication provider section in your
app-config.yamlfile:auth: environment: production providers: github: production: clientId: ${GITHUB_APP_CLIENT_ID} clientSecret: ${GITHUB_APP_CLIENT_SECRET} callbackUrl: <your_intermediate_service_url/handler> sessionDuration: { hours: 24 } signIn: resolvers: - resolver: usernameMatchingUserEntityName dangerouslyAllowSignInWithoutUserInCatalog: true signInPage: githubcallbackUrl- Enter the callback URL that GitHub uses when initiating an OAuth flow, such as: <your_intermediate_service_url/handler>. Define it when Developer Hub is not the immediate receiver, such as in cases when you use one OAuth app for many Developer Hub instances.
sessionDuration-
Enter the user session lifespan, in
mslibrary format (such as '24h', '2 days'), ISO duration, or "human duration". signInresolvers- After successful authentication, Developer Hub resolves the user signing in to an existing user in the Developer Hub catalog. Configure a specific resolver to best match users securely for your use case..
Enter the resolver list to override the default resolver:
usernameMatchingUserEntityName.The authentication provider tries each sign-in resolver in order until it succeeds. If none of the attempts succeed, the sign-in fails.
WarningIn production mode, configure only one resolver to make sure users are securely matched.
resolver-
Enter the sign-in resolver name. Available resolvers:
usernameMatchingUserEntityName,preferredUsernameMatchingUserEntityName,emailMatchingUserEntityProfileEmail. dangerouslyAllowSignInWithoutUserInCatalogEnter
trueto configure the sign-in resolver to bypass the user provisioning requirement in the Developer Hub software catalog.WarningIn production mode, do not enable
dangerouslyAllowSignInWithoutUserInCatalog.
To disable the guest login option, in the
app-config.yamlfile, set the authentication environment toproduction:auth: environment: production
Verification
- Go to the Developer Hub login page.
- Your Developer Hub sign-in page displays Sign in using GitHub and the Guest user sign-in is disabled.
- Log in with a GitHub account.
10.2.6.5. Enable authentication with Microsoft Azure
Configure Microsoft Azure as your Red Hat Developer Hub sign-in provider.
Prerequisites
Procedure
Add the Microsoft authentication provider to your
app-config.yamlfile:auth: environment: production providers: microsoft: production: clientId: ${MICROSOFT_CLIENT_ID} clientSecret: ${MICROSOFT_CLIENT_SECRET} tenantId: ${MICROSOFT_TENANT_ID} signInPage: microsoftenvironment-
Enter
productionto disable the Guest login option in the Developer Hub login page. clientId-
Enter the configured secret variable name:
${MICROSOFT_CLIENT_ID}. clientSecret-
Enter the configured secret variable name:
${MICROSOFT_CLIENT_SECRET}. tenantId-
Enter the configured secret variable name:
${MICROSOFT_TENANT_ID}. signInPage-
Enter
microsoftto set the Azure provider as your Developer Hub sign-in provider.
Optional: Add optional fields to the Microsoft authentication provider section in your
app-config.yamlfile:auth: environment: production providers: microsoft: production: clientId: ${MICROSOFT_CLIENT_ID} clientSecret: ${MICROSOFT_CLIENT_SECRET} tenantId: ${MICROSOFT_TENANT_ID} domainHint: ${MICROSOFT_TENANT_ID} additionalScopes: - Mail.Send sessionDuration: hours: 24 signIn: resolvers: - resolver: usernameMatchingUserEntityName dangerouslyAllowSignInWithoutUserInCatalog: true signInPage: microsoftdomainHintLeave this parameter empty, or enter the tenant ID when your application registration is single-tenant.
Leave this parameter empty when your application registration is multitenant.
Enter the tenant ID to reduce login friction for users with accounts in multiple tenants, by automatically filtering out accounts from other tenants. For more information, see Home Realm Discovery.
additionalScopes-
Enter the list of additional scopes to add scopes for the application registration. The default and mandatory value lists following scopes:
openid,offline_access,profile,email,User.Read. sessionDuration-
Lifespan of the user session. Enter a duration in
mslibrary (such as '24h', '2 days'), ISO duration, or "human duration" format. signIn.resolversAfter successful authentication, Developer Hub resolves the user signing in to an existing user in the Developer Hub catalog. To best match users securely for your use case, consider configuring a specific resolver.
Enter the resolver list to override the default resolver:
userIdMatchingUserEntityAnnotation.The authentication provider tries each sign-in resolver in order until it succeeds, and fails if none succeed.
WarningIn production mode, configure only one resolver to make sure users are securely matched.
resolverEnter the sign-in resolver name. Available resolvers:
emailMatchingUserEntityAnnotation- Use this resolver to look up the user by matching their Microsoft email to the email entity annotation.
emailLocalPartMatchingUserEntityName- Use this resolver to look up the user by matching their Microsoft email user name to the user entity name.
emailMatchingUserEntityProfileEmail- Use this resolver to look up the user by matching their Microsoft email to the user entity profile email.
dangerouslyAllowSignInWithoutUserInCatalogEnter
trueto configure the sign-in resolver to bypass the user provisioning requirement in the Developer Hub software catalog.WarningIn production mode, do not enable
dangerouslyAllowSignInWithoutUserInCatalog.
To disable the guest login option, in the
app-config.yamlfile, set the authentication environment toproduction:auth: environment: production
Verification
- Go to the Developer Hub login page.
- Your Developer Hub sign-in page displays Sign in using Microsoft and the Guest user sign-in is disabled.
- Log in with an Azure account.
10.2.6.6. Enable authentication with GitLab
Configure GitLab as your Red Hat Developer Hub sign-in provider.
Prerequisites
- You have shared secrets with GitLab.
- You have provisioned users and groups to the software catalog.
Procedure
Add a GitLab authentication provider section to your RHDH
app-config.yamlfile:includeTransitiveGroupOwnership: true signInPage: gitlab auth: environment: production session: secret: <name_of_secret> providers: gitlab: production: audience: https://${GITLAB_HOST} clientId: ${GITLAB_CLIENT_ID} clientSecret: ${GITLAB_CLIENT_SECRET} callbackUrl: https://__<my_developer_hub_domain>__/api/auth/gitlab/handler/frameaudience-
Enter your GitLab instance address:
https://${GITLAB_HOST} clientId-
Enter the configured client ID:
${GITLAB_CLIENT_ID}. clientSecret-
Enter the configured secret variable name:
${GITLAB_CLIENT_SECRET}. callbackUrl-
Enter your Developer Hub authentication backend URL:
https://<my_developer_hub_domain>/api/auth/gitlab/handler/frame
To disable the guest login option, in the
app-config.yamlfile, set the authentication environment toproduction:auth: environment: production
Verification
- Go to the Developer Hub login page.
- Your Developer Hub sign-in page displays Sign in using GitLab and the Guest user sign-in is disabled.
- Log in with a GitLab account.
10.2.6.7. Enable authentication with PingFederate
You can enable authentication with PingFederate to allow users to sign in to Developer Hub by using their PingFederate credentials and match authenticated users to their LDAP catalog entities.
Prerequisites
- You have administrative access to PingFederate with a configured LDAP Data Store.
- You have configured the LDAP catalog provider in Developer Hub.
- You have added a custom Developer Hub application configuration, and have enough permissions to modify it.
Procedure
Configure the LDAP Data Store for binary attributes.
Configure the Data Store to treat unique identifiers as binary data to ensure they are processed correctly for OGNL transformations.
- In PingFederate, go to System > Data Stores and edit your LDAP store.
-
In Advanced options > LDAP Binary Attributes, add
objectGUIDto the list. -
In the Attribute Source lookup configuration, set the Encoding Type for
objectGUIDto Hex.
Create the Authentication Policy Contract.
The contract bridges the LDAP directory and the OIDC policy, transforming the binary GUID into a string format.
-
Create a new contract named
rhdh-contract. - Add an Attribute Source linked to your LDAP Data Store.
-
Set the Search Filter to
sAMAccountName=${username}. -
Expose the LDAP UUID attribute (for example,
objectGUIDfor Active Directory) within the contract. Under Contract Fulfillment, map thesubclaim to theobjectGUIDfrom LDAP by using an Expression source. Enter the following OGNL expression to format the binary GUID as a UUID string:
#GUID = #this.get("ds.<ldap-data-source-id>.objectGUID").toString(), #GUID.substring(6,8) + #GUID.substring(4,6) + #GUID.substring(2,4) + #GUID.substring(0,2) + "-" + #GUID.substring(10,12) + #GUID.substring(8,10) + "-" + #GUID.substring(14,16) + #GUID.substring(12,14) + "-" + #GUID.substring(16,20) + "-" + #GUID.substring(20,32)Replace
<ldap-data-source-id>with the ID of your LDAP Data Store in PingFederate.
-
Create a new contract named
Configure OAuth and OIDC scopes.
Ensure PingFederate allows the standard OIDC scopes requested by Developer Hub.
- Navigate to System > OAuth Scopes.
-
Ensure
emailandprofileare added to the Common Scopes list.
Bridge the contract to the OIDC policy.
Configure the policy to deliver the transformed UUID through the
subclaim in the ID token and UserInfo endpoint.-
Access Token Mapping: Map the
subfield fromrhdh-contractto your Access Token Manager. -
OIDC Policy Fulfillment: Fulfill the
subclaim by selecting Access Token as the source andsubas the value. -
Enable Delivery: In the OIDC Policy Attribute Contract, select the ID Token and UserInfo checkboxes for the
subclaim. -
Extend Contract: Add
ldap_uuidto the Attribute Contract and map it to thesubvalue by using the Access Token to ensure consistency.
-
Access Token Mapping: Map the
Create the OIDC client.
- In PingFederate, go to Applications > OAuth Clients and click Add Client.
- Under Client Authentication, select Client Secret, generate a secret, and save it.
-
Enter the Redirect URI:
https://<my_developer_hub_domain>/api/auth/oidc/handler/frame. - Under Allowed Grant Types, select Authorization Code.
- Under OpenID Connect > Policy, select the OIDC policy you created.
Save the following values for the next step:
- Client ID
- Client Secret
-
OIDC metadata URL: The
.well-known/openid-configurationendpoint URL for your PingFederate instance.
- Create a long, complex, and unique string to use as the Developer Hub session secret key.
Add your PingFederate credentials and the session secret key to Developer Hub, by adding the following key-value pairs to your Developer Hub secrets. You can use these secrets in the Developer Hub configuration files by using their environment variable name.
AUTH_OIDC_CLIENT_ID- Enter the saved Client ID.
AUTH_OIDC_CLIENT_SECRET- Enter the saved Client Secret.
AUTH_OIDC_METADATA_URL- Enter the saved OIDC metadata URL.
SESSION_SECRET- Enter the created session secret key.
Enable session support by adding the session secret to your
app-config.yamlfile:auth: session: secret: ${SESSION_SECRET}Enable the PingFederate authentication provider with the LDAP UUID matching resolver by adding the OIDC provider section in your
app-config.yamlfile:auth: environment: production providers: oidc: production: metadataUrl: ${AUTH_OIDC_METADATA_URL} clientId: ${AUTH_OIDC_CLIENT_ID} clientSecret: ${AUTH_OIDC_CLIENT_SECRET} signIn: resolvers: - resolver: oidcLdapUuidMatchingAnnotation ldapUuidKey: sub signInPage: oidcenvironment: production-
Mark the environment as
productionto hide the Guest login on the Developer Hub home page. metadataUrl- Enter your PingFederate OIDC metadata URL, defined earlier.
clientId- Enter your Developer Hub application client ID in PingFederate, defined earlier.
clientSecret- Enter your Developer Hub application client secret in PingFederate, defined earlier.
oidcLdapUuidMatchingAnnotation-
Match the authenticated user to an LDAP catalog entity by using the LDAP UUID. By default, Developer Hub attempts to match the
ldap_uuidclaim from the UserInfo endpoint to the LDAP catalog entity. ldapUuidKey-
Enter the claim key containing the LDAP UUID. Set to
subto use thesubclaim, which contains the transformed UUID from the PingFederate policy contract. signInPage-
Enter
oidcto enable the OIDC provider as the default sign-in provider.
Verification
- Go to the Developer Hub login page.
- Verify that the Developer Hub sign-in page displays Sign in using OIDC and the Guest user sign-in is disabled.
- Log in with OIDC by using your PingFederate user credentials.
10.2.6.8. Enable user authentication with GitHub as an auxiliary authentication provider
If your primary authentication provider is not GitHub, you can configure GitHub as an auxiliary provider to grant users the GitHub permissions needed for templates or plugins, without re-resolving user identities.
Prerequisites
You have enough permissions in GitHub to create and manage a GitHub App.
TipAlternatively, ask your GitHub administrator to prepare the required GitHub App.
- You have added a custom Developer Hub application configuration, and have enough permissions to change it.
- You have configured a primary authentication provider to provision user and group identities to the Red Hat Developer Hub software catalog, and establish Developer Hub user sessions.
Procedure
Add the
auth.providers.githubsection to yourapp-config.yamlfile:auth: providers: github: production: clientId: ${GITHUB_APP_CLIENT_ID} clientSecret: ${GITHUB_APP_CLIENT_SECRET} disableIdentityResolution: truewhere:
clientId:: Enter the configured secret variable name:${GITHUB_APP_CLIENT_ID}.clientSecret-
Enter the configured secret variable name:
${GITHUB_APP_CLIENT_SECRET}. disableIdentityResolution-
Enter
trueto skip user identity resolution for this provider to enable sign-in from an auxiliary authentication provider.
WarningDo not enable this setting on the primary authentication provider you plan on using for sign-in and identity management.
To disable the guest login option, in the
app-config.yamlfile, set the authentication environment toproduction:auth: environment: production
Verification
- Go to the Developer Hub login page.
- Log in with your primary authentication provider account.
- In the top user menu, go to Settings > Authentication Providers.
- In the GitHub line, click the Sign in button and log in.
- In the GitHub line, the button displays Sign out.
Additional resources
10.2.7. Connect your platform to external identity providers and APIs
10.2.7.1. Connect your platform to external identity providers and APIs
Enable authentication with external services to allow Red Hat Developer Hub to communicate with secondary identity providers and external APIs.
10.2.7.2. Configure service-to-service authentication to secure API calls
10.2.7.2.1. Configure service-to-service authentication to secure API calls
You can configure service-to-service authentication to secure communication between services, including plugin-to-plugin and external-service-to-plugin communication.
The availability of service-to-service authentication might vary for REST APIs. Each plugin defines the restrictions on this feature. Consult your specific plugin’s documentation for detailed limitations.
For example, the RBAC plugin supports exclusively all GET requests, but no POST requests.
10.2.7.2.2. Enable service-to-service authentication by using a static token
You can use a static token to enable service-to-service authentication. This method is simpler to set up than JWKS tokens but requires careful token management to ensure security. * Following security best practices.
Some security best practices when using static tokens include:
- Regular rotation
- Rotate tokens on a regular schedule to limit the impact of potential leaks. Document the rotation process to ensure consistency.
- Secure storage
-
Never store tokens in plain text in the
app-config.yamlconfiguration file. Instead, use the environment variable mechanism available in Developer Hub. - Access control
- Implement the principle of least privilege, restricting tokens to specific plugins and operations; regularly review and update access permissions.
- Analyze logs
- Monitor and track token usage to identify unusual patterns and set up alerts for failed authentication attempts if you have a monitoring system integration available.
- Documentation
- Document all authentication methods in use and keep an inventory of all tokens and their purposes, and keep security policies up to date.
Static token authentication might be a good solution for simple, non-critical scenarios, such as:
- Development and testing environments
- These require quick setup and configuration, simple debugging and troubleshooting, and easy integration with development tools. Static token authentication can be an easy option, especially when using ephemeral testing environments.
- Simple automation tasks
- Basic CI/CD pipelines, simple maintenance scripts, and basic monitoring systems.
- Internal tools and utilities
- Development tools, testing frameworks, and internal automation scripts.
However, static token authentication might not be suitable for:
- Production environments with high security requirements.
- Systems handling sensitive data.
- Large-scale deployments with many external services.
- Environments requiring frequent token rotation.
Prerequisites
- You have administrative access to configure Developer Hub in your OpenShift cluster.
Procedure
Generate a secure token.
You can use a tool such as Node.js:
$ node -p'require('crypto').randomBytes(24).toString('base64')'This command generates a 24-byte random value and encodes it in base64 format. The resulting token is sufficiently strong for authentication purposes, and properly encoded for use in HTTP headers.
-
Add the generated token in your Developer Hub secrets in OpenShift to define the
<YOUR_SERVICE_TOKEN_ENV_VAR>environment variable where your services can access it. Add the generated token or JWKS URL to your
app-config.yamlDeveloper Hub configuration file in OpenShift.backend: auth: - type: static options: token: "$<YOUR_SERVICE_TOKEN_ENV_VAR>" subject: "<your_service_name>" accessRestrictions: - plugin: "<target_plugin_name>"type-
Enter
staticto specify that authentication is using a static token. optionsEnter the configuration options for static token authentication.
token- Enter the environment variable name from the earlier step.
subject- (Optional) Enter a unique identifier for the service that will be using this token.
plugin- (Optional) Enter the name of the target plugin that the service will communicate with.
Use the token in the
Authorizationheader of your service requests.When making requests from one service to another, include the static token in the
Authorizationheader as follows:Authorization: Bearer <your_generated_token>Replace
<your_generated_token>with the actual token you generated in step 1.For instance, to list all available locations in the catalog by using the
curlcommand, you would use:$ curl --location --request GET 'https://<my_developer_hub_domain>/api/catalog/locations' \ --header 'Content-Type: application/json' \ --header 'Authorization: Bearer <your_generated_token>'
Verification
-
In the Audit Logs of the service receiving the request, verify that Developer Hub authenticated the request successfully by using the
subjectvalue as the actor.
10.2.7.2.3. Enable service-to-service authentication by using JSON web key sets (JWKS) tokens
You can use JSON Web Key Sets (JWKS) tokens to enable service-to-service authentication.
Consider using JWKS tokens when you need a more secure and scalable authentication method compared to static tokens. While JWKS tokens require more setup and configuration, they offer enhanced security features that are crucial for production environments and sensitive applications:
- Asymmetric encryption
- Your trusted Identity Provider issues JWKS tokens by using asymmetric encryption. JWKS uses a pair of shared keys: one public, one private, instead of a single shared static token. The Identity Provider signs the JSON Web Token (JWT) with its private key, then Developer Hub verifies it using the public key fetched from the JWKS endpoint. Developer Hub can validate these tokens without sharing secret keys directly. This means Developer Hub never has access to the private signing key, reducing the risk of compromise.
- Easy key rotation
- The Identity Provider can rotate signing keys regularly without requiring changes to Developer Hub afterward. This minimizes downtime and enhances security.
- Ability to validate claims
- JWKS tokens include claims such as issuer and audience. Developer Hub can verify these claims to ensure the token is from a trusted source and prevent the external service from using the token in unintended contexts.
The diagram illustrates the authentication flow between an external service and Developer Hub:
- The external service requests, receives, and returns an access token from the identity provider to request a resource from Developer Hub.
- The identity provider issues a JWKS token signed with its private key, and provides the public key via the JWKS endpoint.
- Developer Hub receives and validates the token and its claims.
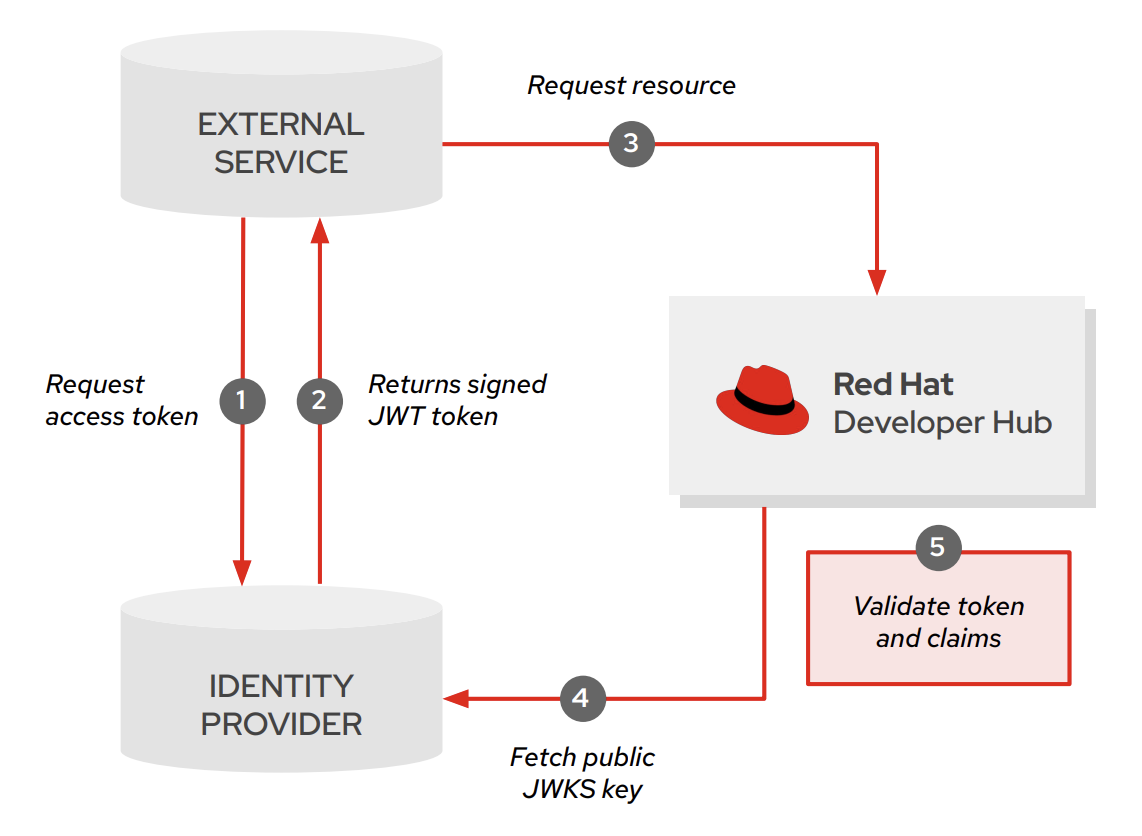
Prerequisites
- You have administrative access to configure Developer Hub in your OpenShift cluster.
- Developer Hub can access a JWKS endpoint available from your Identity Provider.
-
You have configured the external service to obtain a JWT from your Identity Provider and include it in the
Authorizationheader of requests to Developer Hub.
Procedure
Add the JWKS URL to your
app-config.yamlDeveloper Hub configuration file:backend: auth: externalAccess: - type: jwks options: url: <your_jwks_endpoint> algorithm: RS256 issuer: <your_issuer_claim> audience: <your_audience_claim> subjectPrefix: <your_subject_prefix>where:
type-
Enter
jwksto specify that authentication is using JWKS tokens. optionsEnter the configuration options for JWKS authentication.
url-
Enter the URL of your JWKS endpoint, such as
http://your-idp.example.com/well-known/jwks.json. algorithm-
(Optional) Enter the signing algorithm used by your Identity Provider, such as
RS256. issuer-
(Optional) Enter the expected issuer claim in the token
issfield, such ashttp://your-idp.example.com. audience-
(Optional) Enter the expected audience claim in the token
audfield, such asmanagement. subjectPrefix-
(Optional) Enter a prefix to add to the subject claim, and to display in the Audit Log for debugging and tracking purposes, such as
your_prefix.
10.2.7.2.4. Set access restrictions to external service tokens
By default, when you configure service-to-service access in Red Hat Developer Hub, any external service with a valid token has unrestricted access to all backend plugins and actions. To limit the scope of an external service, you can define access restrictions.
Procedure
Restrict access to specific plugins.
For example, to restrict access to the catalog plugin for the static tokens, add the following
accessRestrictionssection to yourapp-config.yamlDeveloper Hub configuration file:backend: auth: externalAccess: - type: static accessRestrictions: - plugin: catalogtype-
Specify whether this is a
jwksorstatictoken. plugin-
Specify the allowed plugin, such as
catalog,scaffolder, ortechdocs.
With this configuration:
-
The token is only allowed to make requests to the
catalogplugin. -
The token has unrestricted access to all actions within the
catalogplugin.
Restrict access by action attributes, to filter permissions based on what kind of action to allow.
List the specific actions defined by the permission, such as
createandread.backend: auth: externalAccess: - type: jwks accessRestrictions: - plugin: catalog permissionAttribute: action: - create - readRestrict access by explicit permission IDs, to control access at the permission rule level.
List the exact ID of the permission to allow.
backend: auth: externalAccess: - type: jwks accessRestrictions: - plugin: catalog permission: - catalog.entity.create - catalog.entity.readBy choosing between explicit permission IDs and action-based attributes, you can strike the right balance between precision and flexibility depending on your external service needs.
10.2.8. Configure session expiration and auto-logout policies
10.2.8.1. Configure session expiration and auto-logout policies
You can manage how long users stay authenticated in Red Hat Developer Hub by configuring session duration and auto-logout settings.
10.2.8.2. Session management
10.2.8.2.1. Session management
Session management in Red Hat Developer Hub involves multiple mechanisms that control how long users stay authenticated and what happens when sessions expire.
10.2.8.2.2. Understand session management in Developer Hub
Session management in Red Hat Developer Hub involves multiple mechanisms that control how long users stay authenticated and what happens when sessions expire.
10.2.8.2.2.1. What happens when a session expires
When a session approaches expiration, Developer Hub can display a pre-expiration warning dialog that includes a countdown timer. The timing of this warning depends on how you configure the auto-logout feature.
After the session expires, Developer Hub redirects the user to the login page. To continue working, the user must re-authenticate with the configured identity provider and is then returned to Developer Hub.
10.2.8.2.2.2. AutoLogout (frontend inactivity)
The AutoLogout feature monitors user activity in the browser and logs out the user after a configurable idle period. AutoLogout revokes the refresh token for Developer Hub, but does not end the Identity Provider (IdP) session. The logout mechanism is the same as if you manually logout from the user settings page.
You configure AutoLogout under the auth.autologout section of your app-config.yaml file.
10.2.8.2.2.3. Session duration (provider-level)
Session duration controls the absolute session lifetime regardless of user activity. This is a backend HTTP-only cookie configuration. When this duration elapses, no warning popup is displayed. Instead, the user is redirected to the sign-in page the next time they interact with Developer Hub, such as navigating to a new page or refreshing the browser.
You configure session duration per provider by using the auth.providers.<name>.<env>.sessionDuration parameter in your app-config.yaml file. This parameter accepts milliseconds, ISO duration, or human-readable duration values (for example, 24h, 2 days).
10.2.8.2.2.4. Identity Provider session settings
Your Identity Provider (IdP), such as Red Hat Build of Keycloak, GitHub, Microsoft Azure, or GitLab, maintains its own session timeout independently of Developer Hub.
Signing out of Developer Hub does not end the IdP SSO session. This is expected behavior. If the IdP session is still active when a user signs back in to Developer Hub, re-authentication might be seamless, with no password prompt.
10.2.8.2.2.5. How the mechanisms interact
The three session management mechanisms operate at different layers:
- AutoLogout
- Triggers on user inactivity in the browser. Frontend-only: does not revoke tokens or end server-side sessions.
- Session duration
- Controls the absolute session lifetime on the server side. The session expires after the configured duration regardless of user activity. No warning popup is displayed; the user is redirected to the sign-in page on next interaction.
- Identity Provider session
- Outlives Developer Hub sign-out. A user might re-enter Developer Hub without a password prompt if the IdP session is still active.
The mechanism with the shortest timeout takes effect first. For example, if AutoLogout is set to 30 minutes of idle time but the session duration is set to 15 minutes, the session expires after 15 minutes regardless of user activity.
Additional resources
10.2.8.3. Configure session management
You can configure the session duration for your authentication provider in Red Hat Developer Hub.
Prerequisites
- You have administrative access to the Red Hat Developer Hub configuration files.
Procedure
To set the absolute session lifetime for an authentication provider, add the
sessionDurationparameter to yourapp-config.yamlfile:auth: providers: <name>: <env>: sessionDuration: 24hsessionDurationEnter the session lifetime in milliseconds, ISO duration, or human-readable format (for example,
24h,2 days). When this duration elapses, the session expires regardless of user activity.This parameter is not set by default.
- Restart the Red Hat Developer Hub application to apply the changes.
Additional resources
10.2.8.4. Enable auto-logout for inactive users
To enhance security, you can configure Red Hat Developer Hub to automatically log out users after a specified period of inactivity. This helps prevent unauthorized access to stale user sessions.
Prerequisites
Procedure
Add the
auth.autologoutsection to your{my-app-config.yaml}file.auth: autologout: enabled: true idleTimeoutMinutes: 60 promptBeforeIdleSeconds: 10 useWorkerTimers: false logoutIfDisconnected: truewhere:
enabledEnter
trueto enable auto-logout.Enter
falseto disable auto-logout.The default value is
false.idleTimeoutMinutes(Optional) Enter the number of minutes of inactivity before automatically logging out the user.
The default value is
60minutes.promptBeforeIdleSeconds(Optional) Enter the number of seconds before the auto-logout occurs to prompt the user about the pending logout.
The default value is
10seconds.useWorkerTimers(Optional) Enter
falseto use main thread timers, when your browser does not support web workers. Your browser might stop timers in inactive tabs, which can affect the auto-logout functionality.Enter
trueto use web worker timers for tracking user activity, and avoid issues when your browser stops timers in inactive tabs.The default value is
false.logoutIfDisconnected(Optional) Enter
trueto log out the users with no active connection, in case of network issues, or when they have no active Developer Hub tab open in their browser.Enter
falseto keep the user logged in during temporary disconnections, or when they have no active Developer Hub tab open in their browser.The default value is
true.
- Restart the Red Hat Developer Hub application to apply the changes.
Verification
- Log in to the Red Hat Developer Hub application.
-
Remain inactive for the duration specified in
idleTimeoutMinutes. -
Observe that a prompt is displayed before the auto-logout occurs, as specified in
promptBeforeIdleSeconds. - Confirm that you are automatically logged out after the inactivity period.
10.2.8.5. Reduce the size of issued tokens
If user identity tokens grow large and cause HTTP errors, you can use the omitIdentityTokenOwnershipClaim flag to remove the ent claim from the JWT payload and reduce token size.
Procedure
In the
app-config.yamlfile, setomitIdentityTokenOwnershipClaimtotrueas follows:auth: omitIdentityTokenOwnershipClaim: true
10.3. Define authorization policies to restrict access based on user roles
10.3.1. Define authorization policies to restrict access based on user roles
Configure role-based access control (RBAC) to define roles, permissions, and policies for users and groups in Developer Hub.
Role-based access control (RBAC) is a security concept that defines how to control access to resources in a system by specifying a mapping between users of the system and the actions that those users can perform on resources in the system. You can use RBAC to define roles with specific permissions and then assign the roles to users and groups.
RBAC on Developer Hub is built on top of the Permissions framework, which defines RBAC policies in code. Rather than defining policies in code, you can use the Developer Hub RBAC feature to define policies in a declarative fashion by using a simple CSV based format. You can define the policies by using Developer Hub web interface or REST API instead of editing the CSV directly.
An administrator can define authorizations in Developer Hub by taking the following steps:
- Enable the RBAC feature and give authorized users access to the feature.
Define roles and policies by combining the following methods:
- The Developer Hub policy administrator uses the Developer Hub web interface or REST API.
- The Developer Hub administrator edits the main Developer Hub configuration file.
- The Developer Hub administrator edits external files.
10.3.2. Enable and give access to the role-based access control (RBAC) feature
Enable the RBAC plugin and declare policy administrators to manage permissions and access the RBAC REST API and Web UI.
The role-based access control (RBAC) feature is disabled by default. Enable the RBAC plugin and declare policy administrators to start using RBAC features.
The permission policies for users and groups in the Developer Hub are managed by permission policy administrators. Only permission policy administrators can access the RBAC REST API.
Prerequisites
Procedure
The RBAC plugin is installed but disabled by default. To enable the
./dynamic-plugins/dist/backstage-community-plugin-rbacplugin, edit yourdynamic-plugins.yamlwith the following content.dynamic-plugins.yamlfragmentplugins: - package: ./dynamic-plugins/dist/backstage-community-plugin-rbac disabled: falseSee Installing and viewing plugins in Red Hat Developer Hub.
Declare policy administrators to enable a select number of authenticated users to configure RBAC policies through the REST API or Web UI, instead of changing the CSV file directly.
The permissions can be specified in a separate CSV file referenced in your
my-rhdh-app-configconfig map, or permissions can be created using the REST API or Web UI.To declare users such as <your_policy_administrator_name> as policy administrators, edit your custom Developer Hub ConfigMap, such as
app-config-rhdh, and add following code to theapp-config.yamlcontent:app-config.yamlfragmentpermission: enabled: true rbac: admin: users: - name: user:default/<your_policy_administrator_name>To display the available permissions provided by installed plugins in the Developer Hub UI, you must supply the corresponding list of plugin IDs. There are two ways to do this, by updating your application configuration or by using the RBAC REST API permissions endpoint.
To supply plugins by updating your application configuration, you can specify the plugins with permissions in your
app-config.yamlfile as follows:app-config.yamlfragmentpermission: enabled: true rbac: admin: users: - name: user:default/<your_policy_administrator_name> pluginsWithPermission: - catalog - scaffolder - permission- To specify the plugins with permissions by using the RBAC REST API permissions endpoint, see the RBAC REST API permissions endpoint.
Verification
- Sign out from the existing Red Hat Developer Hub session and log in again using the declared policy administrator account.
With RBAC enabled, most features are disabled by default.
- Navigate to the Catalog page in RHDH. The Create button is not visible. You cannot create new components.
- Navigate to the API page. The Register button is not visible.
Next steps
- Explicitly enable permissions to resources in Developer Hub.
10.3.3. Determine permission policy and role configuration source
Identify the source of permission policies and roles to keep data consistency and find which source controls each resource.
You can configure Red Hat Developer Hub policy and roles by using different sources. To keep data consistency, Developer Hub associates each permission policy and role with one unique source. You can only use this source to change the resource.
The available sources are:
- Configuration file
Configure roles and policies in the Developer Hub
app-config.yamlconfiguration file, for instance to declare your policy administrators.The Configuration file pertains to the default
role:default/rbac_adminrole provided by the RBAC plugin. The default role has limited permissions to create, read, update, delete permission policies or roles, and to read catalog entities.NoteIn case the default permissions are insufficient for your administrative requirements, you can create a custom admin role with the required permission policies.
- REST API
- Configure roles and policies by using the Developer Hub Web UI or by using the REST API.
- CSV file
- Configure roles and policies by using external CSV files.
- Legacy
The legacy source applies to policies and roles defined before RBAC backend plugin version
2.1.3, and is the least restrictive among the source location options.ImportantReplace the permissions and roles using the legacy source with the permissions using the REST API or the CSV file sources.
Procedure
-
To find the source of a role or policy, use a
GETrequest.
10.3.4. Design your policy rules
Design policy rules carefully to avoid permission conflicts and unintended access denials in Developer Hub.
Carefully design your policies to avoid permission conflicts that can result in unintended access denials.
Red Hat Developer Hub applies policies as follows:
-
The default policy is
deny. - A conditional rule overrides a basic rule.
-
A
denybasic rule overrides anallowbasic rule. -
An
allowconditional rule overrides adenybasic rule. -
A
denyconditional rule overrides anallowconditional rule.
Procedure
-
Use
allowrules to explicitly allow access. -
Avoid creating
denyrules unless you know precisely how they can affect existing basicallowrules and existing conditional rules.
10.3.5. Manage roles using the Web UI
10.3.5.1. Manage roles using the Web UI
Use the Developer Hub Web UI to create, modify, and delete roles and assign permissions to users and groups.
Policy administrators can use the Developer Hub web interface (Web UI) to assign specific roles and permissions to individual users or groups. Assigning roles ensures that access to resources and functionalities is regulated across the Developer Hub.
With the policy administrator role in Developer Hub, you can assign permissions to users and groups. This role allows you to view, create, change, and delete the roles by using the Developer Hub Web UI.
10.3.5.2. Create a role in the Red Hat Developer Hub Web UI
Create a role in Developer Hub by using the Web UI to define permissions, users, and groups.
You can create a role in the Red Hat Developer Hub using the Web UI.
Prerequisites
-
If RBAC is enabled, you have a role with the following permissions:
policy.entity.create,policy.entity.read,catalog.entity.read.
Procedure
Go to Administration at the bottom of the sidebar in the Developer Hub.
The RBAC tab is displayed, showing all the created roles in the Developer Hub.
- (Optional) Click any role to view the role information on the OVERVIEW page.
- Click CREATE to create a role.
- Enter the name and description of the role in the given fields and click NEXT.
- Add users and groups using the search field, and click NEXT.
- Select Plugin and Permission from the drop-downs in the Add permission policies section.
- Select or clear the Policy that you want to set in the Add permission policies section, and click NEXT.
- Review the added information in the Review and create section.
- Click CREATE.
Verification
The created role is displayed in the list available in the RBAC tab.
10.3.5.3. Edit a role in the Red Hat Developer Hub Web UI
Edit a role in Developer Hub by using the Web UI to change role details, users, groups, and permission policies.
You can edit a role in the Red Hat Developer Hub using the Web UI.
The policies generated from a policy.csv or ConfigMap file cannot be edited or deleted using the Developer Hub Web UI.
Prerequisites
-
If RBAC is enabled, you have a role with the following permissions:
policy.entity.update,policy.entity.read,catalog.entity.read. - The role that you want to edit is created in the Developer Hub.
Procedure
Go to Administration at the bottom of the sidebar in the Developer Hub.
The RBAC tab is displayed, showing all the created roles in the Developer Hub.
- (Optional) Click any role to view the role information on the OVERVIEW page.
- Select the edit icon for the role that you want to edit.
- Edit the details of the role, such as name, description, users and groups, and permission policies, and click NEXT.
- Review the edited details of the role and click SAVE.
Verification
- After saving the changes, you can view the edited details of the role on the OVERVIEW page of the role.
- You can also edit a role’s users and groups or permissions by using the edit icon on the Users and Groups or Permissions cards on the OVERVIEW page.
10.3.5.4. Delete a role in the Red Hat Developer Hub Web UI
Delete a role in Developer Hub by using the Web UI to remove roles that are no longer needed.
You can delete a role in the Red Hat Developer Hub using the Web UI.
The policies generated from a policy.csv or ConfigMap file cannot be edited or deleted using the Developer Hub Web UI.
Prerequisites
-
If RBAC is enabled, you have a role with the following permissions:
policy.entity.delete,policy.entity.read,catalog.entity.read. - The role that you want to delete is created in the Developer Hub.
Procedure
Go to Administration at the bottom of the sidebar in the Developer Hub.
The RBAC tab is displayed, showing all the created roles in the Developer Hub.
- (Optional) Click any role to view the role information on the OVERVIEW page.
Select the delete icon from the Actions column for the role that you want to delete.
The Delete this role? pop-up is displayed on the screen.
- Click DELETE.
10.3.6. Manage policies using the REST API
10.3.6.1. Manage policies using the REST API
Automate the maintenance of permission policies and roles by using the Developer Hub RBAC REST API.
To automate the maintenance of Red Hat Developer Hub permission policies and roles, you can use Developer Hub role-based access control (RBAC) REST API.
You can perform the following actions with the REST API:
Retrieve information about:
- All permission policies
- Specific permission policies
- Specific roles
- Static plugins permission policies
Create, update, or delete:
- Permission policy
- Role
10.3.6.2. Send requests to the RBAC REST API by using the curl utility
Send RBAC REST API requests by using the curl utility to create, update, and delete roles and permission policies.
You can send RBAC REST API requests by using the curl utility.
Prerequisites
Procedure
Find your Bearer token to authenticate to the REST API.
- In your browser, open the web console Network tab.
- In the main screen, reload the Developer Hub Homepage.
-
In the web console Network tab, search for the
query?term=network call. - Save the token in the response JSON for the next steps.
In a terminal, run the curl command and review the response:
GETrequest, orDELETErequest not requiring JSON body dataEnter a curl command with the following parameters and review the response:
$ curl -v \ -H "Authorization: Bearer <token>" \ -X <method> "https://<my_developer_hub_domain>/<endpoint>" \
POSTorPUTrequest, orDELETErequest requiring JSON body dataEnter a curl command with the following parameters and review the response:
$ curl -v -H "Content-Type: application/json" \ -H "Authorization: Bearer <token>" \ -X <method> "https://<my_developer_hub_domain>/<endpoint>" \ -d <body>
- <token>
- Enter your saved authorization token.
- <method>
Enter the HTTP method for your API endpoint.
GET- To retrieve specified information from a specified resource endpoint.
POST- To create or update a resource.
PUT- To update a resource.
DELETE- To delete a resource.
- https://<my_developer_hub_domain>
- Enter your Developer Hub URL.
- <endpoint>
-
Enter the API endpoint to which you want to send a request, such as
/api/permission/policies. - <body>
Enter the JSON body with data that your API endpoint requires with the HTTP
POST, orPUTrequest, and might require with the HTTPDELETErequest.To create a role:
$ curl -v -H "Content-Type: application/json" \ -H "Authorization: Bearer <token>" \ -X POST "https://<my_developer_hub_domain>/api/permission/roles" \ -d '{ "memberReferences": ["group:default/example"], "name": "role:default/test", "metadata": { "description": "This is a test role" } }'
To update a role:
$ curl -v -H "Content-Type: application/json" \ -H "Authorization: Bearer <token>" \ -X PUT "https://<my_developer_hub_domain>/api/permission/roles/role/default/test" \ -d '{ "oldRole": { "memberReferences": [ "group:default/example" ], "name": "role:default/test" }, "newRole": { "memberReferences": [ "group:default/example", "user:default/test" ], "name": "role:default/test" } }'
To create a permission policy:
$ curl -v -H "Content-Type: application/json" \ -H "Authorization: Bearer $token" \ -X POST "https://<my_developer_hub_domain>/api/permission/policies" \ -d '[{ "entityReference":"role:default/test", "permission": "catalog-entity", "policy": "read", "effect":"allow" }]'To update a permission policy:
$ curl -v -H "Content-Type: application/json" \ -H "Authorization: Bearer $token" \ -X PUT "https://<my_developer_hub_domain>/api/permission/policies/role/default/test" \ -d '{ "oldPolicy": [ { "permission": "catalog-entity", "policy": "read", "effect": "allow" } ], "newPolicy": [ { "permission": "policy-entity", "policy": "read", "effect": "allow" } ] }'To create a condition:
$ curl -v -H "Content-Type: application/json" \ -H "Authorization: Bearer $token" \ -X POST "https://<my_developer_hub_domain>/api/permission/roles/conditions" \ -d '{ "result": "CONDITIONAL", "roleEntityRef": "role:default/test", "pluginId": "catalog", "resourceType": "catalog-entity", "permissionMapping": ["read"], "conditions": { "rule": "IS_ENTITY_OWNER", "resourceType": "catalog-entity", "params": {"claims": ["group:default/janus-authors"]} } }'To update a condition:
$ curl -v -H "Content-Type: application/json" \ -H "Authorization: Bearer $token" \ -X PUT "https://<my_developer_hub_domain>/api/permission/roles/conditions/1" \ -d '{ "result":"CONDITIONAL", "roleEntityRef":"role:default/test", "pluginId":"catalog", "resourceType":"catalog-entity", "permissionMapping": ["read", "update", "delete"], "conditions": { "rule": "IS_ENTITY_OWNER", "resourceType": "catalog-entity", "params": {"claims": ["group:default/janus-authors"]} } }'
Verification
Review the returned HTTP status code:
200OK- The request was successful.
201Created- The request resulted in a new resource being successfully created.
204No Content- The request was successful, and the response payload has no more content.
400Bad Request- Input error with the request.
401Unauthorized- Lacks valid authentication for the requested resource.
403Forbidden- Refusal to authorize request.
404Not Found- Could not find requested resource.
409Conflict- Request conflict with the current state and the target resource.
10.3.6.3. Send requests to the RBAC REST API by using a REST client
Send RBAC REST API requests by using any REST client with authorization tokens and appropriate HTTP methods.
You can send RBAC REST API requests by using any REST client.
Prerequisites
Procedure
Find your Bearer token to authenticate to the REST API.
- In your browser, open the web console Network tab.
- In the main screen, reload the Developer Hub Homepage.
-
In the web console Network tab, search for the
query?term=network call. - Save the token in the response JSON for the next steps.
In your REST client, run a command with the following parameters and review the response:
- Authorization
- Enter your saved authorization token.
- HTTP method
Enter the HTTP method for your API endpoint.
GET- To retrieve specified information from a specified resource endpoint.
POST- To create or update a resource.
PUT- To update a resource.
DELETE- To delete a resource.
- URL
-
Enter your Developer Hub URL and API endpoint: https://<my_developer_hub_domain>/<endpoint>, such as
https://<my_developer_hub_domain>/api/permission/policies. - Body
-
Enter the JSON body with data that your API endpoint might need with the HTTP
POSTrequest.
10.3.6.4. Send requests to the RBAC REST API by using an external service
Send GET requests to the RBAC REST API from an external service authenticated with a service-to-service token.
You can send GET requests to the RBAC REST API by using an external service authenticated by using a service-to-service token.
Prerequisites
- You have access to the RBAC feature.
- The external service can send HTTP GET requests, and is authenticated by using a service-to-service token.
Procedure
-
The external service sends a GET request to the RBAC REST API with the service-to-service token in the
Authorizationheader. - The RBAC REST API validates the service-to-service token, and then processes the request if the token is valid. Otherwise, the RBAC REST API returns an error response.
- The RBAC REST API returns the response to the external service.
- The external service processes the response from the RBAC REST API.
10.3.6.5. Supported REST API endpoints
10.3.6.5.1. Supported REST API endpoints
Reference information about the supported RBAC REST API endpoints for managing roles, permission policies, conditional policies, and user statistics in Developer Hub.
10.3.6.5.2. Supported RBAC REST API endpoints
Reference information about RBAC REST API endpoints for managing roles, permissions, and conditional policies.
The RBAC REST API provides endpoints for managing roles, permissions, and conditional policies in the Developer Hub and for retrieving information about the roles and policies.
10.3.6.5.2.1. Roles
The RBAC REST API supports the following endpoints for managing roles in the Red Hat Developer Hub.
- [GET] /api/permission/roles
Returns all roles in Developer Hub.
Example response (JSON):
[ { "memberReferences": ["user:default/username"], "name": "role:default/guests" }, { "memberReferences": [ "group:default/groupname", "user:default/username" ], "name": "role:default/rbac_admin" } ]- [GET] /api/permission/roles/<kind>/<namespace>/<name>
Returns information for a single role in Developer Hub.
Example response (JSON):
[ { "memberReferences": [ "group:default/groupname", "user:default/username" ], "name": "role:default/rbac_admin" } ]- [POST] /api/permission/roles/<kind>/<namespace>/<name>
- Creates a role in Developer Hub.
| Name | Description | Type | Presence |
|---|---|---|---|
|
|
The |
Request body |
Required |
Example request body (JSON):
+
{
"memberReferences": ["group:default/test"],
"name": "role:default/test_admin"
}Example response:
+
201 Created
- [PUT] /api/permission/roles/<kind>/<namespace>/<name>
-
Updates
memberReferences,kind,namespace, ornamefor a role in Developer Hub.
Request parameters: The request body contains the oldRole and newRole objects:
| Name | Description | Type | Presence |
|---|---|---|---|
|
|
The |
Request body |
Required |
Example request body (JSON):
+
{
"oldRole": {
"memberReferences": ["group:default/test"],
"name": "role:default/test_admin"
},
"newRole": {
"memberReferences": ["group:default/test", "user:default/test2"],
"name": "role:default/test_admin"
}
}Example response:
+
200 OK
- [DELETE] /api/permission/roles/<kind>/<namespace>/<name>?memberReferences=<VALUE>
- Deletes the specified user or group from a role in Developer Hub.
| Name | Description | Type | Presence |
|---|---|---|---|
|
|
Kind of the entity |
String |
Required |
|
|
Namespace of the entity |
String |
Required |
|
|
Name of the entity |
String |
Required |
|
|
Associated group information |
String |
Required |
Example response:
+
204
- [DELETE] /api/permission/roles/<kind>/<namespace>/<name>
- Deletes a specified role from Developer Hub.
| Name | Description | Type | Presence |
|---|---|---|---|
|
|
Kind of the entity |
String |
Required |
|
|
Namespace of the entity |
String |
Required |
|
|
Name of the entity |
String |
Required |
Example response:
+
204
10.3.6.5.2.2. Permission policies
The RBAC REST API supports the following endpoints for managing permission policies in the Red Hat Developer Hub.
- [GET] /api/permission/policies
- Returns permission policies list for all users.
Example response (JSON):
+
[
{
"entityReference": "role:default/test",
"permission": "catalog-entity",
"policy": "read",
"effect": "allow",
"metadata": {
"source": "csv-file"
}
},
{
"entityReference": "role:default/test",
"permission": "catalog.entity.create",
"policy": "use",
"effect": "allow",
"metadata": {
"source": "csv-file"
}
},
]- [GET] /api/permission/policies/<kind>/<namespace>/<name>
- Returns permission policies related to the specified entity reference.
| Name | Description | Type | Presence |
|---|---|---|---|
|
|
Kind of the entity |
String |
Required |
|
|
Namespace of the entity |
String |
Required |
|
|
Name related to the entity |
String |
Required |
Example response (JSON):
+
[
{
"entityReference": "role:default/test",
"permission": "catalog-entity",
"policy": "read",
"effect": "allow",
"metadata": {
"source": "csv-file"
}
},
{
"entityReference": "role:default/test",
"permission": "catalog.entity.create",
"policy": "use",
"effect": "allow",
"metadata": {
"source": "csv-file"
}
}
]- [POST] /api/permission/policies
- Creates a permission policy for a specified entity.
| Name | Description | Type | Presence |
|---|---|---|---|
|
|
Reference values of an entity including |
String |
Required |
|
|
Permission from a specific plugin, resource type, or name |
String |
Required |
|
|
Policy action for the permission, such as |
String |
Required |
|
|
Indication of allowing or not allowing the policy |
String |
Required |
Example request body (JSON):
+
[
{
"entityReference": "role:default/test",
"permission": "catalog-entity",
"policy": "read",
"effect": "allow"
}
]Example response:
+
201 Created
- [PUT] /api/permission/policies/<kind>/<namespace>/<name>
- Updates a permission policy for a specified entity.
Request parameters: The request body contains the oldPolicy and newPolicy objects:
| Name | Description | Type | Presence |
|---|---|---|---|
|
|
Permission from a specific plugin, resource type, or name |
String |
Required |
|
|
Policy action for the permission, such as |
String |
Required |
|
|
Indication of allowing or not allowing the policy |
String |
Required |
Example request body (JSON):
+
{
"oldPolicy": [
{
"permission": "catalog-entity",
"policy": "read",
"effect": "allow"
},
{
"permission": "catalog.entity.create",
"policy": "create",
"effect": "allow"
}
],
"newPolicy": [
{
"permission": "catalog-entity",
"policy": "read",
"effect": "deny"
},
{
"permission": "policy-entity",
"policy": "read",
"effect": "allow"
}
]
}Example response:
+
200
- [DELETE] /api/permission/policies/<kind>/<namespace>/<name>?permission={value1}&policy={value2}&effect={value3}
- Deletes a permission policy added to the specified entity.
| Name | Description | Type | Presence |
|---|---|---|---|
|
|
Kind of the entity |
String |
Required |
|
|
Namespace of the entity |
String |
Required |
|
|
Name related to the entity |
String |
Required |
|
|
Permission from a specific plugin, resource type, or name |
String |
Required |
|
|
Policy action for the permission, such as |
String |
Required |
|
|
Indication of allowing or not allowing the policy |
String |
Required |
Example response:
+
204 No Content
- [DELETE] /api/permission/policies/<kind>/<namespace>/<name>
- Deletes all permission policies added to the specified entity.
| Name | Description | Type | Presence |
|---|---|---|---|
|
|
Kind of the entity |
String |
Required |
|
|
Namespace of the entity |
String |
Required |
|
|
Name related to the entity |
String |
Required |
Example request body (JSON):
+
[
{
"entityReference": "role:default/test",
"permission": "catalog-entity",
"policy": "delete",
"effect": "allow"
},
{
"entityReference": "role:default/test",
"permission": "catalog-entity",
"policy": "update",
"effect": "allow"
}
]Example response:
+
204 No Content
- [GET] /api/permission/plugins/policies
- Returns permission policies for all static plugins.
Example response (JSON):
+
[
{
"pluginId": "catalog",
"policies": [
{
"isResourced": true,
"permission": "catalog-entity",
"policy": "read"
},
{
"isResourced": false,
"permission": "catalog.entity.create",
"policy": "create"
},
{
"isResourced": true,
"permission": "catalog-entity",
"policy": "delete"
},
{
"isResourced": true,
"permission": "catalog-entity",
"policy": "update"
},
{
"isResourced": false,
"permission": "catalog.location.read",
"policy": "read"
},
{
"isResourced": false,
"permission": "catalog.location.create",
"policy": "create"
},
{
"isResourced": false,
"permission": "catalog.location.delete",
"policy": "delete"
}
]
},
...
]- [GET] /api/permission/plugins/id
- Returns object with list plugin IDs:
Example response (JSON):
+
[
{
"ids": ["catalog", "permission"]
}
]- [POST] /api/permission/plugins/id
- Add more plugins IDs defined in the request object.
Request Parameters: object in JSON format.
Example request body (JSON):
+
[
{
"ids": ["scaffolder"]
}
]Returns a status code of 200 and JSON with actual object stored in the server:
Example response (JSON):
+
[
{
"ids": ["catalog", "permission", "scaffolder"]
}
]- [DELETE] /api/permission/plugins/id
- Delete plugins IDs defined in the request object.
Request Parameters: object in JSON format.
Example request body (JSON):
+
[
{
"ids": ["scaffolder"]
}
]Returns a status code of 200 and JSON with actual object stored in the server:
Example response (JSON):
+
[
{
"ids": ["catalog", "permission"]
}
]To prevent an inconsistent state after a deployment restart, the REST API does not allow deletion of plugin IDs that were provided by using the application configuration. These ID values can only be removed through the configuration file.
10.3.6.5.2.3. Conditional policies
The RBAC REST API supports the following endpoints for managing conditional policies in the Red Hat Developer Hub.
- [GET] /api/permission/plugins/condition-rules
- Returns available conditional rule parameter schemas for the available plugins that are enabled in Developer Hub.
Example response (JSON):
+
[
{
"pluginId": "catalog",
"rules": [
{
"name": "HAS_ANNOTATION",
"description": "Allow entities with the specified annotation",
"resourceType": "catalog-entity",
"paramsSchema": {
"type": "object",
"properties": {
"annotation": {
"type": "string",
"description": "Name of the annotation to match on"
},
"value": {
"type": "string",
"description": "Value of the annotation to match on"
}
},
"required": [
"annotation"
],
"additionalProperties": false,
"$schema": "http://json-schema.org/draft-07/schema#"
}
},
{
"name": "HAS_LABEL",
"description": "Allow entities with the specified label",
"resourceType": "catalog-entity",
"paramsSchema": {
"type": "object",
"properties": {
"label": {
"type": "string",
"description": "Name of the label to match on"
}
},
"required": [
"label"
],
"additionalProperties": false,
"$schema": "http://json-schema.org/draft-07/schema#"
}
},
{
"name": "HAS_METADATA",
"description": "Allow entities with the specified metadata subfield",
"resourceType": "catalog-entity",
"paramsSchema": {
"type": "object",
"properties": {
"key": {
"type": "string",
"description": "Property within the entities metadata to match on"
},
"value": {
"type": "string",
"description": "Value of the given property to match on"
}
},
"required": [
"key"
],
"additionalProperties": false,
"$schema": "http://json-schema.org/draft-07/schema#"
}
},
{
"name": "HAS_SPEC",
"description": "Allow entities with the specified spec subfield",
"resourceType": "catalog-entity",
"paramsSchema": {
"type": "object",
"properties": {
"key": {
"type": "string",
"description": "Property within the entities spec to match on"
},
"value": {
"type": "string",
"description": "Value of the given property to match on"
}
},
"required": [
"key"
],
"additionalProperties": false,
"$schema": "http://json-schema.org/draft-07/schema#"
}
},
{
"name": "IS_ENTITY_KIND",
"description": "Allow entities matching a specified kind",
"resourceType": "catalog-entity",
"paramsSchema": {
"type": "object",
"properties": {
"kinds": {
"type": "array",
"items": {
"type": "string"
},
"description": "List of kinds to match at least one of"
}
},
"required": [
"kinds"
],
"additionalProperties": false,
"$schema": "http://json-schema.org/draft-07/schema#"
}
},
{
"name": "IS_ENTITY_OWNER",
"description": "Allow entities owned by a specified claim",
"resourceType": "catalog-entity",
"paramsSchema": {
"type": "object",
"properties": {
"claims": {
"type": "array",
"items": {
"type": "string"
},
"description": "List of claims to match at least one on within ownedBy"
}
},
"required": [
"claims"
],
"additionalProperties": false,
"$schema": "http://json-schema.org/draft-07/schema#"
}
}
]
}
... <another plugin condition parameter schemas>
]- [GET] /api/permission/roles/conditions/:id
- Returns conditions for the specified ID.
Example response (JSON):
+
{
"id": 1,
"result": "CONDITIONAL",
"roleEntityRef": "role:default/test",
"pluginId": "catalog",
"resourceType": "catalog-entity",
"permissionMapping": ["read"],
"conditions": {
"anyOf": [
{
"rule": "IS_ENTITY_OWNER",
"resourceType": "catalog-entity",
"params": {
"claims": ["group:default/team-a"]
}
},
{
"rule": "IS_ENTITY_KIND",
"resourceType": "catalog-entity",
"params": {
"kinds": ["Group"]
}
}
]
}
}- [GET] /api/permission/roles/conditions
- Returns list of all conditions for all roles.
Example response (JSON):
+
[
{
"id": 1,
"result": "CONDITIONAL",
"roleEntityRef": "role:default/test",
"pluginId": "catalog",
"resourceType": "catalog-entity",
"permissionMapping": ["read"],
"conditions": {
"anyOf": [
{
"rule": "IS_ENTITY_OWNER",
"resourceType": "catalog-entity",
"params": {
"claims": ["group:default/team-a"]
}
},
{
"rule": "IS_ENTITY_KIND",
"resourceType": "catalog-entity",
"params": {
"kinds": ["Group"]
}
}
]
}
}
]- [POST] /api/permission/roles/conditions
- Creates a conditional policy for the specified role.
| Name | Description | Type | Presence |
|---|---|---|---|
|
|
Always has the value |
String |
Required |
|
|
String entity reference to the RBAC role, such as |
String |
Required |
|
|
Corresponding plugin ID, such as |
String |
Required |
|
|
Array permission action, such as |
String array |
Required |
|
|
Resource type provided by the plugin, such as |
String |
Required |
|
|
Condition JSON with parameters or array parameters joined by criteria |
JSON |
Required |
|
|
Name of the role |
String |
Required |
|
|
The description of the role |
String |
Optional |
Example request body (JSON):
+
{
"result": "CONDITIONAL",
"roleEntityRef": "role:default/test",
"pluginId": "catalog",
"resourceType": "catalog-entity",
"permissionMapping": ["read"],
"conditions": {
"rule": "IS_ENTITY_OWNER",
"resourceType": "catalog-entity",
"params": {
"claims": ["group:default/team-a"]
}
}
}Example response (JSON):
+
{
"id": 1
}- [PUT] /permission/roles/conditions/:id
- Updates a condition policy for a specified ID.
| Name | Description | Type | Presence |
|---|---|---|---|
|
|
Always has the value |
String |
Required |
|
|
String entity reference to the RBAC role, such as |
String |
Required |
|
|
Corresponding plugin ID, such as |
String |
Required |
|
|
Array permission action, such as |
String array |
Required |
|
|
Resource type provided by the plugin, such as |
String |
Required |
|
|
Condition JSON with parameters or array parameters joined by criteria |
JSON |
Required |
|
|
Name of the role |
String |
Required |
|
|
The description of the role |
String |
Optional |
Example request body (JSON):
+
{
"result": "CONDITIONAL",
"roleEntityRef": "role:default/test",
"pluginId": "catalog",
"resourceType": "catalog-entity",
"permissionMapping": ["read"],
"conditions": {
"anyOf": [
{
"rule": "IS_ENTITY_OWNER",
"resourceType": "catalog-entity",
"params": {
"claims": ["group:default/team-a"]
}
},
{
"rule": "IS_ENTITY_KIND",
"resourceType": "catalog-entity",
"params": {
"kinds": ["Group"]
}
}
]
}
}Example response:
+
200
- [DELETE] /api/permission/roles/conditions/:id
- Deletes a conditional policy for the specified ID.
Example response:
+
204
10.3.6.5.2.4. User statistics
The licensed-users-info-backend plugin exposes various REST API endpoints to retrieve data related to logged-in users.
No additional configuration is required for the licensed-users-info-backend plugin. If the RBAC backend plugin is enabled, then an administrator role must be assigned to access the endpoints, as the endpoints are protected by the policy.entity.read permission.
The base URL for user statistics endpoints is http://SERVER:PORT/api/licensed-users-info, such as http://localhost:7007/api/licensed-users-info.
- [GET] /users/quantity
- Returns the total number of logged-in users.
Example request:
+
curl -X GET "http://localhost:7007/api/licensed-users-info/users/quantity" \ -H "Content-Type: application/json" \ -H "Authorization: Bearer $token"
Example response:
+
{ "quantity": "2" }- [GET] /users
- Returns a list of logged-in users with their details.
Example request:
+
curl -X GET "http://localhost:7007/api/licensed-users-info/users" \ -H "Content-Type: application/json" \ -H "Authorization: Bearer $token"
Example response:
+
[
{
"userEntityRef": "user:default/dev",
"lastTimeLogin": "Thu, 22 Aug 2024 16:27:41 GMT",
"displayName": "John Leavy",
"email": "dev@redhat.com"
}
]- [GET] /users
- Returns a list of logged-in users in CSV format.
Example request:
+
curl -X GET "http://localhost:7007/api/licensed-users-info/users" \ -H "Content-Type: text/csv" \ -H "Authorization: Bearer $token"
Example response:
+
userEntityRef,displayName,email,lastTimeLogin user:default/dev,John Leavy,dev@redhat.com,"Thu, 22 Aug 2024 16:27:41 GMT"
10.3.6.5.3. User statistics in Red Hat Developer Hub
Monitor active user counts and download user lists by using the licensed-users-info-backend plugin for licensing transparency.
In Red Hat Developer Hub, the licensed-users-info-backend plugin provides statistical information about the logged-in users by using the Web UI or REST API endpoints.
The licensed-users-info-backend plugin enables administrators to monitor the number of active users on Developer Hub. Using this feature, organizations can compare their actual usage with the number of licenses they have purchased. Additionally, you can share the user metrics with Red Hat for transparency and exact licensing.
The licensed-users-info-backend plugin is enabled by default. This plugin enables a Download User List link at the bottom of the Administration → RBAC tab.
10.3.7. Define policies in external files to provision permissions during cluster deployment
10.3.7.1. Define policies in external files to provision permissions during cluster deployment
Configure permissions and roles in external files before starting Developer Hub to automate maintenance.
To automate Red Hat Developer Hub maintenance, you can configure permissions and roles in external files, before starting Developer Hub.
10.3.7.2. Define authorizations in external files by using the Operator
Define permissions and roles in external CSV and YAML files and configure Developer Hub to use them with the Operator.
To automate Red Hat Developer Hub maintenance, you can define permissions and roles in external files, before starting Developer Hub. You need to prepare your files, upload them to your OpenShift Container Platform project, and configure Developer Hub to use the external files.
Prerequisites
Procedure
Define your policies in a
rbac-policies.csvCSV file by using the following format:Define role permissions:
p, <role_entity_reference>, <permission>, <action>, <allow_or_deny>
- <role_entity_reference>
-
Role entity reference, such as:
role:default/guest. - <permission>
Permission, such as:
bulk.import,catalog.entity.read, orcatalog.entity.refresh, or permission resource type, such as:bulk-importorcatalog-entity.- <action>
-
Action type, such as:
use,read,create,update,delete. - <allow_or_deny>
-
Access granted:
allowordeny.
Assign the role to a group or a user:
g, <group_or_user>, <role_entity_reference>
- <group_or_user>
Group, such as:
user:default/mygroup, or user, such as:user:default/myuser.p, role:default/guests, catalog-entity, read, allow p, role:default/guests, catalog.entity.create, create, allow g, user:default/my-user, role:default/guests g, group:default/my-group, role:default/guests
Define your conditional policies in a
rbac-conditional-policies.yamlYAML file by using the following format:result: CONDITIONAL roleEntityRef: <role_entity_reference> pluginId: <plugin_id> permissionMapping: - read - update - delete conditions: <conditions>
Upload your
rbac-policies.csvandrbac-conditional-policies.yamlfiles to arbac-policiesconfig map in your OpenShift Container Platform project containing Developer Hub.$ oc create configmap rbac-policies \ --from-file=rbac-policies.csv \ --from-file=rbac-conditional-policies.yamlUpdate your
Backstagecustom resource to mount in the Developer Hub filesystem your files from therbac-policiesconfig map:apiVersion: rhdh.redhat.com/v1alpha5 kind: Backstage spec: application: extraFiles: mountPath: /opt/app-root/src configMaps: - name: rbac-policiesUpdate your Developer Hub
app-config.yamlconfiguration file to use therbac-policies.csvandrbac-conditional-policies.yamlexternal files:permission: enabled: true rbac: conditionalPoliciesFile: /opt/app-root/src/rbac-conditional-policies.yaml policies-csv-file: /opt/app-root/src/rbac-policies.csv policyFileReload: true
10.3.7.3. Define authorizations in external files by using Helm
Define permissions and roles in external CSV and YAML files and configure Developer Hub to use them with Helm.
To automate Red Hat Developer Hub maintenance, you can define permissions and roles in external files, before starting Developer Hub. You need to prepare your files, upload them to your OpenShift Container Platform project, and configure Developer Hub to use the external files.
Prerequisites
Procedure
Define your policies in a
rbac-policies.csvCSV file by using the following format:Define role permissions:
p, <role_entity_reference>, <permission>, <action>, <allow_or_deny>
- <role_entity_reference>
-
Role entity reference, such as:
role:default/guest. - <permission>
Permission, such as:
bulk.import,catalog.entity.read, orcatalog.entity.refresh, or permission resource type, such as:bulk-importorcatalog-entity.- <action>
-
Action type, such as:
use,read,create,update,delete. - <allow_or_deny>
-
Access granted:
allowordeny.
Assign the role to a group or a user:
g, <group_or_user>, <role_entity_reference>
- <group_or_user>
Group, such as:
user:default/mygroup, or user, such as:user:default/myuser.Sample
rbac-policies.csv:p, role:default/guests, catalog-entity, read, allow p, role:default/guests, catalog.entity.create, create, allow g, user:default/my-user, role:default/guests g, group:default/my-group, role:default/guests
Define your conditional policies in a
rbac-conditional-policies.yamlYAML file by using the following format:result: CONDITIONAL roleEntityRef: <role_entity_reference> pluginId: <plugin_id> permissionMapping: - read - update - delete conditions: <conditions>
Upload your
rbac-policies.csvandrbac-conditional-policies.yamlfiles to arbac-policiesconfig map in your OpenShift Container Platform project containing Developer Hub.$ oc create configmap rbac-policies \ --from-file=rbac-policies.csv \ --from-file=rbac-conditional-policies.yamlUpdate your Developer Hub
BackstageHelm chart to mount in the Developer Hub filesystem your files from therbac-policiesconfig map:- In the Developer Hub Helm Chart, go to Root Schema → Backstage chart schema → Backstage parameters → Backstage container additional volume mounts.
Select Add Backstage container additional volume mounts and add the following values:
- mountPath
-
/opt/app-root/src/rbac - Name
-
rbac-policies
Add the RBAC policy to the Backstage container additional volumes in the Developer Hub Helm Chart:
- name
-
rbac-policies - configMap
- defaultMode
-
420 - name
-
rbac-policies
Update your Developer Hub
app-config.yamlconfiguration file to use therbac-policies.csvandrbac-conditional-policies.yamlexternal files:permission: enabled: true rbac: conditionalPoliciesFile: /opt/app-root/src/rbac-conditional-policies.yaml policies-csv-file: /opt/app-root/src/rbac-policies.csv policyFileReload: true
10.3.7.4. Configure RBAC for Extensions by using the RBAC CSV file
You can grant access to Extensions plugin management by adding permission policies to your RBAC CSV file.
Prerequisites
- You have enabled RBAC and assigned a policy administrator role.
- You manage authorizations by using external files.
-
You have added
extensionsto the list of authorized plugins under yourpermission.rbac.pluginsWithPermissionconfiguration.
Procedure
Add the following policies to your CSV file to allow users to view and manage plugins in Extensions:
g, user:default/<YOUR_USERNAME>, role:default/extensions-admin p, role:default/extensions-admin, extensions.plugin.configuration.read, read, allow p, role:default/extensions-admin, extensions.plugin.configuration.write, create, allow p, role:default/extensions-admin, catalog.entity.read, read, allowOptional: Restrict access to specific plugins by defining a conditional policy in the
rbac-conditional-policies.yamlfile as described in Defining conditional policies:result: CONDITIONAL roleEntityRef: "role:default/extensions-admin" pluginId: extensions resourceType: extensions-plugin permissionMapping: - create conditions: rule: HAS_NAME resourceType: extensions-plugin params: pluginNames: [<your_plugin_name>]where:
pluginNamesEnter the plugin name or title for user access.
This policy allows users to install or update only the specified plugins and restricts access to all other plugins.
Optional: Restrict access by annotation by defining a conditional policy:
result: CONDITIONAL roleEntityRef: "role:default/extensions-admin" pluginId: extensions resourceType: extensions-plugin permissionMapping: - create conditions: rule: HAS_ANNOTATION resourceType: extensions-plugin params: annotation: "extensions.backstage.io/certified-by" value: "Red Hat"This policy allows users to install or update only the plugins that have the specified annotation.
Verification
- Verify that the user can view and manage plugins in Extensions.
Additional resources
10.3.8. Configure guest access
10.3.8.1. Configure guest access
Enable guest access to test role and policy creation without configuring an authentication provider.
Use guest access with the role-based access control (RBAC) front-end plugin to allow a user to test role and policy creation without the need to set up and configure an authentication provider.
Guest access is not recommended for production.
10.3.8.2. Configure the RBAC backend plugin
Enable the permission framework and configure admin users by updating the app-config-rhdh.yaml file.
You can configure the RBAC backend plugin by updating the app-config.yaml file to enable the permission framework.
Prerequisites
-
You have installed the
@backstage-community/plugin-rbacplugin in Developer Hub. For more information, see Configuring dynamic plugins.
Procedure
Update the
app-config.yamlfile to enable the permission framework as shown:permission enabled: true rbac: admin: users: - name: user:default/guest pluginsWithPermission: - catalog - permission - scaffolderNoteThe
pluginsWithPermissionsection of theapp-config.yamlfile includes only three plugins by default. Update the section as needed to include any additional plugins that also incorporate permissions.
10.3.8.3. Set up the guest authentication provider
Enable guest authentication for testing RBAC features without configuring a full authentication provider.
You can enable guest authentication and use it alongside the RBAC front-end plugin.
Prerequisites
-
You have installed the
@backstage-community/plugin-rbacplugin in Developer Hub. For more information, see Configuring dynamic plugins.
Procedure
In the
app-config.yamlfile, add the user entity reference to resolve and enable thedangerouslyAllowOutsideDevelopmentoption, as shown in the following example:auth: environment: development providers: guest: userEntityRef: user:default/guest dangerouslyAllowOutsideDevelopment: trueNoteYou can use
user:default/guestas the user entity reference to match the added user under thepermission.rbac.admin.userssection of theapp-config.yamlfile.
10.3.9. Permission policy types
Reference information about resource type and basic permission types in Developer Hub.
Permission policies in Red Hat Developer Hub are a set of rules to govern access to resources or functionalities. These policies state the authorization level that is granted to users based on their roles. The permission policies are implemented to keep security and confidentiality within a given environment.
You can define the following types of permissions in Developer Hub:
- resource type
- basic
The distinction between the two permission types depends on whether a permission includes a defined resource type.
You can define the resource type permission by using either the associated resource type or the permission name as shown in the following example:
p, role:default/myrole, catalog.entity.read, read, allow g, user:default/myuser, role:default/myrole p, role:default/another-role, catalog-entity, read, allow g, user:default/another-user, role:default/another-role
You can define the basic permission in Developer Hub using the permission name as shown in the following example:
p, role:default/myrole, catalog.entity.create, create, allow g, user:default/myuser, role:default/myrole
10.3.10. Conditional policies in Red Hat Developer Hub
Use conditional policies with criteria, objects, and aliases to filter access to Developer Hub resources based on dynamic parameters.
The permission framework in Red Hat Developer Hub provides conditions, supported by the RBAC backend plugin (backstage-plugin-rbac-backend). The conditions work as content filters for the Developer Hub resources that are provided by the RBAC backend plugin.
The RBAC backend API stores conditions assigned to roles in the database. When you request to access the front-end resources, the RBAC backend API searches for the corresponding conditions and delegates them to the appropriate plugin by using its plugin ID. If you are assigned to multiple roles with different conditions, then the RBAC backend merges the conditions by using the anyOf criteria.
- Conditional criteria
A condition in Developer Hub is a simple condition with a rule and parameters. However, a condition can also contain a parameter or an array of parameters combined by conditional criteria. The supported conditional criteria includes:
allOf- Ensures that all conditions within the array must be true for the combined condition to be satisfied.
anyOf- Ensures that at least one of the conditions within the array must be true for the combined condition to be satisfied.
not- Ensures that the condition within it must not be true for the combined condition to be satisfied.
- Conditional object
The plugin specifies the parameters supported for conditions. You can access the conditional object schema from the RBAC API endpoint to understand how to construct a conditional JSON object, which is then used by the RBAC backend plugin API.
A conditional object contains the following parameters:
Parameter Type Description resultString
Always has the value
CONDITIONALroleEntityRefString
String entity reference to the RBAC role, such as
role:default/devpluginIdString
Corresponding plugin ID, such as
catalogpermissionMappingString array
Array permission actions, such as
['read', 'update', 'delete']resourceTypeString
Resource type provided by the plugin, such as
catalog-entityconditionsJSON
Condition JSON with parameters or array parameters joined by criteria
- Conditional policy aliases
The RBAC backend plugin (
backstage-plugin-rbac-backend) supports the use of aliases in conditional policy rule parameters. The conditional policy aliases are dynamically replaced with the corresponding values during policy evaluation. Each alias in conditional policy is prefixed with a$sign indicating its special function.The supported conditional aliases include:
$currentUserThis alias is replaced with the user entity reference for the user who requests access to the resource. For example, if user Tom from the default namespace requests access,
$currentUserbecomesuser:default/tom.Example conditional policy object with
$currentUseralias:{ "result": "CONDITIONAL", "roleEntityRef": "role:default/developer", "pluginId": "catalog", "resourceType": "catalog-entity", "permissionMapping": ["delete"], "conditions": { "rule": "IS_ENTITY_OWNER", "resourceType": "catalog-entity", "params": { "claims": ["$currentUser"] } } }$ownerRefsThis alias is replaced with ownership references, usually as an array that includes the user entity reference and the user’s parent group entity reference. For example, for user Tom from team-a,
$ownerRefsbecomes['user:default/tom', 'group:default/team-a'].Example conditional policy object with
$ownerRefsalias:{ "result": "CONDITIONAL", "roleEntityRef": "role:default/developer", "pluginId": "catalog", "resourceType": "catalog-entity", "permissionMapping": ["delete"], "conditions": { "rule": "IS_ENTITY_OWNER", "resourceType": "catalog-entity", "params": { "claims": ["$ownerRefs"] } } }
10.3.11. Download active users list in Red Hat Developer Hub
Download the list of active users in CSV format from the RBAC page in Developer Hub.
You can download the list of users in CSV format by using the Developer Hub web interface.
Prerequisites
-
RBAC plugins (
@backstage-community/plugin-rbacand@backstage-community/plugin-rbac-backend) must be enabled in Red Hat Developer Hub. -
If RBAC is enabled, you have a role with the following permission:
policy.entity.read.
Procedure
- In Red Hat Developer Hub, navigate to Administration and select the RBAC tab.
- At the bottom of the RBAC page, click Download User List.
- Optional: Change the file name in the Save as field and click Save.
- To access the downloaded users list, go to the Downloads folder on your local machine and open the CSV file.
10.3.12. Delegate RBAC management to decentralize administration
10.3.12.1. Delegate RBAC management to decentralize administration
Delegate RBAC responsibilities to team leads by using the multitenancy feature and IS_OWNER conditional rule.
An enterprise customer requires the ability to delegate role-based access control (RBAC) responsibilities to other individuals in the organization. In this scenario, you, as the administrator, can give access to the RBAC plugin specifically to designated users, such as team leads. Each team lead is then able to manage permissions only for users within their assigned team or department, without visibility into or control over permissions outside their assigned scope. This approach allows team leads to manage access and permissions for their own teams independently, while administrators keep global oversight.
In Red Hat Developer Hub, you can delegate RBAC access by using the multitenancy feature of the RBAC plugin, specifically the IS_OWNER conditional rule. You can either use the web UI or the RBAC backend API, depending on your preferred workflow and level of automation:
- Use the web UI to create roles, assign users or groups, define permissions, and apply ownership conditions through an intuitive interface.
- Use the API for a more flexible and automatable approach, where you can programmatically manage roles, permissions, and ownership conditions using authenticated curl requests.
By delegating RBAC access through either method, you can expect the following outcomes:
- Team leads can manage RBAC settings for their teams independently.
- Visibility of other users' or teams' permissions is restricted.
- Administrators retain overarching control while delegating team-specific access.
Use groups to configure persona-specific homepage layouts, ensuring users see homepage content appropriate to their role.
10.3.12.2. Configure RBAC delegation
10.3.12.2.1. Configure RBAC delegation
Configure RBAC delegation to allow designated users to manage permissions for their teams by using the web UI or the RBAC backend API.
10.3.12.2.2. Delegate RBAC access in Red Hat Developer Hub by using the web UI
Delegate RBAC access to team leads by using the Web UI to create roles with IS_OWNER conditional rules.
You can delegate the RBAC access in Red Hat Developer Hub by using the web UI.
Prerequisites
- Your RHDH instance is running with the RBAC plugin installed and configured.
- You have administrative access to RHDH.
Procedure
- Log in to your RHDH instance with administrator credentials.
- Navigate to Administration → RBAC.
-
Click Create Role and define a new role for team leads, such as
role:default/team_lead. -
In the Members section, add the user or group, such as
user:default/team_lead. Grant permissions required by team leads, such as:
policy.entity.create- To allow policy creation.
catalog-entity:read- To allow catalog access.
Apply conditions to limit access as follows:
IS_OWNER-
Use the
IS_OWNERrule to ensure team leads can only manage resources they own.
- Click Save to create the role and apply changes.
Verification
- Log in as a team lead.
Verify the following:
- RBAC UI is accessible.
- Only users or roles related to their team are visible.
- No access to roles or permissions outside their scope is granted.
10.3.12.2.3. Delegate RBAC access in Red Hat Developer Hub by using API
Delegate RBAC access to team leads by using the RBAC backend API to create roles with IS_OWNER conditional rules.
You can delegate the RBAC access in Red Hat Developer Hub by using the RBAC backend API.
Prerequisites
- Your RHDH instance is running with the RBAC plugin installed and configured.
- You have administrative access to RHDH.
-
You have API access using
curlor another tool.
Procedure
Create a new role designated for team leads by using the RBAC backend API:
For example, to create a new role for the team lead by using the RBAC backend API:
$ curl -X POST 'http://localhost:7007/api/permission/roles' \ --header "Authorization: Bearer $ADMIN_TOKEN" \ --header "Content-Type: application/json" \ --data '{ "memberReferences": ["user:default/team_lead"], "name": "role:default/team_lead", "metadata": { "description": "This is an example team lead role" } }'Allow team leads to read catalog entities and create permissions in the RBAC plugin using the following API request:
For example, to grant the team lead role permission to create RBAC policies and read catalog entities:
$ curl -X POST 'http://localhost:7007/api/permission/policies' \ --header "Authorization: Bearer $ADMIN_TOKEN" \ --header "Content-Type: application/json" \ --data '[ { "entityReference": "role:default/team_lead", "permission": "policy.entity.create", "policy": "create", "effect": "allow" }, { "entityReference": "role:default/team_lead", "permission": "catalog-entity", "policy": "read", "effect": "allow" } ]'To ensure team leads can only manage what they own, use the
IS_OWNERconditional rule as follows:For example, to apply a conditional access policy by using the
IS_OWNERrule for the team lead role:$ curl -X POST 'http://localhost:7007/api/permission/roles/conditions' \ --header "Authorization: Bearer $ADMIN_TOKEN" \ --header "Content-Type: application/json" \ --data '{ "result": "CONDITIONAL", "pluginId": "permission", "resourceType": "policy-entity", "conditions": { "rule": "IS_OWNER", "resourceType": "policy-entity", "params": { "owners": [ "user:default/team_lead" ] } }, "roleEntityRef": "role:default/team_lead", "permissionMapping": [ "read", "update", "delete" ] }'The previous example of conditional policy limits visibility and control to only owned roles and policies.
Log in to RHDH as team lead and verify the following:
Use the following request and verify that you do not see any roles:
For example, to retrieve roles visible to the team lead:
$ curl -X GET 'http://localhost:7007/api/permission/roles' \ --header "Authorization: Bearer $TEAM_LEAD_TOKEN"
Use the following request to create a new role for their team:
For example, to create a new role for their team with ownership assigned:
$ curl -X POST 'http://localhost:7007/api/permission/roles' \ --header "Authorization: Bearer $TEAM_LEAD_TOKEN" \ --header "Content-Type: application/json" \ --data '{ "memberReferences": ["user:default/team_member"], "name": "role:default/team_a", "metadata": { "description": "This is an example team_a role", "owner": "user:default/team_lead" } }'NoteYou can set the ownership during creation, but you can also update the ownership at any time.
Use the following request to assign a permission policy to the new role:
For example, to grant read access to catalog entities for the new role:
$ curl -X POST 'http://localhost:7007/api/permission/policies' \ --header "Authorization: Bearer $ADMIN_TOKEN" \ --header "Content-Type: application/json" \ --data '[ { "entityReference": "role:default/team_a", "permission": "catalog-entity", "policy": "read", "effect": "allow" } ]'Use the following request to verify that only team-owned roles and policies are visible:
For example, to retrieve roles and permission policies visible to the team lead:
$ curl -X GET 'http://localhost:7007/api/permission/roles' \ --header "Authorization: Bearer $TEAM_LEAD_TOKEN" $ curl -X GET 'http://localhost:7007/api/permission/policies' \ --header "Authorization: Bearer $TEAM_LEAD_TOKEN"
Verification
Log in as a team lead and verify the following:
- The RBAC UI is accessible.
- Only the assigned users or group is visible.
- Permissions outside the scoped team are not viewable or editable.
- Log in as an administrator and verify that you retain full visibility and control.
Chapter 11. Observe
11.1. Observe
TODO: Replace this placeholder with an overview of Observe.
11.2. Monitor system logs and application metrics to ensure platform availability
11.2.1. Monitor system logs and application metrics to ensure platform availability
TODO: Replace this placeholder with an overview of Monitor system logs and application metrics to ensure platform availability.
11.3. Manage telemetry collection to balance data insights with privacy requirements
11.3.1. Manage telemetry collection to balance data insights with privacy requirements
TODO: Replace this placeholder with an overview of Manage telemetry collection to balance data insights with privacy requirements.
11.4. Capture and review audit logs to trace user activities and maintain accountability
11.4.1. Capture and review audit logs to trace user activities and maintain accountability
TODO: Replace this placeholder with an overview of Capture and review audit logs to trace user activities and maintain accountability.
11.5. Centralize workflow observability
11.5.1. Centralize workflow observability
TODO: Replace this placeholder with an overview of Centralize workflow observability.
11.5.2. Deploy observability manifests to configure the Jaeger and Loki stacks
11.5.2.1. Deploy observability manifests to configure the Jaeger and Loki stacks
TODO: Replace this placeholder with an overview of Deploy observability manifests to configure the Jaeger and Loki stacks.
11.5.3. Trace attribute definitions and filtering keys
11.5.3.1. Trace attribute definitions and filtering keys
TODO: Replace this placeholder with an overview of Trace attribute definitions and filtering keys.
11.6. Collect diagnostic data to troubleshoot platform issues
11.6.1. Collect diagnostic data to troubleshoot platform issues
TODO: Replace this placeholder with an overview of Collect diagnostic data to troubleshoot platform issues.
11.6.2. Run must-gather on OpenShift to collect diagnostic data
11.6.2.1. Run must-gather on OpenShift to collect diagnostic data
TODO: Replace this placeholder with an overview of Run must-gather on OpenShift to collect diagnostic data.
Chapter 12. Integrate
12.1. Integrate
TODO: Replace this placeholder with an overview of Integrate.
12.2. Enable AI assistance for developers
12.2.1. Enable AI assistance for developers
TODO: Replace this placeholder with an overview of Enable AI assistance for developers.
12.2.2. Developer Lightspeed for RHDH architecture
12.2.2.1. Developer Lightspeed for RHDH architecture
TODO: Replace this placeholder with an overview of Developer Lightspeed for RHDH architecture.
12.2.3. Build a private knowledge base with Lightspeed Notebooks
12.2.3.1. Build a private knowledge base with Lightspeed Notebooks
TODO: Replace this placeholder with an overview of Build a private knowledge base with Lightspeed Notebooks.
12.2.4. Configure Model Context Protocol tools to enhance AI interactions with portal data
12.2.4.1. Configure Model Context Protocol tools to enhance AI interactions with portal data
TODO: Replace this placeholder with an overview of Configure Model Context Protocol tools to enhance AI interactions with portal data.
12.2.4.2. Enable Scaffolder MCP tools
12.2.4.2.1. Enable Scaffolder MCP tools
TODO: Replace this placeholder with an overview of Enable Scaffolder MCP tools.
12.2.5. Accelerate AI model discovery by integrating the OpenShift AI Connector
12.2.5.1. Accelerate AI model discovery by integrating the OpenShift AI Connector
TODO: Replace this placeholder with an overview of Accelerate AI model discovery by integrating the OpenShift AI Connector.
12.3. Integrate CI/CD and infrastructure tools to visualize pipelines and workloads
12.3.1. Integrate CI/CD and infrastructure tools to visualize pipelines and workloads
TODO: Replace this placeholder with an overview of Integrate CI/CD and infrastructure tools to visualize pipelines and workloads.
Chapter 13. Optimize
13.1. Optimize
TODO: Replace this placeholder with an overview of Optimize.
13.2. Scale system performance for growing traffic
13.2.1. Scale system performance for growing traffic
TODO: Replace this placeholder with an overview of Scale system performance for growing traffic.
13.2.2. Configure the dynamic plugins cache
13.2.2.1. Configure the dynamic plugins cache
TODO: Replace this placeholder with an overview of Configure the dynamic plugins cache.
Chapter 14. Extend
14.1. Extend
TODO: Replace this placeholder with an overview of Extend.
14.2. Manage the plugin ecosystem to add functionality without downtime
14.2.1. Manage the plugin ecosystem to add functionality without downtime
TODO: Replace this placeholder with an overview of Manage the plugin ecosystem to add functionality without downtime.
14.2.2. Install dynamic plugins
14.2.2.1. Install dynamic plugins
TODO: Replace this placeholder with an overview of Install dynamic plugins.
14.2.3. Browse and manage available plugins using the Extensions UI
14.2.3.1. Browse and manage available plugins using the Extensions UI
TODO: Replace this placeholder with an overview of Browse and manage available plugins using the Extensions UI.
14.2.6. Configure specialized front-end extensions for APIs and features
14.2.6.1. Configure specialized front-end extensions for APIs and features
TODO: Replace this placeholder with an overview of Configure specialized front-end extensions for APIs and features.
14.2.7. Filter plugins by support badges
14.2.7.1. Filter plugins by support badges
TODO: Replace this placeholder with an overview of Filter plugins by support badges.
14.3. Develop custom dynamic plugins to support custom workflows
14.3.1. Develop custom dynamic plugins to support custom workflows
TODO: Replace this placeholder with an overview of Develop custom dynamic plugins to support custom workflows.
14.3.2. Package and deploy dynamic plugins as OCI images
14.3.2.1. Package and deploy dynamic plugins as OCI images
TODO: Replace this placeholder with an overview of Package and deploy dynamic plugins as OCI images.
14.4. Manage containerized plugins securely by migrating to OCI artifacts
14.4.1. Manage containerized plugins securely by migrating to OCI artifacts
TODO: Replace this placeholder with an overview of Manage containerized plugins securely by migrating to OCI artifacts.
14.4.2. Migrate community plugins to the GitHub Container Registry
14.4.2.1. Migrate community plugins to the GitHub Container Registry
TODO: Replace this placeholder with an overview of Migrate community plugins to the GitHub Container Registry.
Chapter 15. Troubleshoot
15.1. Troubleshoot
Diagnose and resolve issues with authentication, configuration, plugins, workflows, and AI integrations in Developer Hub.
15.2. Troubleshoot user access and authentication issues to restore user entry
15.2.1. Troubleshoot user access and authentication issues to restore user entry
Resolve authentication failures, session expiration issues, and configuration problems that prevent users from accessing Developer Hub.
15.2.2. Troubleshoot authentication issues
15.2.2.1. Troubleshoot authentication issues
Learn how to troubleshoot common authentication issues.
15.2.2.2. Reduce the size of issued tokens
If user identity tokens grow large and cause HTTP errors, you can use the omitIdentityTokenOwnershipClaim flag to remove the ent claim from the JWT payload and reduce token size.
Procedure
In the
app-config.yamlfile, setomitIdentityTokenOwnershipClaimtotrueas follows:auth: omitIdentityTokenOwnershipClaim: true
15.2.2.3. Troubleshoot unexpected session expiration
If sessions expire sooner than expected, check the following settings. The mechanism with the shortest timeout takes effect first.
Procedure
- Check the Identity Provider (IdP) session timeout: the IdP might have a shorter session lifetime than Developer Hub.
-
Check the
sessionDurationparameter for your authentication provider. -
Check the AutoLogout
idleTimeoutMinutessetting, if auto-logout is enabled.
15.2.2.4. Troubleshoot missing session expiration warning
If users receive no warning before their session expires, auto-logout might not be enabled. Without auto-logout, sessions expire silently based on sessionDuration or IdP settings.
Procedure
-
To enable pre-expiration warnings, configure the
auth.autologoutsettings in yourapp-config.yamlfile.
15.2.2.5. Troubleshoot missing login redirect after session expiration
If users are not redirected to the login page after their session expires, verify the following.
Procedure
- Verify that your Developer Hub version includes the upstream session expiration fix.
-
Verify that your authentication provider is correctly configured with valid
metadataUrl,clientId, andclientSecretsettings.
15.2.2.6. Troubleshoot login failed errors
When a user cannot sign in to Developer Hub, the sign-in page displays a "Login failed" error message. The following sections describe common login errors and their solutions.
15.2.2.6.1. Login failed: unable to resolve user identity
Login failed; caused by Error: Failed to sign-in, unable to resolve user identity. Please verify that your catalog contains the expected User entities that would match your configured sign-in resolver.
This error indicates that the user signing in does not match a user entity in the Developer Hub software catalog.
To resolve this issue:
Check that the corresponding catalog provider plugin is set up correctly and is successfully syncing users and groups into the catalog.
In the backend logs, look for a successful synchronization message such as:
catalog info Read 114 GitHub users and 22 GitHub groups in 3.4 seconds. Committing... catalog info Committed 114 GitHub users and 22 GitHub groups in 0.0 seconds.
- If users and groups have been ingested into the catalog, verify that the sign-in resolver used (default or configured) matches the correct user attributes.
- Optionally, use guest login to look into the user entity in the catalog and verify the attributes.
15.2.2.6.2. Login failed: provider not configured to support sign-in
Login failed; caused by Error: The <providerId> provider is not configured to support sign-in.
This error indicates that the authentication provider has disableIdentityResolution set to true, meaning it is configured as an auxiliary provider, not for primary sign-in.
To resolve this issue:
-
In your
app-config.yamlfile, ensure thatdisableIdentityResolutionis not set totruefor your primary sign-in authentication provider.
15.2.2.6.3. Login failed: user profile does not contain an email
Login failed, user profile does not contain an email
This error indicates that the authentication client does not have permission to read the user’s email from the identity provider.
To resolve this issue:
- Grant the necessary email-reading permissions to the authentication client in the identity provider.
-
Or, use a sign-in resolver that does not rely on email, such as
preferredUsernameMatchingUserEntityNameinstead ofemailMatchingUserEntityProfileEmail.
15.2.2.7. Diagnose specific login failures
Common login errors encountered during authentication and their solutions.
15.2.2.7.1. Login failed: unable to resolve user identity
Login failed; caused by Error: Failed to sign-in, unable to resolve user identity. Please verify that your catalog contains the expected User entities that would match your configured sign-in resolver.
This error indicates that the user signing in does not match a user entity in the Developer Hub software catalog.
To resolve this issue:
Check that the corresponding catalog provider plugin is set up correctly and is successfully syncing users and groups into the catalog.
In the backend logs, look for a successful synchronization message such as:
catalog info Read 114 GitHub users and 22 GitHub groups in 3.4 seconds. Committing... catalog info Committed 114 GitHub users and 22 GitHub groups in 0.0 seconds.
- If users and groups have been ingested into the catalog, verify that the sign-in resolver used (default or configured) matches the correct user attributes.
- Optionally, use guest login to look into the user entity in the catalog and verify the attributes.
15.2.2.7.2. Login failed: provider not configured to support sign-in
Login failed; caused by Error: The <providerId> provider is not configured to support sign-in.
This error indicates that the authentication provider has disableIdentityResolution set to true, meaning it is configured as an auxiliary provider, not for primary sign-in.
To resolve this issue:
-
In your
app-config.yamlfile, ensure thatdisableIdentityResolutionis not set totruefor your primary sign-in authentication provider.
15.2.2.7.3. Login failed: user profile does not contain an email
Login failed, user profile does not contain an email
This error indicates that the authentication client does not have permission to read the user’s email from the identity provider.
To resolve this issue:
- Grant the necessary email-reading permissions to the authentication client in the identity provider.
-
Or, use a sign-in resolver that does not rely on email, such as
preferredUsernameMatchingUserEntityNameinstead ofemailMatchingUserEntityProfileEmail.
15.2.2.8. Troubleshoot catalog provider errors
Catalog provider plugins can fail to ingest users and groups into the Developer Hub software catalog. The following sections describe common catalog provider errors visible in the backend logs and their solutions.
15.2.2.8.1. LDAP: Malformed entity envelope
LdapOrgEntityProvider:default refresh failed, TypeError: Malformed entity envelope, TypeError: /metadata/name must NOT have fewer than 1 characters - limit: 1
This error occurs when a user being ingested from LDAP has no value for the name field, which is mapped to the uid LDAP attribute by default.
To resolve this issue:
Add a filter to the LDAP users configuration to exclude users without a
uid:catalog: providers: ldapOrg: default: users: - dn: OU=Users,DC=example,DC=com options: filter: (uid=*)
15.2.2.8.2. GitHub: API rate limit exceeded
GithubMultiOrgEntityProvider:default refresh failed, HttpError: API rate limit exceeded
This error occurs when Developer Hub makes unauthenticated API calls to GitHub, which are limited to 60 requests per hour. Authenticated requests using a GitHub App get up to 5,000 requests per hour.
To resolve this issue:
-
Verify that the
integrations.githubsection is configured in yourapp-config.yamlfile with valid GitHub App credentials.
15.2.2.8.3. GitLab: API rate limit exceeded
This error occurs when Developer Hub makes unauthenticated API calls to GitLab, which are subject to rate limits.
To resolve this issue:
-
Verify that the
integrations.gitlabsection is configured in yourapp-config.yamlfile with a valid GitLab personal access token.
15.2.2.9. Resolve malformed LDAP entity envelopes
This error occurs when a user being ingested from LDAP has no value for the name field, which is mapped to the uid LDAP attribute by default.
Prerequisites
- You have configured LDAP user provisioning in Developer Hub.
Procedure
Add a filter to the LDAP users configuration to exclude users without a
uid:catalog: providers: ldapOrg: default: users: - dn: OU=Users,DC=example,DC=com options: filter: (uid=*)
Verification
Check the backend logs for successful LDAP synchronization without the malformed entity envelope error:
LdapOrgEntityProvider:default refresh succeeded
15.2.3. Troubleshoot configuration issues
15.2.3.1. Troubleshoot configuration issues
Resolve common configuration issues in Developer Hub, such as Helm overwriting predefined array values.
15.2.3.2. Fix Helm overwriting predefined arrays
If you use Helm to install dynamic plugins, you might meet an issue where predefined values in fields with arrays are overwritten after you add new values. The issue affects fields such as:
-
extraEnvVars -
extraVolumeMounts -
extraVolumes
Fix this issue by duplicating the predefined values from RHDH Helm Chart’s values.yaml file into your own version of the file.
Procedure
For
extraEnvVars, add the following content to yourvalues.yamlfile:extraEnvVars: - name: BACKEND_SECRET valueFrom: secretKeyRef: key: backend-secret name: '{{ include "rhdh.backend-secret-name" $ }}' - name: POSTGRESQL_ADMIN_PASSWORD valueFrom: secretKeyRef: key: postgres-password name: '{{- include "rhdh.postgresql.secretName" . }}'For
extraVolumeMounts, add the following content to yourvalues.yamlfile:extraVolumeMounts: - name: dynamic-plugins-root mountPath: /opt/app-root/src/dynamic-plugins-root - name: temp mountPath: /tmpFor
extraVolume, add the following content to yourvalues.yamlfile:extraVolumes: - name: dynamic-plugins-root ephemeral: volumeClaimTemplate: spec: accessModes: - ReadWriteOnce resources: requests: storage: 5Gi
15.3. Troubleshoot plugin and workflow deployment errors to resume automation
15.3.1. Troubleshoot plugin and workflow deployment errors to resume automation
Diagnose and resolve pod startup failures and serverless workflow deployment issues in Developer Hub.
15.3.2. Troubleshoot a pod startup failure after enabling a plugin
If the RHDH pod fails to start after enabling a plugin, you can inspect the pod logs and configure the required environment variables.
Procedure
Inspect your RHDH pod logs to identify if the plugin requires specific environment variables or additional configuration, for example:
Plugin '<PLUGIN_NAME>' threw an error during startup, waiting for X other plugins to finish before shutting down the process. Plugin '<PLUGIN_NAME>' startup failed; caused by Error: Missing required config value at '<concretePluginRequiredVariable.name>' in 'app-config.local.yaml' type="initialization"
-
Verify the required configuration by inspecting the
dynamic-plugins.default.yamlfile that lists the required environment variables for each plugin. The variables for each plugin are in the format of${PLUGIN_VARIABLE_NAME}. If any required environment variables are missing, set the environment variables by using a secret. For example:
kind: Secret apiVersion: v1 metadata: name: rhdh-secrets labels: backstage.io/kubernetes-id: developer-hub data: PLUGIN_VARIABLE_NAME: 'dummy-value' type: OpaqueMount the secret:
If you deployed RHDH by using the Operator, update your
BackstageCR, as follows:spec: application: extraEnvs: secrets: - name: rhdh-secretsIf you deployed RHDH by using the Helm chart, in the
upstream.backstagekey in your Helm chart values, enter the name of the Developer Hubrhdh-secretssecret as the value for theextraEnvVarsSecretsfield. For example:upstream: backstage: extraEnvVarsSecrets: - rhdh-secrets
15.3.3. Diagnose serverless workflow issues
15.3.3.1. Diagnose serverless workflow issues
Troubleshoot HTTP error codes, deployment errors, cross-namespace configuration issues, and missing workflows in the Orchestrator plugin.
15.3.3.2. Troubleshoot workflow HTTP error codes
Workflow operations fail when a service endpoint returns an HTTP error code. The user interface displays the HTTP code and error message.
The following table lists common HTTP errors encountered during workflow execution:
| HTTP code | Description | Possible cause |
|---|---|---|
|
|
Unauthorized access |
The token, password, or username provided for the endpoint might be incorrect or expired. |
|
|
Forbidden |
The server understood the request but refused to process it due to insufficient permissions to a resource or action. |
|
|
Conflict |
The workflow attempted to create or update a resource (for example, Kubernetes or OpenShift resources) that already exists. |
Additional resources
15.3.3.3. Troubleshoot common workflow deployment errors
Use these steps to diagnose and resolve common workflow deployment, connectivity, or configuration failures.
Procedure
If the workflow operation fails, examine the container log of the specific workflow instance to determine the cause by running the following command:
$ oc logs my-workflow-xy73lj
If the workflow fails to reach an HTTPS endpoint, check the pod log for an SSL certificate verification failure. This occurs if the target endpoint uses a Certificate Authority (CA) that the workflow cannot verify. The resulting error resembles the following:
sun.security.provider.certpath.SunCertPathBuilderException - unable to find valid certification path to requested target
- To resolve the SSL certificate error, load the additional CA certificate into the running workflow container.
15.3.3.4. Troubleshoot cross-namespace SonataFlow configuration and deployment issues
Use this procedure to resolve configuration and deployment failures when SonataFlow workflows are installed in a namespace separate from the core services, or if the Data Index fails to connect to the PostgreSQL database.
Prerequisites
- You have administrator privileges to access the OpenShift cluster.
Procedure
- Identify required namespaces.
-
Retrieve the namespace value where RHDH is running using
oc get backstage -A. Identify the SonataFlow Services Namespace by checking for either a
sonataflowclusterplatformorsonataflowplatforminstance.NoteBy default, the SonataFlow namespace must be the same as the RHDH namespace.
If the workflow is deployed to a namespace outside the core SonataFlow services, configure network policies to permit the necessary inter-namespace traffic.
# Example
NetworkPolicyconfiguration to ingress traffic into the workflow namespace apiVersion: networking.k8s.io/v1 kind: NetworkPolicy metadata: name: {{ .Release.Name }}-allow-infra-ns-to-workflow-ns # SonataFlow and Workflows are using the RHDH target namespace. namespace: {{ .Release.Namespace | quote }} spec: podSelector: {} ingress: - from: - namespaceSelector: matchLabels: # Allow knative events to be delivered to workflows. kubernetes.io/metadata.name: knative-eventing - namespaceSelector: matchLabels: # Allow auxiliary knative function for workflow (such as m2k-save-transformation) kubernetes.io/metadata.name: knative-serving - namespaceSelector: matchLabels: # Allow communication between the serverless logic operator and the workflow namespace. kubernetes.io/metadata.name: openshift-serverless-logicAdd
SonataFlowClusterPlatformCustom Resource as shown in the following configuration:oc create -f - <<EOF apiVersion: sonataflow.org/v1alpha08 kind: SonataFlowClusterPlatform metadata: name: cluster-platform spec: platformRef: name: sonataflow-platform namespace: $RHDH_NAMESPACETo allow communication between RHDH namespace and the workflow namespace, create the following network policies:
Allow RHDH services to accept traffic from workflows. Create an additional network policy within the RHDH instance namespace as shown in the following configuration::
oc create -f - <<EOF apiVersion: networking.k8s.io/v1 kind: NetworkPolicy metadata: name: allow-external-workflows-to-rhdh # Namespace where network policies are deployed namespace: $RHDH_NAMESPACE spec: podSelector: {} ingress: - from: - namespaceSelector: matchLabels: # Allow SonataFlow services to communicate with new/additional workflow namespace. kubernetes.io/metadata.name: $ADDITIONAL_WORKFLOW_NAMESPACEAllow traffic from RHDH, SonataFlow and Knative. Create a network policy within the additional workflow namespace as shown in the following configuration:
oc create -f - <<EOF apiVersion: networking.k8s.io/v1 kind: NetworkPolicy metadata: name: allow-rhdh-and-knative-to-workflows namespace: $ADDITIONAL_WORKFLOW_NAMESPACE spec: podSelector: {} ingress: - from: - namespaceSelector: matchLabels: # Allows traffic from pods in the RHDH namespace. kubernetes.io/metadata.name: $RHDH_NAMESPACE - namespaceSelector: matchLabels: # Allows traffic from pods in the Knative Eventing namespace. kubernetes.io/metadata.name: knative-eventing - namespaceSelector: matchLabels: # Allows traffic from pods in the Knative Serving namespace. kubernetes.io/metadata.name: knative-serving
-
(Optional) Create an
allow-intra-namespacepolicy in the workflow namespace to enable unrestricted communication among all pods within that namespace. If workflow persistence is required, perform the following configuration steps:
Create a dedicated PostgreSQL Secret containing database credentials within the workflow namespace as shown in the following configuration:
oc get secret sonataflow-psql-postgresql -n <your_namespace> -o yaml > secret.yaml sed -i '/namespace: <your_namespace>/d' secret.yaml oc apply -f secret.yaml -n $ADDITIONAL_NAMESPACE
Configure the workflow
serviceRefproperty to correctly reference the PostgreSQL service namespace as shown in the following configuration:apiVersion: sonataflow.org/v1alpha08 kind: SonataFlow ... spec: ... persistence: postgresql: secretRef: name: sonataflow-psql-postgresql passwordKey: postgres-password userKey: postgres-username serviceRef: databaseName: sonataflow databaseSchema: greeting name: sonataflow-psql-postgresql namespace: $POSTGRESQL_NAMESPACE port: 5432namespace- Enter the namespace where the PostgreSQL server is deployed.
If the
sonataflow-platform-data-index-servicecannot connect to the PostgreSQL database on startup, perform the following diagnostic checks:-
Verify that the PostgreSQL Pod has fully transitioned to a
runningand operational status. Allow additional time for database initialization before expecting related service pods (DataIndex,JobService) to establish a connection. - If the PostgreSQL Server operates in a dedicated namespace (for example, outside RHDH), verify that network policies are configured to allow ingress traffic from the SonataFlow services namespace. Network policies might prevent the Data Index and Job Service pods from connecting to the database.
-
Verify that the PostgreSQL Pod has fully transitioned to a
15.3.3.5. Troubleshoot workflows missing from the RHDH UI
You can perform the following checks to verify the workflow status and connectivity when the deployed workflow is missing from the RHDH Orchestrator UI.
Prerequisites
- You have administrator privileges to access the OpenShift cluster where RHDH and SonataFlow services are running.
Procedure
- Verify if the workflow uses GitOps profile. The RHDH Orchestrator UI displays only the workflows that use this profile. Make sure the workflow definition and the SonataFlow manifests use the GitOps profile.
Verify that the workflow pod has started and is ready. The readiness of a workflow pod depends on its successful registration with the Data Index. When a workflow initializes, it performs the following actions:
- It attempts to create its schema in the database (if persistence is active).
It attempts to register itself to the Data Index. The workflow pod remains in an unready state until it successfully registers to the Data Index.
Check the workflow deployment for additional status and error messages that might be unavailable in the pod log.
Check if the workflow pod can reach the Data Index service. Connect to the workflows pod and send the following GraphQL request to the Data Index:
curl -g -k -X POST -H "Content-Type: application/json" \ -d '{"query":"query{ ProcessDefinitions { id, serviceUrl, endpoint } }"}' \ http://sonataflow-platform-data-index-service.<your_namespace>/graphqlUse the Data Index service and namespace as defined in your environment. By default, this is the same namespace where RHDH is installed. If your SonataFlow resources are installed in a separate namespace, use
<your_namespace>. Check if the RHDH pod can reach the workflow service by running the following command:curl http://<workflow_service>.<workflow_namespace>/management/processes
Connect to the RHDH pod. Verify its connection to the Data Index service and inspect the RHDH pod logs for messages from the Orchestrator plugin.
To inspect the logs, identify the RHDH pod and run the following oc logs command:
oc get pods -n <your_namespace> oc logs <rhdh_pod_name> -n <your_namespace>
You must find messages indicating it is attempting to fetch workflow information from the Data Index, similar to the following:
{"level":"\u001b[32minfo\u001b[39m","message":"fetchWorkflowInfos() called: http://sonataflow-platform-data-index-service.<your_namespace>","plugin":"orchestrator","service":"backstage","span_id":"fca4ab29f0a7aef9","timestamp":"2025-08-04 17:58:26","trace_flags":"01","trace_id":"5408d4b06373ff8fb34769083ef771dd"}Notice the "plugin":"orchestrator" that can help to filter the messages.
Make sure the Data Index properties are set in the
-managed-propsConfigMap of the workflow as shown in the following configuration:kogito.data-index.health-enabled = true kogito.data-index.url = http://sonataflow-platform-data-index-service.<your_namespace> ... mp.messaging.outgoing.kogito-processdefinitions-events.url = http://sonataflow-platform-data-index-service.<your_namespace>/definitions mp.messaging.outgoing.kogito-processinstances-events.url = http://sonataflow-platform-data-index-service.<your_namespace>/processes
NoteThe
-managed-propsConfigMap is located in the same namespace as the workflow and is generated by the OpenShift Serverless Logic (OSL) Operator.These properties, along with similar settings for the Job Services, indicate that the (OSL) Operator successfully registered the Data Index service.
Confirm that the workflow is registered in the Data Index database. Connect to the database used by the Data Index and run the following command from the PSQL instance pod:
PGPASSWORD=<psql password> psql -h localhost -p 5432 -U < user> -d sonataflow
Replace
<psql password>and<user>with your database credentials.Run the following SQL commands to query the registered workflow definitions:
sonataflow=# SET search_path TO "sonataflow-platform-data-index-service"; sonataflow=# select id, name from definitions;
You must see your workflows listed in the query results.
Make sure you have enabled Data Index and Job Service in the
SonataFlowPlatformcustom resource (CR) as shown in the following configuration:services: dataIndex: enabled: true jobService: enabled: trueIf you fail to enable the Data Index and the Job Services in the
SonataFlowPlatformcustom resource (CR), the Orchestrator plugin fails to fetch the available workflows.NoteYou can also manually edit the
SonataFlowPlatformCR instance to trigger the re-creation of workflow-related manifests.Configure role-based access control (RBAC) permissions to ensure workflows are visible in the Orchestrator UI.
NoteWhen the RBAC plugin is enabled, the Orchestrator UI does not display workflows by default. You must explicitly grant read permissions.
-
Check your RHDH
app-config.yamlfile to confirm if the RBAC plugin is enabled. -
Confirm your user or role has the
orchestrator.workflowpermission with thereadaction. If this permission is missing, add the following to your RBAC CSV (
rbac-policy.csv) file:p, role:default/workflowUser, orchestrator.workflow, read, allow
Make sure
policyFileReloadis set totruein your configuration, or restart the RHDH application:permission: enabled: true rbac: policyFileReload: true
-
Check your RHDH
15.4. Troubleshoot AI and tool integrations to restore intelligent features
15.4.1. Troubleshoot AI and tool integrations to restore intelligent features
Diagnose and resolve issues with the OpenShift AI Connector and Model Context Protocol (MCP) server and client integrations.
15.4.2. Troubleshoot AI Connector functionality
15.4.2.1. Troubleshoot AI Connector functionality
The connector system consists of the two dynamic plugins and the three OpenShift AI Connector for RHDH sidecar containers. You must gather logs from these components and provide them to Red Hat Support for diagnostic analysis.
The actual contents of the diagnostic data are not part of any product guaranteed specification, and can change at any time.
During startup, you might see non-critical log errors, such as in cluster config error: open /var/run/secrets/kubernetes.io/serviceaccount/token: no such file or directory, in the sidecar logs. This error is expected during the initial setup and does not indicate a failure, provided the container eventually becomes healthy.
15.4.2.2. Verify dynamic plugin status
Validate that the dynamic plugins have been successfully installed into your RHDH project Pod.
Procedure
Use the following command to check the installation logs:
$ oc logs -c install-dynamic-plugins deployment/<your RHDH deployment>
Verification
In the install-dynamic-plugin logs, you can check the following installation logs for successful logs:
-
red-hat-developer-hub-backstage-plugin-catalog-backend-module-model-catalog(Entity Provider) -
red-hat-developer-hub-backstage-plugin-catalog-techdoc-url-reader-backend(TechDoc URL Reader)
15.4.2.3. Inspect plugin logs
View the OpenShift AI Connector for Red Hat Developer Hub plugins in the backstage-backend container to diagnose issues.
Procedure
Check the plugin logs for the following components:
Plugin Component Logger Service Target Common Log Text Model Catalog Entity Provider
ModelCatalogResourceEntityProviderDiscovering ResourceEntities from Model Server…Model Catalog TechDoc URL Reader
ModelCatalogBridgeTechdocUrlReaderModelCatalogBridgeTechdocUrlReader.readUrl-
Optional: To enable debug logging, set the
LOG_LEVELenvironment variable todebugon thebackstage-backendcontainer.
Additional resources
- For more information about logging configuration, see Monitoring and logging.
15.4.2.4. Inspect the OpenShift AI Connector
The OpenShift AI Connector for RHDH sidecars manage the data fetching and storage. Use these steps to inspect their state and logs.
Procedure
Check Cached Data (ConfigMap): The processed AI Model metadata is stored in a
ConfigMap.$ oc get configmap bac-import-model -o json | jq -r '.binaryData | to_entries[] | "=== \(.key) ===\n" + (.value | @base64d | fromjson | .body | @base64d | fromjson | tostring)' | jq -R 'if startswith("=== ") then . else (. | fromjson) end'Check Location Service API: Confirm the location service is providing data to the RHDH Entity Provider.
$ oc rsh -c backstage-backend deployment/<your RHDH deployment> $ curl http://localhost:9090/list
Check Sidecar Container Logs:
$ oc logs -c rhoai-normalizer deployment/<your {product-very-short} deployment> $ oc logs -c storage-rest deployment/<your {product-very-short} deployment> $ oc logs -c location deployment/<your {product-very-short} deployment>
15.4.2.5. Red Hat OpenShift AI model registry and model catalog queries
To access the same RHOAI data as the connector, use curl to query the RHOAI model registry and model catalog APIs, ensuring the ServiceAccount token has correct access control:
Example showing how to fetch registered models
$ curl -k -H "Authorization: Bearer $TOKEN" ${rhoai-short}_MODEL_REGISTRY_URL/api/model_registry/v1alpha3/registered_models | jqExample showing how to fetch model versions
$ curl -k -H "Authorization: Bearer $TOKEN" ${rhoai-short}_MODEL_REGISTRY_URL/api/model_registry/v1alpha3/model_versions | jqExample showing how to fetch model artifacts
$ curl -k -H "Authorization: Bearer $TOKEN" ${rhoai-short}_MODEL_REGISTRY_URL/api/model_registry/v1alpha3/model_artifacts | jqExample showing how to fetch inference services
$ curl -k -H "Authorization: Bearer $TOKEN" ${rhoai-short}_MODEL_REGISTRY_URL/api/model_registry/v1alpha3/inference_services | jqExample showing how to fetch serving environments
$ curl -k -H "Authorization: Bearer $TOKEN" ${rhoai-short}_MODEL_REGISTRY_URL/api/model_registry/v1alpha3/serving_environments | jqExample showing how to fetch catalog sources
$ curl -k -H "Authorization: Bearer $TOKEN" ${rhoai-short}_MODEL_CATALOG_URL/api/model_catalog/v1alpha1/sources | jq
15.4.3. Troubleshoot MCP server and client problems
15.4.3.1. Troubleshoot MCP server and client problems
Diagnose and resolve common issues with MCP server installation, client configuration, and tool execution in Developer Hub.
15.4.3.2. Verify successful installation of MCP plugins
Verify MCP plugin installation by checking pod logs for successful plugin loading and MCP tool registration.
Procedure
Log in to the OCP cluster running RHDH and go to your RHDH project using the following code:
$ oc project my-rhdh-project
Inspect the logs for the installation of the RHDH dynamic plugins using the following code:
$ oc logs -c install-dynamic-plugins deployment/<my-product-deployment>
Verification
You must see an entry for the MCP backend server plugin as shown in the following code:
..... prior logs .... ======= Installing dynamic plugin oci://ghcr.io/redhat-developer/rhdh-plugin-export-overlays/backstage-plugin-mcp-actions-backend:<tag> ==> Copying image oci://ghcr.io/redhat-developer/rhdh-plugin-export-overlays/backstage-plugin-mcp-actions-backend:<tag> to local filesystem ==> Successfully installed dynamic plugin oci://ghcr.io/redhat-developer/rhdh-plugin-export-overlays/backstage-plugin-mcp-actions-backend:<tag>
where:
<tag>-
Enter your RHDH version of Backstage and the plugin version, in the format
bs_<backstage-version>__<plugin-version>(note the double underscore delimiter). To find these versions, complete the following steps:
- Find your Backstage version in the RHDH release notes preface.
Locate the plugin version in the Dynamic Plugins Reference guide. For example, for RHDH 1.9 based on Backstage 1.45.3, use the format
bs_1.45.3__<plugin-version>.TipTo ensure environment stability, use a SHA256 digest instead of a version tag. See Determining SHA256 Digests.
You must see entries for any of the MCP tool plugins you installed as shown in the following code:
..... prior logs .... ======= Installing dynamic plugin oci://ghcr.io/redhat-developer/rhdh-plugin-export-overlays/red-hat-developer-hub-backstage-plugin-software-catalog-mcp-tool:<tag> ==> Copying image oci://ghcr.io/redhat-developer/rhdh-plugin-export-overlays/red-hat-developer-hub-backstage-plugin-software-catalog-mcp-tool:<tag> to local filesystem ==> Successfully installed dynamic plugin oci://ghcr.io/redhat-developer/rhdh-plugin-export-overlays/red-hat-developer-hub-backstage-plugin-software-catalog-mcp-tool:<tag>
where:
<tag>-
Enter your RHDH version of Backstage and the plugin version, in the format
bs_<backstage-version>__<plugin-version>(note the double underscore delimiter). To find these versions, complete the following steps:
- Find your Backstage version in the RHDH release notes preface.
Locate the plugin version in the Dynamic Plugins Reference guide. For example, for RHDH 1.9 based on Backstage 1.45.3, use the format
bs_1.45.3__<plugin-version>.TipTo ensure environment stability, use a SHA256 digest instead of a version tag. See Determining SHA256 Digests.
15.4.3.3. Check MCP tool logs for status and errors
Review Backstage LoggerService logs for MCP tool execution status and error messages.
The Backstage LoggerService target name starts with the name of the MCP tool (either software-catalog-mcp-tool or techdocs-mcp-tool). The MCP tools generate a log by default. For example:
`[backend]: 2025-09-25T16:24:22.660Z software-catalog-mcp-tool info fetch-catalog-entities: Fetching catalog entities with options: kind="Component"`
If any errors occur in the MCP tools, check the logs.
15.4.3.4. MCP tool error messages
MCP tools provide optional error messages that communicate issues including input validation errors encountered during tool use.
The MCP tools response provides an optional error message that communicates any issues encountered during the use of the tool, including potential input validation errors.
15.4.3.5. Resolve the Model does not support tool calling error
Resolve tool calling errors by confirming your AI model supports tool calls and switching to a compatible model if needed.
This error indicates that the model configured in your MCP client lacks the required functionality to handle tool calls. The error message appears similar to: Invalid request: model gemma3:27b does not support tool calls.
Procedure
- Consult your model documentation to confirm its support for tool calling.
- If the current model does not support tool calling, change the model that your MCP client uses to a tool-calling compatible model.
15.4.3.6. Resolve authentication issues when tools are not found
Verify authentication tokens and configuration settings when Model Context Protocol (MCP) clients connect to the server but do not display deployed tools.
If an MCP client connects to the server but cannot find deployed tools, verify the authentication status and endpoint resolution.
Procedure
Check the token validation status in the Red Hat Developer Lightspeed for Red Hat Developer Hub interface:
- In the Red Hat Developer Lightspeed for Red Hat Developer Hub chat box, click the menu icon (Chatbot options) and select MCP settings.
- Locate the relevant server and check the status message displayed below the token field.
- If the status is Authorization failed. Try again, the token is incorrect, improperly formatted, or missing. You must verify the token value and ensure the server is enabled.
Verify the authentication token configuration.
- Ensure a static token is configured for the RHDH MCP server.
-
In your MCP client, verify that the token is set as the bearer token. The authorization header must use the
Bearer <mcp_token>format.
Check the MCP endpoint configuration.
- Confirm that the MCP server URL properly resolves correctly, particularly when using desktop clients.
- Use legacy SSE endpoint if your MCP client requires it instead of the Streamable endpoint. (For more details, see the Configuration topic).
Verify the RHDH
app-config.yamlfile for formatting errors:-
Ensure there are no duplicate
backendentries and that the YAML indentation is accurate. -
Confirm that the configuration for the static token and MCP plugin sources is nested under an existing
backendfield, if one is present. For a reference configuration, see Configure MCP in RHDH.
-
Ensure there are no duplicate
15.4.3.7. Resolve nonsensical MCP tool output
Improve MCP tool output quality by using larger models or models with larger context windows when nonsensical results occur.
Nonsensical output often occurs when smaller models or models with smaller context sizes cannot effectively manage repeated tool calls within the same context window.
Procedure
Select an appropriate model for tool calling.
- Verify that the model has good support for tool calling.
- Make sure your model is not too small. We recommend a model with at least 7 billion parameters and a context window of 32k.
Refine your queries.
- Use more well-defined queries that limit the amount of data returned in the response from the tool.
- If possible, increase the context window size of the model. We recommend at least 32k for these MCP tools.
Chapter 16. Reference
16.1. Reference
TODO: Replace this placeholder with an overview of Reference.
16.2. Dynamic plugin parameter reference for configuration paths
16.2.1. Dynamic plugin parameter reference for configuration paths
TODO: Replace this placeholder with an overview of Dynamic plugin parameter reference for configuration paths.
16.3. Permission policies and conditional rules reference for RBAC configurations
16.3.1. Permission policies and conditional rules reference for RBAC configurations
TODO: Replace this placeholder with an overview of Permission policies and conditional rules reference for RBAC configurations.
16.3.2. Permission policies
16.3.2.1. Permission policies
Reference information about permission policy types and available permissions for catalog, scaffolder, RBAC, Kubernetes, Extensions, and plugin resources.
Developer Hub supports permission policies for controlling access to resources and functionalities. The following reference modules describe the available permission types and permissions for each plugin category.
16.3.2.2. Permission policy types
Reference information about resource type and basic permission types in Developer Hub.
Permission policies in Red Hat Developer Hub are a set of rules to govern access to resources or functionalities. These policies state the authorization level that is granted to users based on their roles. The permission policies are implemented to keep security and confidentiality within a given environment.
You can define the following types of permissions in Developer Hub:
- resource type
- basic
The distinction between the two permission types depends on whether a permission includes a defined resource type.
You can define the resource type permission by using either the associated resource type or the permission name as shown in the following example:
p, role:default/myrole, catalog.entity.read, read, allow g, user:default/myuser, role:default/myrole p, role:default/another-role, catalog-entity, read, allow g, user:default/another-user, role:default/another-role
You can define the basic permission in Developer Hub using the permission name as shown in the following example:
p, role:default/myrole, catalog.entity.create, create, allow g, user:default/myuser, role:default/myrole
16.3.2.3. Catalog permissions
Reference information about available catalog permissions for reading, creating, updating, and deleting catalog entities and locations.
| Name | Resource type | Policy | Description |
|---|---|---|---|
|
|
|
|
Enables a user or role to read from the catalog |
|
|
|
Enables a user or role to create catalog entities, including registering an existing component in the catalog | |
|
|
|
|
Enables a user or role to refresh a single or multiple entities from the catalog |
|
|
|
|
Enables a user or role to delete a single or multiple entities from the catalog |
|
|
|
Enables a user or role to read a single or multiple locations from the catalog | |
|
|
|
Enables a user or role to create locations within the catalog | |
|
|
|
Enables a user or role to delete locations from the catalog |
16.3.2.4. Bulk import permission
Reference information about the bulk import permission for accessing bulk import endpoints.
| Name | Resource type | Policy | Description |
|---|---|---|---|
|
|
|
|
Enables the user to access the bulk import endpoints, such as listing all repositories and organizations accessible by the signed-in user (using SCM OAuth) and managing the import requests. Repositories already present in the software catalog are automatically hidden from this list. |
bulk.import permissions will fail to list repositories if GitHub or GitLab OAuth providers are not explicitly configured for the instance.
16.3.2.5. Scaffolder permissions
Reference information about scaffolder permissions for executing actions, reading templates, and managing scaffolder tasks.
| Name | Resource type | Policy | Description |
|---|---|---|---|
|
|
|
|
Enables the execution of an action from a template |
|
|
|
|
Enables a user or role to read a single or multiple one parameters from a template |
|
|
|
|
Enables a user or role to read a single or multiple steps from a template |
|
|
|
Enables a user or role to trigger software templates which create new scaffolder tasks | |
|
|
|
Enables a user or role to cancel currently running scaffolder tasks | |
|
|
|
Enables a user or role to read all scaffolder tasks and their associated events and logs | |
|
|
|
Enables a user or role to access front-end template management features, including editing, previewing, and trying templates, forms, and custom fields. |
16.3.2.6. RBAC permissions
Reference information about RBAC permissions for reading, creating, updating, and deleting permission policies and roles.
| Name | Resource type | Policy | Description |
|---|---|---|---|
|
|
|
|
Enables a user or role to read permission policies and roles |
|
|
|
Enables a user or role to create a single or multiple permission policies and roles | |
|
|
|
|
Enables a user or role to update a single or multiple permission policies and roles |
|
|
|
|
Enables a user or role to delete a single or multiple permission policies and roles |
16.3.2.7. Kubernetes permissions
Reference information about Kubernetes permissions for reading cluster details and resources and accessing proxy endpoints.
| Name | Resource type | Policy | Description |
|---|---|---|---|
|
|
|
Enables a user to read Kubernetes cluster details under the | |
|
|
|
Enables a user to read information about Kubernetes resources located at | |
|
|
|
Enables a user or role to access the proxy endpoint |
16.3.2.8. Topology permissions
Reference information about Topology plugin permissions for reading Kubernetes cluster details and accessing proxy endpoints.
Topology plugin does not have its own defined permissions. Kubernetes permissions are used instead.
| Name | Resource type | Policy | Description |
|---|---|---|---|
|
|
|
Enables a user to read Kubernetes cluster details under the | |
|
|
|
Enables a user to read information about Kubernetes resources located at | |
|
|
|
Enables a user or role to access the proxy endpoint, allowing the user or role to read pod logs and events within RHDH |
16.3.2.9. Tekton permissions
Reference information about Tekton plugin permissions for reading Kubernetes cluster details and accessing proxy endpoints.
Tekton plugin does not have its own defined permissions. Kubernetes permissions are used instead.
| Name | Resource type | Policy | Description |
|---|---|---|---|
|
|
|
Enables a user to read Kubernetes cluster details under the | |
|
|
|
Enables a user to read information about Kubernetes resources located at | |
|
|
|
Enables a user or role to access the proxy endpoint, allowing the user or role to read pod logs and events within RHDH |
16.3.2.10. ArgoCD permissions
Reference information about ArgoCD plugin permissions for reading ArgoCD resources.
| Name | Resource type | Policy | Description |
|---|---|---|---|
|
|
|
Enables a user to read from the ArgoCD plugin |
16.3.2.11. Quay permissions
Reference information about Quay plugin permissions for reading Quay resources.
| Name | Resource type | Policy | Description |
|---|---|---|---|
|
|
|
Enables a user to read from the Quay plugin |
16.3.2.12. Extensions permissions
Reference information about available Extensions permissions for reading and writing plugin configurations.
| Name | Resource type | Policy | Description |
|---|---|---|---|
|
|
|
|
Enables a user or role to view plugin configurations in Extensions |
|
|
|
|
Enables a user or role to install, update, enable, or disable plugins by using Extensions |
16.3.3. Conditional policy aliases and schemas
16.3.3.1. Conditional policy aliases and schemas
Reference information about conditional policy rules, schemas, and examples for defining conditions with or without criteria.
You can access API endpoints for conditional policies in Red Hat Developer Hub. The RBAC backend API constructs a condition JSON object based on the condition schema. In Red Hat Developer Hub, you can define conditional policies with or without criteria.
16.3.3.2. Conditional policy API endpoints
Reference information about the conditional policy API endpoint for retrieving available conditional rules and schemas.
You can access API endpoints for conditional policies in Red Hat Developer Hub. For example, to retrieve the available conditional rules, which can help you define these policies, you can access the GET [api/plugins/condition-rules] endpoint.
The api/plugins/condition-rules returns the condition parameters schemas, for example:
[
{
"pluginId": "catalog",
"rules": [
{
"name": "HAS_ANNOTATION",
"description": "Allow entities with the specified annotation",
"resourceType": "catalog-entity",
"paramsSchema": {
"type": "object",
"properties": {
"annotation": {
"type": "string",
"description": "Name of the annotation to match on"
},
"value": {
"type": "string",
"description": "Value of the annotation to match on"
}
},
"required": [
"annotation"
],
"additionalProperties": false,
"$schema": "http://json-schema.org/draft-07/schema#"
}
},
{
"name": "HAS_LABEL",
"description": "Allow entities with the specified label",
"resourceType": "catalog-entity",
"paramsSchema": {
"type": "object",
"properties": {
"label": {
"type": "string",
"description": "Name of the label to match on"
}
},
"required": [
"label"
],
"additionalProperties": false,
"$schema": "http://json-schema.org/draft-07/schema#"
}
},
{
"name": "HAS_METADATA",
"description": "Allow entities with the specified metadata subfield",
"resourceType": "catalog-entity",
"paramsSchema": {
"type": "object",
"properties": {
"key": {
"type": "string",
"description": "Property within the entities metadata to match on"
},
"value": {
"type": "string",
"description": "Value of the given property to match on"
}
},
"required": [
"key"
],
"additionalProperties": false,
"$schema": "http://json-schema.org/draft-07/schema#"
}
},
{
"name": "HAS_SPEC",
"description": "Allow entities with the specified spec subfield",
"resourceType": "catalog-entity",
"paramsSchema": {
"type": "object",
"properties": {
"key": {
"type": "string",
"description": "Property within the entities spec to match on"
},
"value": {
"type": "string",
"description": "Value of the given property to match on"
}
},
"required": [
"key"
],
"additionalProperties": false,
"$schema": "http://json-schema.org/draft-07/schema#"
}
},
{
"name": "IS_ENTITY_KIND",
"description": "Allow entities matching a specified kind",
"resourceType": "catalog-entity",
"paramsSchema": {
"type": "object",
"properties": {
"kinds": {
"type": "array",
"items": {
"type": "string"
},
"description": "List of kinds to match at least one of"
}
},
"required": [
"kinds"
],
"additionalProperties": false,
"$schema": "http://json-schema.org/draft-07/schema#"
}
},
{
"name": "IS_ENTITY_OWNER",
"description": "Allow entities owned by a specified claim",
"resourceType": "catalog-entity",
"paramsSchema": {
"type": "object",
"properties": {
"claims": {
"type": "array",
"items": {
"type": "string"
},
"description": "List of claims to match at least one on within ownedBy"
}
},
"required": [
"claims"
],
"additionalProperties": false,
"$schema": "http://json-schema.org/draft-07/schema#"
}
}
]
}
... <another plugin condition parameter schemas>
]The RBAC backend API constructs a condition JSON object based on the previous condition schema.
16.3.3.3. Conditional policy without criteria
Reference information about defining conditional policies without criteria to control access based on a single rule.
Consider a condition without criteria displaying catalogs only if user is a member of the owner group. To add this condition, you can use the catalog plugin schema IS_ENTITY_OWNER as follows:
{
"rule": "IS_ENTITY_OWNER",
"resourceType": "catalog-entity",
"params": {
"claims": ["group:default/team-a"]
}
}
In the previous example, the only conditional parameter used is claims, which contains a list of user or group entity references.
You can apply the previous example condition to the RBAC REST API by adding additional parameters as follows:
{
"result": "CONDITIONAL",
"roleEntityRef": "role:default/test",
"pluginId": "catalog",
"resourceType": "catalog-entity",
"permissionMapping": ["read"],
"conditions": {
"rule": "IS_ENTITY_OWNER",
"resourceType": "catalog-entity",
"params": {
"claims": ["group:default/team-a"]
}
}
}16.3.3.4. Conditional policy with criteria
Reference information about defining conditional policies with criteria to control access based on multiple rules combined with logical operators.
Consider a condition with criteria, which displays catalogs only if user is a member of owner group OR displays list of all catalog user groups.
To add the criteria, you can add another rule as IS_ENTITY_KIND in the condition as follows:
{
"anyOf": [
{
"rule": "IS_ENTITY_OWNER",
"resourceType": "catalog-entity",
"params": {
"claims": ["group:default/team-a"]
}
},
{
"rule": "IS_ENTITY_KIND",
"resourceType": "catalog-entity",
"params": {
"kinds": ["Group"]
}
}
]
}Running conditions in parallel during creation is not supported. Therefore, consider defining nested conditional policies based on the available criteria.
+ Example of nested conditions:
+
{
"anyOf": [
{
"rule": "IS_ENTITY_OWNER",
"resourceType": "catalog-entity",
"params": {
"claims": ["group:default/team-a"]
}
},
{
"rule": "IS_ENTITY_KIND",
"resourceType": "catalog-entity",
"params": {
"kinds": ["Group"]
}
}
],
"not": {
"rule": "IS_ENTITY_KIND",
"resourceType": "catalog-entity",
"params": { "kinds": ["Api"] }
}
}You can apply the previous example condition to the RBAC REST API by adding additional parameters as follows:
{
"result": "CONDITIONAL",
"roleEntityRef": "role:default/test",
"pluginId": "catalog",
"resourceType": "catalog-entity",
"permissionMapping": ["read"],
"conditions": {
"anyOf": [
{
"rule": "IS_ENTITY_OWNER",
"resourceType": "catalog-entity",
"params": {
"claims": ["group:default/team-a"]
}
},
{
"rule": "IS_ENTITY_KIND",
"resourceType": "catalog-entity",
"params": {
"kinds": ["Group"]
}
}
]
}
}16.3.3.5. Conditional policy plugin examples
Reference information about conditional policy examples for Keycloak, Quay, and Extensions plugins demonstrating access control patterns.
The following examples can be used with Developer Hub plugins. These examples can help you determine how to define conditional policies:
Conditional policy defined for Keycloak plugin:
{
"result": "CONDITIONAL",
"roleEntityRef": "role:default/developer",
"pluginId": "catalog",
"resourceType": "catalog-entity",
"permissionMapping": ["update", "delete"],
"conditions": {
"not": {
"rule": "HAS_ANNOTATION",
"resourceType": "catalog-entity",
"params": { "annotation": "keycloak.org/realm", "value": "<YOUR_REALM>" }
}
}
}
The previous example of Keycloak plugin prevents users in the role:default/developer from updating or deleting users that are ingested into the catalog from the Keycloak plugin.
In the previous example, the annotation keycloak.org/realm requires the value of <YOUR_REALM>.
Conditional policy defined for Quay plugin:
{
"result": "CONDITIONAL",
"roleEntityRef": "role:default/developer",
"pluginId": "scaffolder",
"resourceType": "scaffolder-action",
"permissionMapping": ["use"],
"conditions": {
"not": {
"rule": "HAS_ACTION_ID",
"resourceType": "scaffolder-action",
"params": { "actionId": "quay:create-repository" }
}
}
}
The previous example of Quay plugin prevents the role role:default/developer from using the Quay scaffolder action. Note that permissionMapping contains use, signifying that scaffolder-action resource type permission does not have a permission policy.
Conditional policy defined for Extensions plugin:
{
"result": "CONDITIONAL",
"roleEntityRef": "role:default/extensions-admin",
"pluginId": "extensions",
"resourceType": "extensions-plugin",
"permissionMapping": ["create"],
"conditions": {
"rule": "HAS_NAME",
"resourceType": "extensions-plugin",
"params": { "pluginNames": ["<your_plugin_name>"] }
}
}
The previous example of Extensions plugin restricts users in the role:default/extensions-admin to only installing or updating the specified plugin.
Additional resources
16.4. Trace attributes and OpenTelemetry configurations
16.4.1. Trace attributes and OpenTelemetry configurations
TODO: Replace this placeholder with an overview of Trace attributes and OpenTelemetry configurations.
16.5. Helm chart configuration parameters to define advanced deployment
16.5.1. Helm chart configuration parameters to define advanced deployment
TODO: Replace this placeholder with an overview of Helm chart configuration parameters to define advanced deployment.