
ExTester Runner
Quick Start
Section titled “Quick Start”- Install the ExTester Runner extension from the VS Code marketplace
- Open your VS Code extension project
- Click the ExTester Runner icon in the Activity Bar
- Find your test in the UI Tests view
- Click the play button (▶️) to run it
What is ExTester Runner?
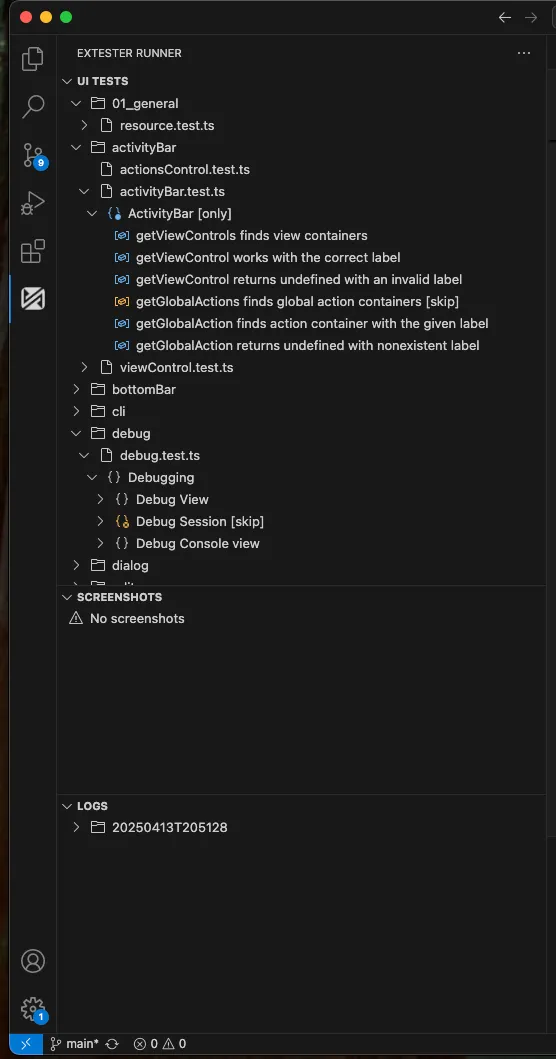
Section titled “What is ExTester Runner?”ExTester Runner is a VS Code extension that provides a comprehensive UI for running and managing UI tests for VS Code extensions using the ExTester framework. It offers a seamless testing experience directly within VS Code, eliminating the need to switch between different tools or environments.
The extension integrates into VS Code’s Activity Bar and provides three main views:
- UI Tests: A hierarchical view of test files and their structure (Mocha
describe/itblocks) - Screenshots: A view of screenshot image files captured during test runs
- Logs: A view of log files generated during test executions
How it Works
Section titled “How it Works”Core Functionality
Section titled “Core Functionality”-
Test Discovery and Organization
- Automatically discovers test files based on configured glob patterns
- Organizes tests in a hierarchical structure matching your project’s folder layout
- Supports Mocha’s test structure with
describeanditblocks - Provides visual indicators for test status and modifiers (
.only,.skip)
-
Test Execution
- One-click test running for individual files, folders or all tests
- Supports running tests at different levels:
- Test file (all tests in a file)
- All test files in a folder
- All tests in the workspace
-
Test, Logs and Screenshots Management
- Automatic refresh of views when test files change
- Provides quick navigation to test source code
- Displays screenshots and logs sorted newest-first so the latest run is always at the top
- Timestamp-named run folders show a human-readable date/time label (e.g.
Jan 15, 2025, 14:30:22) with the raw folder name as secondary text - Clear all — removes the entire contents of the Logs or Screenshots directory in one click (with confirmation)
- Delete individual item — removes a single file or folder from either view (inline trash icon or right-click > Delete, with confirmation)
- Reveal in File Explorer — opens the Logs or Screenshots root directory, or any individual item, in the OS file manager (Finder on macOS, Explorer on Windows)
Configuration
Section titled “Configuration”The extension is highly configurable through VS Code settings. All setting IDs are prefixed with extesterRunner. when editing settings.json by hand (e.g. extesterRunner.testFileGlob):
-
View Configuration
testFileGlob: Pattern to locate test files (default:**/ui-test/**/*.test.ts)excludeGlob: Pattern to exclude paths from test search (default:**/node_modules/**)ignorePathPart: Pattern to hide specific path segments in the test view
-
Test Execution Settings
outputFolder: Directory for compiled test files (default:out)rootFolder: Root source directory for test files (default: not set)tempFolder: Directory for temporary test files (default: not set — the system temporary folder is used)visualStudioCode.Version: VS Code version for test execution —max,min,latest, or an exact version such as1.97.1(default:max)visualStudioCode.Type: VS Code build type —stableorinsider(default:stable)additionalArgs: Additional CLI arguments for test runner (default:[])
-
Log Management
hideEmptyLogFolders: Controls visibility of empty log directories (default:true)
Setup and Configuration
Section titled “Setup and Configuration”Initial Setup
Section titled “Initial Setup”The extension provides a built-in walkthrough to help you get started quickly. To access it:
- Open VS Code
- Go to the Command Palette (Ctrl+Shift+P / Cmd+Shift+P)
- Type “Get started with ExTester Runner” and select it
The walkthrough will guide you through the essential configuration steps:
-
Configure Root and Output Directories
- Set up your test environment by configuring:
- Root Folder: Where your test files are located
- Output Folder: Where compiled tests are stored
- Set up your test environment by configuring:
-
Configure Test File Pattern
- Set up the pattern that ExTester Runner will use to find your test files
- Default pattern:
**/ui-test/**/*.test.ts
-
Configure Excluded Paths
- Specify which paths should be excluded from test file searches
- Default exclusion:
**/node_modules/**
-
Customize Path Display (Optional)
- Improve test view readability by hiding specific path segments
-
Additional Arguments (Optional)
- Configure additional command line arguments for ExTester
-
Additional Configuration Options
- Explore the remaining ExTester Runner settings
Manual Configuration
Section titled “Manual Configuration”If you prefer to configure the extension manually, you can access all settings through VS Code’s settings panel:
- Open VS Code Settings (Ctrl+, / Cmd+,)
- Search for “ExTester Runner”
- Configure the settings listed in the Configuration section above (prefixed
extesterRunner.*when editingsettings.jsondirectly)
Getting Started
Section titled “Getting Started”- Install the ExTester Runner extension from the VS Code marketplace
- Open your VS Code extension project
- Configure the necessary settings through VS Code’s settings panel
- Use the Activity Bar to access the ExTester Runner views
The extension includes a built-in walkthrough to help users get started quickly, guiding them through the essential configuration steps.